The Best Cinnamon Rolls Recipe
These homemade cinnamon rolls are soft and fluffy with gooey, brown sugar and butter cinnamon filling and a delicious cream cheese icing. And, the rolls are baked in cream for extra moist fluffiness.
Let the cinnamon buns rise once for a quicker version, twice for the perfect version, or even overnight if you’d like them fresh with your morning coffee. This recipe gives you all the options and all the cinnamon roll flavor you crave.

The Best Dough for Homemade Cinnamon Rolls
This delicious homemade cinnamon rolls recipe uses my all-time favorite sweet yeast dough as the base. And I am not the only one that loves it, as evidenced by your rave reviews and 5-star ratings.
Plenty of butter and egg yolks make the dough rich and delicious. The perfect amount of sugar sweetens it just enough. Then, you add the warm cinnamon, brown sugar, and butter into the mix, and oh heavens! It’s delicious!

Not only will you love the flavors, texture, and combination of both, but you’ll love the versatility of this recipe. Whether you have all the time in the world to create them, a limited amount of time, or you need to have them ready ahead of time – this recipe can be adapted for it all. See the bottom of the post for all the options.
Cinnamon Roll Recipe Ingredients
Let’s talk ingredients – they’re simple, yet all play a certain role in achieving the perfection we are striving for here. If you substitute any of them, do so at your own risk. This cinnamon roll recipe was developed for a certain end goal. Changing any of the listed ingredients will have an impact on the end result.

- Milk – either 2% (what I mostly use) or whole milk will work. If you’d rather use plant-based milk, almond milk will also work.
- Granulated sugar: yeast sweetens the cinnamon roll dough and also aids in the rise. The yeast will use the sugar to produce the air bubbles which make the dough light and fluffy.
- Yeast: instant yeast is the best option for this cinnamon roll recipe. It doesn’t need to be dissolved in water to work.
If you’d rather use active dry yeast, just know that it needs to be dissolved in water to work. Also, you’ll likely need to use up to 25% more of it for the same effect and rising time. Check this article for good info about different yeasts. - Butter: I prefer unsalted butter because it gives me full control over the amount of salt in the recipe. If salted butter is all you have, just skip the salt in the recipe.
- Egg yolks: some recipes use whole eggs, but I prefer the richness that the egg yolk adds to this sweetened yeast dough.
- Flour: Bread flour or any other high protein content flour (like Candian flour that I’m typically using) is the best for this cinnamon roll recipe. It helps to create the proper gluten structure to hold onto larger air pockets created by the yeast. Large air pockets is what makes the buns softer, fluffier, and just better. If all-purpose flour is all you have, go ahead and use all purpose flour. Keep in mind though, bread flour will give you a better result.
- Brown sugar: this recipe will work with either dark brown sugar, light brown sugar, or a combination of both. I prefer dark brown sugar for the stronger flavor that it provides.
- Cinnamon: one of the best parts of this recipe :D. Just beware that freshly purchased cinnamon will have a more potent smell and spiciness. Improper storage and prolonged exposure of cinnamon to air will diminish it’s fragrance and potency, so you might need to use more or less depending on the freshness of the cinnamon.
- Salt: the salt brings out the flavors of the cinnamon rolls more and balances them with the sugar. Do not omit the salt.
- Cream: oh, this is the secret that will make your cinnamon roll extra rich, extra fluffy, and extra moist. It is used to drizzle on top 10 minutes into the baking time. Either heavy whipping cream or half and a half will work.
- Cream Cheese Frosting: oh it’s the cherry on the cake! Just cream cheese, butter, and powdered sugar but combined and melted into the cinnamon roll they’re worth every single calorie.

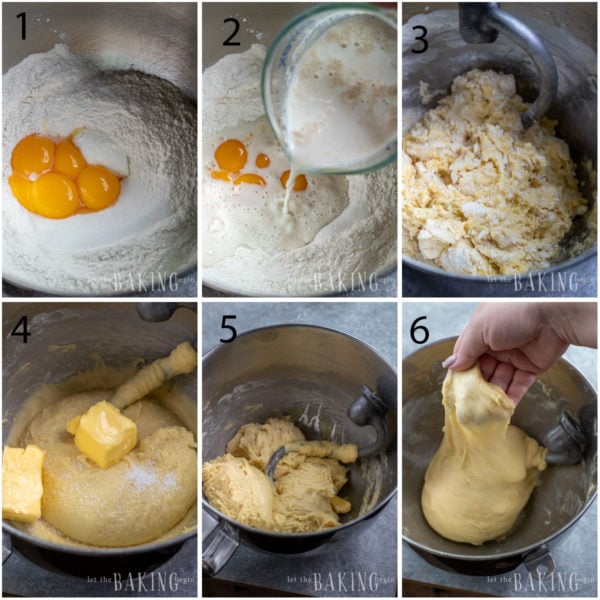
How to make the cinnamon rolls dough (sweet yeast dough):
- In a large cup combine the milk, a good pinch of sugar, and yeast. Stir and let it foam up.
- Meanwhile, in a stand mixer bowl combine the flour, sugar, and salt. Stir to combine.
- Make a well in the middle, and add the egg yolks and the risen milk and yeast mixture. The butter can be added in this step as well, or in the end (step 5).
- Add the hook attachment or knead by hand and knead until you can touch the dough with a clean finger without the dough sticking to it, ~about 10-15 minutes. Add a little more flour if necessary to make a soft dough.
- Next, add butter and knead it in until incorporated.
- Let rise until doubled in size, about 1.5 hours.
How to shape the Best Cinnamon Rolls:
- Turn the dough onto a lightly floured surface and roll into a 24″x14″ rectangle.
- Spread melted butter and sprinkle the mixture of sugar, cinnamon and nutmeg.
- Roll into a tight roll and cut into even 12 pieces.

Proof & Bake:
- Transfer the shaped cinnamon rolls to a parchment-lined baking sheet, cover, and let the dough rise until doubled in size.
- Meanwhile, preheat the oven.
- Transfer the risen rolls to the oven and bake for 10 minutes.
- Drizzle the warm heavy cream over the tops of the rolls and bake another 20 minutes or until lightly golden.

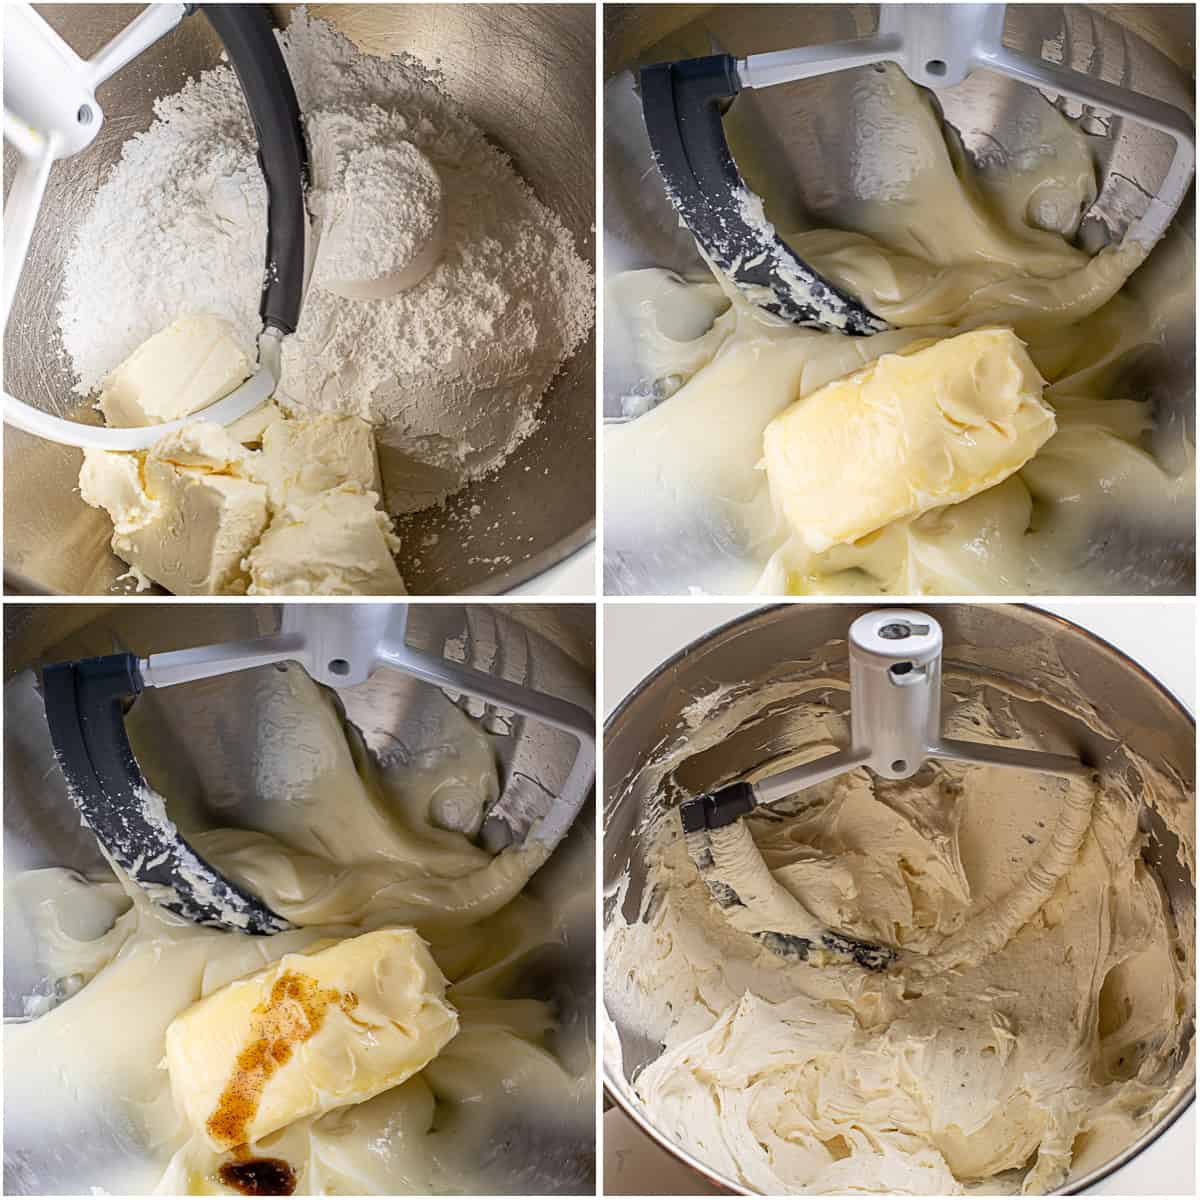
Make the Cinnamon Rolls Icing:
- In a bowl cream together room temperature cream cheese and powdered sugar, then add the butter and vanilla paste and beat until combined or until fluffy.
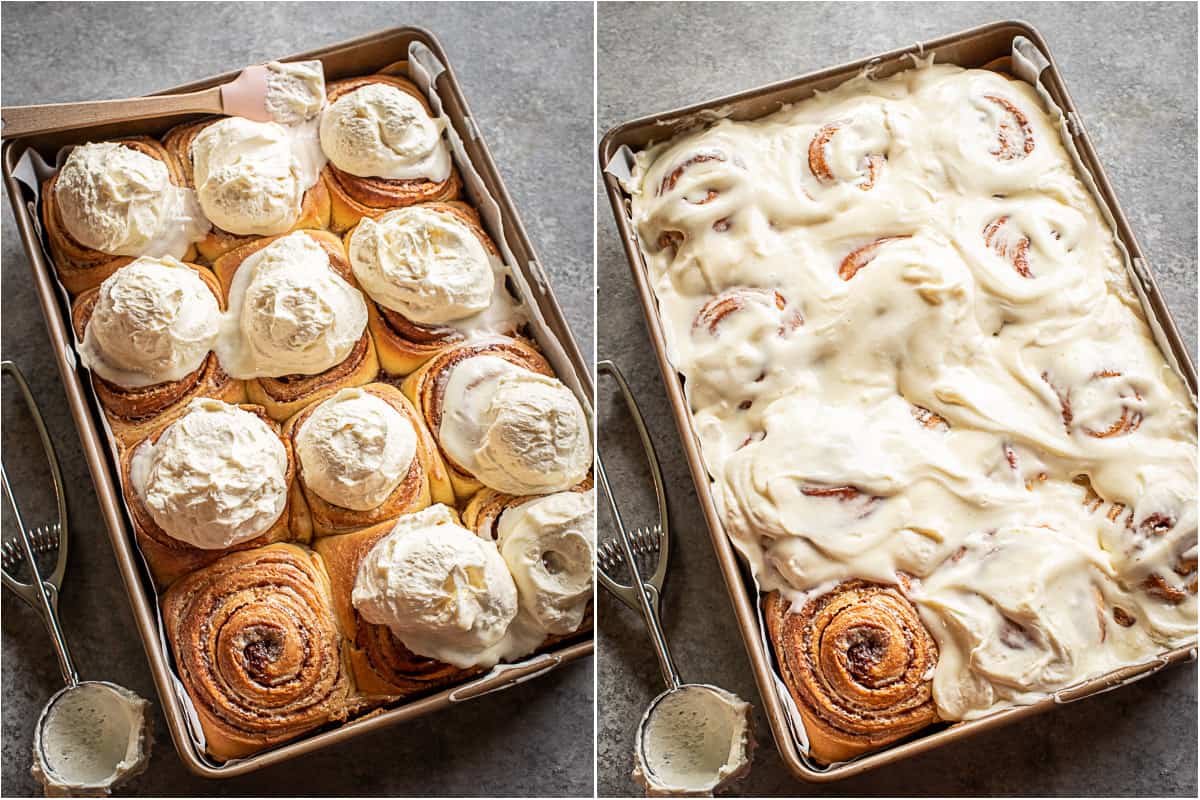
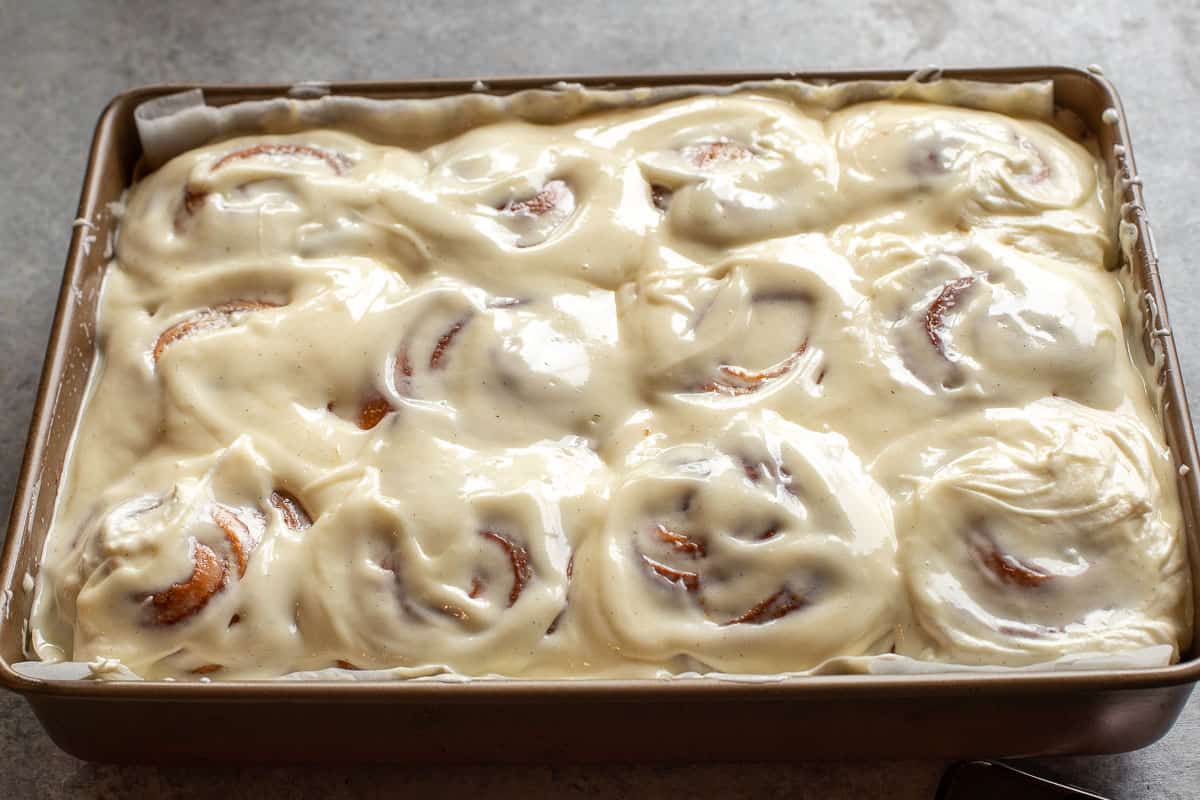
- As soon as the rolls are out of the oven spread the prepared cinnamon rolls icing on top.
Then, pour a glass of milk and enjoy a warm, gooey, delicious cinnamon roll. Also known as the best part of making your own, the very best, homemade cinnamon rolls. Enjoy!!
Pro tips for the best cinnamon rolls
- Weigh the ingredients: if there’s one thing I learnt over the years of baking is that having a scale will give you consistently great results. Scooped incorrectly, you can add up to 20% more flour. So, either weight your ingredients, or for flour, stir to fluff it up, then gently scoop with a measuring cup and scrape the excess with a butter knife.
- Bread flour: the fluffiness of the rolls relies on the dough’s ability to trap the air within the pockets that are created by the yeast. Bread flour has higher protein content which allows it to build strong networks of gluten that hold on to those air pockets. Use it if it’s available. Otherwise, use all-purpose flour.
- Warm milk, not hot: the optimal temperature for the yeast to work is between 77F and 100F. Keep in mind, that going over 120F will kill the yeast and render it useless. An easy way to know if it’s appropriate temperature is to dip your finger into the milk, if it feels like baby bath water it’s perfect. It should feel warm, but not hot.
- Use room temperature ingredients – Bring the eggs to room temp by submerging cold eggs in hot tap water for several minutes before using. Or, remove them from the fridge several hours before starting the recipe.
- Proof in a warm place: starting with warm/ room temperature ingredients is great start. Maintaining the warm temp throughout rising is also necessary. Find a warm, draft-draft free place for best results.
Here are a couple of ideas: place the bowl with the dough in the oven with just the light on. Another idea – boil a cup of water in a microwave for 2 minutes, then remove it and place the dough on a folded kitchen towell in the microwave. The boiling water will heat the inside of the microwave and create the perfect temperature for proofing

FAQ’s
Are two rises necessary for the cinnamon rolls?
The rising time is not only the time when the yeast gets to work and produce air pockets that make the cinnamon rolls fluffy. It is also the time for the flour to get hydrated and for the gluten to stretch as the air pockets expand.
All of those things help with the elasticity of the dough and giving the baked goods the best texture. The first rise always takes longer. The second rise less time.
For best results, both rises are necessary. If you’re short on time, you can skip one rise and only allow the cinnamon rolls to rise before going in the oven.
For super quick cinnamon rolls you can even skip all rises, but with each shortcut, the texture will suffer more and more.
How to make quick cinnamon rolls?
Prepare the dough as written, omit the first proofing, then shape the cinnamon rolls and allow to proof until doubled before baking (this will be the single proofing in the recipe).
This way you’ll be skipping one proofing period. Any shortcut away from the original recipe in the recipe card will yield a slightly inferior result, but even with only one proofing, this recipe will come out very good.
How to make Overnight Cinnamon Rolls?
Simply prepare the recipe all the way to the step before the baking. This means that you can prepare the dough, let it rise, roll the cinnamon rolls and let them rise the second time until almost doubled, and then cover and refrigerate.
It is important to not let the rolls overproof before refrigerating, otherwise, as they rise a little bit more in the fridge they might overproof, which will make the gluten networks supporting the air pockets overextend and collapse when baking. This can cause the cinnamon rolls to be hard and dense instead of soft and airy.
The next day, remove from the fridge and leave the cinnamon rolls at room temperature for about 1 hour to warm up as you preheat the oven. Then, bake and continue with the recipe as written.
How to know when the yeast dough has been proofed and is ready for baking?
Do the poke test – with your finger poke the proofed cinnamon roll about 1 inch deep. If the indentation slowly rises back up but doesn’t fill completely, the cinnamon rolls are ready to be baked.
If it springs back quickly, it still needs more rising time.
If it stays indented and does not spring back at all, the dough has been overproofed and will likely bake and then slightly collapse. The end result will be less fluffy, or flat and dense.
How to freeze cinnamon rolls?
- To freeze before baking: first, you should know that freezing anything with yeast before baking will render some of the yeast inactive, which can make the finished product less fluffy and soft. This can be compensated by adding more yeast, to begin with, or to allow a lot more rising time. If I had to choose when to freeze the cinnamon rolls before, or after, I would choose to freeze them after baking.
Nevertheless, if you would like to do it before baking, here’s how to do it:
Follow the recipe up to the step before the second rise. This means you would prepare the dough, allow it to rise, roll it out, spread the filling and roll the rolls. Now place the rolled cinnamon rolls on a baking sheet, cover it and place in the freezer. Once frozen, transfer to a ziplock bag and remove as much air as you can.
When ready to bake, transfer the rolls to a parchment-lined baking sheet spacing them evenly and allow to thaw in the fridge. Then remove from the fridge and allow to come to room temperature and then proof until doubled in size, ~2 hours. Once doubled in size, bake as directed.
- To freeze after baking: bake and cool the cinnamon rolls completely. Then, if you would like to freeze the whole pan, wrap it well and freeze.
To freeze individual cinnamon rolls, wrap each roll in plastic wrap and place in a large ziplock bag, then freeze.
When ready to eat, remove from the freezer and thaw at room temperature. Then, either warm the cinnamon rolls in the oven by baking them for about 15 minutes (or until warmed through) at 350F, or microwaving them. Next, make the icing and top the cinnamon rolls with it.
If you’d rather freeze the rolls after adding the icing, then freeze unwrapped for several hours, then wrap in the plastic wrap tightly and place back in the freezer. This way, the icing won’t stick to the plastic wrap and make it unsightly when thawed. Thaw at room temperature.
Craving more fluffy goodness? Try these other buns:
The Best Cinnamon Rolls
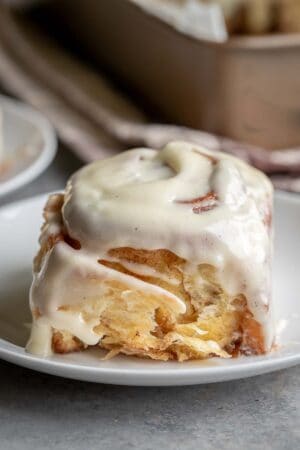
Fluffy, soft, with the right amount of cinnamon and cream cheese Frosting these Cinnamon Rolls are the best there are. Make them the same day, or overnight – you’ll love them!
Ingredients
Sweet Yeast Dough for Cinnamon Rolls
- 1 cup whole milk warmed to 110F
- 2 teaspoons instant dried yeast (I use Platinum Superior Baking Yeast)
- 3 ½ to 4 cups all-purpose flour or bread flour
- 1/2 cup granulated sugar
- 4 egg yolks from large eggs, room temperature
- 1/2 cup unsalted, room temperature butter (or melted)
- 1/2 teaspoon kosher salt
- 1/2 cup heavy cream, warmed to 100F to drizzle over the top while baking
Cinnamon Filling
- 1/3 cup unsalted butter melted
- 1 cup brown sugar, (light or dark) (packed)
- 2 1/2 tablespoons cinnamon
- 1/2 teaspoon nutmeg freshly grated (optional)
Cinnamon Rolls Icing
- 1 cup cream cheese, room temperature
- 1 ½ cup powdered sugar
- 1/2 cup unsalted butter room temperature (spreadable consistency)
- 1 teaspoon vanilla paste or extract
Instructions
-
Proof the yeast: In a cup combine 1 cup of warm (90-110 F) milk, 1 tsp of sugar, and 2 tsp of instant yeast. Stir and leave undisturbed for 10-15 minutes. The yeast should foam up and rise slightly – all a sign of active yeast.
If it does not foam and rise, discard your yeast and do not continue with this recipe until you get unexpired active instant yeast.
-
Mix the dough: In a large mixer bowl whisk together 3 ½ cups flour, 1/2 cup sugar, and 1/2 tsp salt.
Make a well in the middle and add the proofed yeast mixture, and 4 egg yolks and 1/2 cup of room temperature butter.
Quickly stir to roughly combine the ingredients into a shaggy dough.
Now with either a dough hook attachment or by hand knead the dough, adding the remaining 1/2 cup of flour if needed (2 tablespoons at a time) until it is smooth and only slightly sticks to the sides of the bowl and clean hands, about 10 minutes. Shape the dough into a smooth ball.
-
Rest or proof: Allow to rest for 10-15 minutes while you work on the filling (for a quick version of the cinnamon rolls) or cover with a tea towel and allow to rise until doubled in size in a warm place (less than 100F) in a greased bowl, about 1 1/2 hours.
-
Make the cinnamon filling: In a bowl mix together 1 cup brown sugar, 1/2 teaspoons of freshly grated nutmeg, and 2 1/2 tablespoons of cinnamon.
In a separate cup melt 1/3 cup of unsalted butter.
-
Roll the dough: Turn out the dough onto a lightly floured surface and roll into an 18" x 14" rectangle with the wider side closest to you.
-
Fill & roll: Pour the melted butter onto the dough and spread it all over, leaving a 1-inch border on the long side away from you unbuttered.
Sprinkle the sugar-cinnamon mixture evenly over the butter.
Roll the cinnamon roll tightly by rolling, then pulling the rolled section out and rolling some more. Pinch the unbuttered section to the roll, then roll the "log" until it is about 24 inches long.
-
Cut the cinnamon rolls into sections: Use a measuring tape to score the roll every 2 inches, then use floss or a serrated knife to cut through to make 12 even pieces. Transfer each piece to a parchment-lined 9"x13" baking pan.
-
Proof: cover with plastic wrap, and leave in a warm place (example: oven with the light on (no heat)) until your rolls are doubled in size, about 45 min – 1 hour.
Tip: if making the rolls the night before to bake in the morning, allow to proof until doubled in size, then cover with plastic wrap and refrigerate. Do not overproof, or they will deflate overnight and bake flat next morning.
In the morning, remove from the fridge and allow to come to room temperature for about 45 minutes before baking.
-
Bake: preheat the oven to 350F with the baking rack centered. Bake the cinnamon rolls for 10 minutes, then remove from the oven and quickly pour 1/2 cup of warmed-up heavy cream evenly over the rolls. Return to the oven and bake for another 20 minutes or until lightly golden brown.
-
Make the Cream Cheese Cinnamon Rolls Icing: Meanwhile, in a bowl whisk together 1 cup of cream cheese and 1 ½ cups of powdered sugar until smooth. Then add 1/2 cup of butter and 1 teaspoon of vanilla emulsion or extract and beat together for another 2-3 minutes until smooth and fluffy.
-
Frost: You can add the cream cheese frosting to the rolls as soon as they're out of the oven if you'd like the frosting to melt into the rolls, or add it after the cinnamon rolls had a chance to cool down if you'd like the frosting to keep shape.
-
To serve: serve while warm.
-
To store: store covered on the counter for a day, or refrigerate covered for up to 2 days.
To reheat: microwave the cinnamon rolls for 15-30 seconds or until warmed through.
-
To freeze: cool completely, then cover with plastic wrap and freeze for up to a month.
To thaw: leave in the fridge until thawed, then microwave to reheat.

Thank you for following me on Instagram, Facebook & Pinterest!
Hashtag your photos #LetTheBakingBeginBlog so I can see your creations and for a chance to be featured!
Marina | Let the Baking Begin


For perfect cutting use Dental floss or fishing line. Slide it under the end of the roll to the thickness you want, bring ends of the line up and criss-cross. Voila.
4 stars because of all of the leftover egg whites and no suggestions. How about making a pudding pie and using them for meringue? Scrambled egg whites for breakfast is unappealing.
Just curious: if you are using instant yeast (which I’ve never used), why do you need to proof it for 15 minutes? I thought the whole point of instant yeast is to be able to skip this step.
A huge reason you’ll still see a minor “proof” time even in many instant yeast recipes is actually because of the gluten formation process.
When you knead the dough and get that gluten to develop, initially it is very “tight” and so if you roll the dough out it’ll shrink back a lot and it just makes it really hard to work with. Resting it for 10-20 min allows those gluten strands to relax and “loosen” a bit. Along with the added benefit of allowing it to rise a bit.
With the instant yeast you CAN skip the initial proofing, but keeping the proofing in at the full timing also has the added bonus of giving it a bit more rise… but ALSO gives added flavor. Same concept as allowing a dough to proof in a fridge overnight, it develops a more complex and richer flavor.
But if you don’t have time to allow for the full proof time or the overnight slow rise, it is still pretty important to allow it to rest for that 10-20 min or you’re going to spend a lot more time trying to wrestle the dough into submission when rolling it out. Especially when you have to roll it into such a large rectangle and so thin. (Same applies to pizza dough. Letting it rest before shaping or rolling is huge in helping it to be a much easier process)
Hope this helps! I know this is an older comment but if someone else is reading comments they may see this ♡
Hi Marina. My question is about the quantity of flour.
The ingredients list has 3-1/2 cups flour as does no. 2 instructions / first sentence. You also included “adding the remaining 1/2 cup of flour if needed” in last sentence of no. 2 instructions.
Is the total amount of flour 3 cups plus 1/2 cup if needed, or 3-1/2 cups plus 1/2 cup if needed?
Thanks for your help.
Hi Josie,
The recipe is correct as written. You add 3 1/2 cups flour and mix the dough. If the dough looks too lose you can add another 1/2 cup of flour. Hope this helps!
Hi Marina,
I baked a batch of your cinnamon rolls and found the dough to be the best I have ever worked with – pillowy and very easy to roll out. Delicious results.
I weighed my dry ingredients using the nutrition label on the bags for flour/confectioners’ sugar as a reference for weight (my flour: 1/4 cup = 30g).
Hope others will give your recipe a try. Thanks for sharing.
This recipe did not result in a usable dough. I checked and double checked (even tripled check) the ingredients and measurements, used a scale (as I always do), had ingredients at room temperature and this dough did not form a smooth dough – not even close. It was extremely dry. The kitchen aide mixer came to a grinding halt at some point. I attempted to added a little milk a teaspoon at a time. It never got elastic at all – just a pile of lumpy wet flour. So – I’m going to let it rise now and if it still looks odd tops it. I did use bread flour. What went wrong? Yeast was active in the warm milk. So frustrating. PS – For others who review, please don’t give five stars if you haven’t even tried to make them yet. It’s not helpful.
Hi Judy,
I’m sorry you had trouble with this recipe 🙁
The ingredient proportions are such that if the correct ingredient amounts are used, there’s almost no way you can get a dry dough because if anything, this dough is on the runnier/softer side than usual (and I am using Canadian flour, which is similar to the bread flour equivalent in the US).
If you were to try this recipe again, try adding 1 cup flour less, then add as needed to get a soft dough. Are you scooping the flour right from the flour container into the measuring cup? This can compact too much flour into the cup and cause you to add more than necessary.
The correct way to scoop flour is to fluff it up in the bag, then use a spoon to spoon it into the measuring cup and lastly just swipe off excess with a butter knife to give you a level cup.
Also, just a note – this recipe uses a US measuring cup (not a drinking cup) that should fit about 240mls of liquid.
Hope this was helpful. If you have any questions or need any clarification, let me know and I’ll be glad to help.
The best cinnamon rolls ever! Very fluffy! Any of her recipes will not disappoint you ever! Will definitely be making this again and again and again….
Thank you so much, Galina! Really appreciate it!
This looks amazing. I’m really excited to try it! You mentioned weighing the ingredients – do you happen to have the weight of the flour in the dough recipe? Thanks so much.
Looks so good, planning to make it tomorrow. Why does it say for cup of milk (devided) , am I missing something?
Thank you Elena! My cup of flour weighs between 135-140 grams of flour.
Also, if you click on the word “metric” under the list of the ingredients you’ll get the ingredients in the metric system with the weight of each ingredient. Hope you find this helpful 🙂