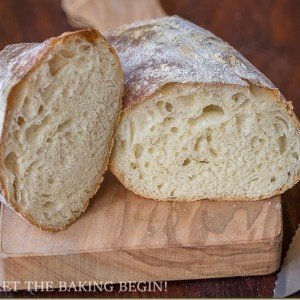
This Farmer’s Rustic Bread Recipe is the best Homemade Bread. Easy Bread Recipe with a golden crackly crust and a chewy crumb, made with just a few basic ingredients.
- 1 cup bread flour or all-purpose Canadian flour
- ⅛ teaspoon yeast, instant rapid-rise
- 1 cup water room temperature ( around 70°F)
- 2 cups bread flour or all-purpose Canadian flour (or any other high protein (13% +))
- 1½ teaspoons kosher salt
- ½ teaspoons yeast, instant rapid-rise
- ⅔ cup water room temperature ( around 70°F)
- ⅓ cup whole or 2% milk room temperature ( around 70°F)
-
Make the biga: Toss 1 cup high protein flour (Canadian or bread flour is best), ⅛ tsp yeast, and 1 cup water in a bowl of a mixer and stir together until it comes together. Cover the bowl and let sit at room temperature in a draft-free place (room temperature) 8 to 24 hours.
-
To the risen biga add 2 cups flour, 1½ tsp salt, ½ tsp yeast, water (start with ⅔ cup water and & 1/3 cup milk and fit the mixer with the paddle attachment. Combine everything on low speed, then continue mixing for a minute or two. When the dough has come together nicely, change to the hook attachment and knead the dough for about 20-30 minutes or until it stops sticking to the sides of the bowl and becomes tacky to touch. The dough should be somewhat runny, but if you stretch a piece into a "window" the dough stretches thin and doesn't tear.
As soon as the dough wraps around the hook into a dough ball and feels tacky to the touch stop mixing. This might take more or less time depending on the protein content of your flour. If your dough doesn't come together and continues to look like batter after kneading, it means that your flour doesn't have enough protein to hold the structure. You can add more flour to bring it more together, but it's likely that the results will not be the best.
Do not continue kneading after the dough stops sticking to the sides. Over-kneading will cause gluten strands to break and will make your dough runny. If you try to lift the dough, it will run through your fingers.
-
First Proofing: Cover the bowl with a clean kitchen towel or with plastic wrap and let rise for 1 to 2 hours (depends on how warm the room is) until doubled in size.
-
Second proofing & stretching: Spray your working surface with nonstick spray or spread 1-2 tablespoons oil. ‘Pour’ the dough out onto a working surface, then with a greased spatula fold the right side of the dough onto itself, then the left side, the side closer to your onto itself, then the side away from you onto itself. Repeat the folding 4 sides one more time. Leave the dough on the counter to rise for 30 minutes, covered with paper or cloth towel.
-
Shape & proof: Carefully split the dough in two trying not to deflate the air pockets as much as you can (I tripled the recipe in the pictures above, so I had 6). Spread it out into a 10x6 rectangle, then roll it tightly into a log. Press down with your fingers every one inch to flatten it if you want it to have the flat ciabatta look.
If you want a regular loaf, do not press down with your fingers, just keep it round. The foil will make it easier to transfer the bread to the oven.
-
Third proofing: Let the shaped dough rise for 30 minutes to 1 hour, covered or until doubled in size. Sprinkle the dough with flour (optional).
-
Preheat oven: About 1 hour before baking, preheat oven to 450°F and set the rack to the lower half of the oven. If you have a pizza stone or something similar set it on the rack and allow to preheat in the oven.
-
Spray the loaf with a spray bottle and put it in the oven on the stone.
-
Bake for 15 minutes or until the top is slightly golden, then unpeel the foil and put the bread bottom side up and bake for another 10-15 minutes (or until the bottom is golden). Allow the bread to cool completely before cutting, about 1 hour.
This bread can be stored at room temperature, wrapped in plastic or put in a zip-lock bag, for up to 3 days, or refrigerated for up to 1 month if double wrapped in plastic and then 1 layer of foil.
To re-crisp the bread, put it in a 450 oven for 5-7 minutes.