Farmer’s Cheese Recipe (Tvorog)
This homemade farmer’s cheese recipe uses just milk and buttermilk to produce tender, creamy curds with a naturally mild flavor, no vinegar, no rennet, and no complicated steps required. The result is authentic Eastern European tvorog that’s soft, rich, and perfect for syrniki, crepes, pierogi, lazy pierogi, donuts, or pastries.

Once you make farmer’s cheese at home, it’s very hard to go back to store-bought. The flavor is cleaner, the texture is softer, and you control exactly how creamy or dry it turns out.
What Is Farmer’s Cheese?
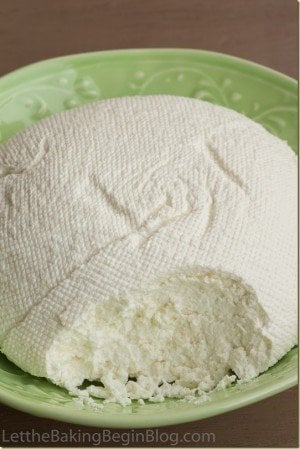
Farmer’s cheese is a fresh, unripened cheese made by gently curdling milk and separating the curds from the whey. It has a mild, slightly tangy flavor and a soft, tender texture that can range from creamy to crumbly depending on how long it’s drained.
In Eastern European kitchens, this cheese is known as tvorog. It’s a staple ingredient used in both sweet and savory dishes.
Unlike ricotta, farmer’s cheese is slightly drier and more structured. Unlike cottage cheese, it has no added cream or large curds.
Why This Method Works Better
There are many ways to make farmer’s cheese, but not all produce the same results.
Most quick versions use lemon juice or vinegar. While they work, they often leave a noticeable sharpness in the final cheese.
Using buttermilk instead:
-
Creates a naturally mild, balanced flavor
-
Produces soft, delicate curds
-
Mimics traditional Eastern European methods
-
Avoids harsh acidity
This is the method that gives you true tvorog.
Ingredient Notes (Important Before You Start)
Milk choice matters.
Whole milk produces the richest, creamiest cheese with the highest yield.
2% milk works, but the curds will be slightly softer and less rich.
Avoid ultra-pasteurized milk. It is processed at very high temperatures and often will not culture or set properly.
Buttermilk provides the culture.
This method relies on cultured buttermilk instead of vinegar or lemon juice. That’s what gives the cheese its naturally mild flavor without sharp acidity.
Quick Overview – How to Make Farmer’s Cheese
Ingredients:
-
whole milk
-
cultured buttermilk
Step 1: Warm milk to 100°F. Remove from heat.
Step 2: Stir in buttermilk. Cover and let sit 12–24 hours until thick.
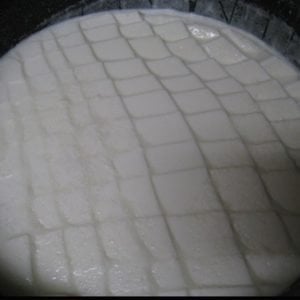
Step 3: Cut into 1-inch squares.
Step 4: Heat slowly to 130–140°F.
Step 5: Drain in cheesecloth until desired texture is reached. Chill before using.
Scroll down to the bottom of the post for the full printable recipe card with detailed step-by-step instructions, temperatures, equipment tips, and troubleshooting.
Texture Guide – How Long Should You Drain?
Drain time determines texture:
Short drain → soft, creamy, spreadable
Medium drain → classic farmer’s cheese texture
Long drain → firmer, crumbly cheese for baking
If you plan to use it for syrniki or filling pastries, a slightly firmer texture works best.
Recipe Notes
To make homemade buttermilk from this cultured mixture, do not reheat. Stir vigorously, transfer to a jar, and refrigerate.
If making buttermilk was your goal from the start, heat the milk to about 100°F, add the buttermilk culture, stir well, then pour into clean jars. Keep the jars in a warm place until the milk thickens and has a tangy flavor. Once thickened, refrigerate to stop the culturing process.
How to Use Farmer’s Cheese
Fresh farmer’s cheese is incredibly versatile.
Use it for:
-
Cheese blintzes or crepes
-
Pierogi filling
-
Cheesecake
-
Stuffed pastries
-
Savory spreads with herbs
-
Pancake or waffle toppings
It’s a foundational ingredient in many Eastern European desserts and breakfasts.

Storage
Store homemade farmer’s cheese in an airtight container in the refrigerator for up to 5 days. For longer storage, freeze for up to 2 months and thaw in the refrigerator before using.
Don’t Throw Away the Whey
The leftover whey is nutrient-rich and very useful.
You can use whey:
-
In bread or pancake batter
-
In smoothies for added protein
-
To feed sourdough starter
-
In place of water when cooking grains
Store whey in an airtight container in the refrigerator for up to 5 days or freeze for up to 3 months.
Nutritional Benefits
Farmer’s cheese is naturally high in protein and calcium. Because you control the ingredients, it contains no stabilizers or additives.
The exact nutrition will vary depending on milk fat percentage, but fresh farmer’s cheese is generally:
-
High in protein (15 grams per 3 oz)
-
Moderate in fat
-
Low in carbohydrates
Frequently Asked Questions
- Can I use 2 % milk?
Yes, but the texture will be slightly less rich and creamy compared to whole milk. - Can I use lemon juice instead of buttermilk?
You can, but the flavor will be sharper and less traditional. - Is farmer’s cheese the same as ricotta?
No. Ricotta is softer and made from whey. Farmer’s cheese is made by curdling milk directly. -
Can It Be Frozen?
Yes.
Freeze up to 2 months.
Texture may become slightly grainier after thawing, but it is still perfect for baking or syrniki.
Beyond breakfast uses, farmer’s cheese can
-
Crumbled over salads
-
Used instead of ricotta in lasagna or stuffed shells
-
Mixed with herbs for a savory spread
-
Baked into casseroles or savory pies
Its mild flavor makes it incredibly adaptable.
 recipe!")
Troubleshooting
Milk didn’t thicken?
Your milk may have been ultra-pasteurized, or the room temperature was too cold. Give it more time or move it to a warmer place.
Curds are too small or rubbery?
The mixture may have overheated. Heat slowly and avoid rapid boiling.
Cheese is too dry?
It was overheated or drained too long. Next time, heat to a lower temperature or shorten the drain time slightly.
Cheese is too wet?
Let it drain longer or gently squeeze the cheesecloth.
What is your favorite way of eating homemade Cheese?
There are many different ways to eat/use this cheese recipe. This homemade cheese is great to use as a filling or just eaten as is. What do you eat Farmer’s cheese with?
Beyond breakfast uses, farmer’s cheese can
-
Crumbled over salads
-
Used instead of ricotta in lasagna or stuffed shells
-
Mixed with herbs for a savory spread
-
Baked into casseroles or savory pies
Its mild flavor makes it incredibly adaptable.
Some great Farmers’ Cheese Recipes:
- Multi-Cooker Farmer’s Cheese – Cheese made in a Multi-Cooker.
- Farmer’s Cheese Crepes with Blueberry Sauce – A delicious way to use farmer’s cheese recipe.
- Apricot Cream Cheese Chimichangas – Crispy fried tortilla with warm jam and farmer’s cheese.
Homemade Fresh Farmer's Cheese (Tvorog)
Homemade Farmer’s Cheese made with just milk and buttermilk to create tender, creamy curds with a naturally mild flavor. This traditional Eastern European tvorog is perfect for syrniki, blintzes, pierogi, or simply drizzled with honey.
Ingredients
Ingredients for Homemade Farmer's Fresh Cheese
- 1 gallon whole milk
- 1-2 cups buttermilk (I use Dairy Gold Buttermilk or other)
Instructions
*Read complete post before the recipe to get a better understanding of how and why you do what you need to do.
-
Warm the Milk
Pour the milk into a large heavy-bottomed pot.
Heat gently to 100°F. The milk should feel slightly warmer than body temperature, but not hot.
Do not overheat. Excess heat can destroy the buttermilk culture.
Remove from heat.
-
Add the Buttermilk Culture
Shake the buttermilk well.
Pour 1–2 cups into the warm milk and stir gently for 1–2 minutes until evenly combined.
Cover the pot with a lid.
-
Culture the Milk
Let the pot sit undisturbed at room temperature for 12–24 hours.
If your kitchen is below 70°F, place the covered pot inside the oven with the light on only. Do not turn on the oven heat.
The mixture is ready when:
• It looks thick like yogurt• You can cut it with a spoon• A spoonful holds its shape instead of runningWhen in doubt, allow the full 24 hours.
Optimal Culturing Temperature
For best results, allow the milk to culture at 72–78°F. This is the ideal temperature range for buttermilk cultures to properly ferment the milk.
Avoid temperatures above 85°F, as excessive warmth can weaken the culture and affect texture.
-
Cut the Curds
Using a long knife, cut the thickened milk into 1-inch squares.
This helps release whey evenly during heating.
-
Slowly Heat the Curds
Insert a thermometer directly into a curd, not into the surrounding whey.
Heat over very low heat.
When the curd temperature reaches 100°F, gently stir once to bring bottom curds to the top.
Continue heating slowly until the internal curd temperature reaches 130–140°F.
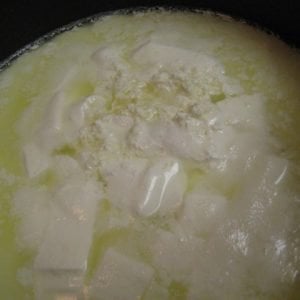
Visual cues:
You will see white curds floating in yellow whey.
Some curds will be small and some large. This is normal.
The whey may appear hot or lightly bubbling. Do not boil.
Once at 130–140°F, stir gently again to break large curds and distribute heat evenly.

-
Drain the Curds
Line a sieve or colander with cheesecloth and set over a large bowl.
Carefully pour the curds and whey into the cheesecloth.
Gather the corners of the cloth, tie securely, and hang to drain over a cabinet handle or faucet.
Allow whey to drip until droplets fall about 30 seconds apart.
For a softer cheese: drain less.For a firmer texture: drain longer.
Transfer the tied cheesecloth bundle to the refrigerator to fully set before removing the cloth.
-
See the bottom of the card for texture guide, storage insructions, and for how to make buttermilk.
Recipe Notes
Recipe Notes
- To make homemade buttermilk from this cultured mixture, do not reheat. Stir vigorously, transfer to a jar, and refrigerate.
- If making buttermilk was your goal from the start, heat the milk to about 100°F, add the buttermilk culture, stir well, then pour into clean jars. Keep the jars in a warm place until the milk thickens and has a tangy flavor. Once thickened, refrigerate to stop the culturing process.
Texture Guide
Short drain time → soft, creamy, spreadable
Medium drain time → classic farmer’s cheese texture
Long drain time → firm, crumbly cheese for baking
Storage
Store in an airtight container in the refrigerator for up to 5 days.
For longer storage, freeze for up to 2 months. Thaw in the refrigerator and stir before using.

Thank you for following me on Instagram, Facebook & Pinterest!
Hashtag your photos #LetTheBakingBeginBlog so I can see your creations and for a chance to be featured!
Marina | Let the Baking Begin


Does it have to be whole milk? Can I substitute for 2% or even 1% milk fat?
You could you use any type of cow milk you’d like. The difference is – whole milk will produce cremier cheese. I typically buy 2% and that is what I commonly use as well.
Very unreliable recipe. I had the same experience as a person further back in the comments, after a whole 24 hours, my milk still hadn’t stiffened up and seemed more like yogurt. Dissapointing because I spend extra on nice local milk and buttermilk. I’m going to just proceed and see how it goes but I don’t have “curds” and “whey,” it’s all pretty mixed together like yogurt so I don’t know how I’m going to properly measure the temp. Every other recipe I’ve seen seems way easier using vinegar instead of buttermilk and I’m probably going to try that method next.
Hi Mary,
As with any fermented process the results heavily depend on the milk and your particular environment, so the process might need to be adjusted to account for those.
I’m not sure what milk and buttermilk you used, but different brands will produce different thickness yogurt once the fermentation process is completed. The one I mentioned in my post produces the thickness you see on the picture. Other brands (our local Costco milk for example) produce thinner, almost buttermilk-like consistency. Even with that consistency though, once heated you’ll be able to get good farmer’s cheese. Just take care not to heat it too much or the cheese will be rubbery. It might take you several times to adjust your process/temperature to fit your desired end result.
The cheese made with just lemon juice/vinegar does not taste anything like the true farmer’s cheese. If you don’t particularly care for the tang of the farmers cheese nor the probiotic benefits, and instead just want something that is more of ricotta flavor (flat/milk flavor) with farmer’s cheese texture then the vinegar option is definitely the way to go. But, the two are not the same in flavor. Just keep that in mind.
Hope this helps!
I may have heated my milk too much before adding the buttermilk; it was 120 degrees (I got it mixed up with a different recipe). Is my buttermilk culture dead?
Hi Marina! I heated it to 100 degrees before I put it in the oven. I waited 24 hours and it looked thick. I cut it in cubes and started warming it up on low heat. Everything looked fine until I started straining it and it started oozing. Looked like yogurt. So I let it sit and drain some more. It was sitting on the kitchen counter for like 24 more hours. I kind of gave up. This evening I came just to check on it and it was fine. It looked it it finished its process on its own. So I put it away and will be Making crepes. It’s very delicious.
The only thing that I wasn’t sure about is this:
Do you only check the temp in one place or multiple places to make sure the temp is at 130 or 140 degrees. It might have been perfect when I checked in one section but didn’t heat thru in another. Can you provide more on this.
Hi Marina I used Darigold Bulgarian style buttermilk and Lucerne Dairy Farms whole milk. I used the recipe precisely. Let it sit in the oven for full 24 hours. I used food thermometer to get it to 140 degrees. When I took the curds and put it in a cloth to drain it didn’t turn the way it was supposed to. It’s more of a yogurt what came out.
Please help. I need to be able to get this recipe to work. We use a lot of cottage cheese and I want to have a good recipe on hand
Let’s see if I can get more info in order to help.
Did you heat it before placing it in the oven for 24 hours?
What did it look like after the 24 hours? What kind of texture was it?
When you heated it to 140 did it curdle into curds?
When you say that it’s more of yogurt when it came out, you mean it just oozed through the cheesecloth and became like yogurt, or what do you mean?
Hi Marina
Is there a brand of milk that you like to use? I heard that some brands work better than others. I never made this before and want to succeed. Please help
Really like this recipe, thank you! When heating thru after it has stood 24 hours I have found it easiest to just let the whey heat up to 120 or 130 degrees, turn it off, take it off the heat and let it stand 15-20 mins. That way there’s no babysitting the curd temp, if that makes any sense. My fav thing to do with farmers cheese is to mix it with one package of softened cream cheese, sugar to taste and use it in different recipes. So delicious! Also it freezes well (without any other ingredients added)
This looks great! Have you ever tried making it in the Instant Pot? Looking for a good alternative.
Thanks Katerina! Check this out 😉 https://letthebakingbegin.com/multi-cooker-farmers-cheese/
Oachen’ khorosho! Svobodno! Been trying different recipes for farmer cheese for many years. This one has ended my search! I need it to fill german kasekuchen and for Easter paskha. Thank you very much. Bud’te zdroviy.
That’s so awesome to hear! Thanks so much for your kind words!
Marina
Made my first homemade cheese and realized there is nothing better than what I ve tasted!!!
Didn’t have buttermilk mentioned in the recipe, so ended up having yogurt like consistency. Anyway, followed the instructions and got the cheese.
My 2 year old baby loves it like lazy cooked dumplings with cooked onions and bacon crumbles.
Thanks Marina! Your recipes are rocking!
Do you suggest using room temperature milk and buttermilk? thanks!
Since we will be heating both, it doesn’t matter if it’s room temperature or not. It will just heat faster if it’s room temperature to begin with.
Can I use whole milk and substitute buttermilk for active plain yogurt instead and how much?
Will I get cheese or some kind of yogurt?
Yes you can. Using different kind of culturing agent (yogurt/buttermilk etc.) will produce different texture of the cultured milk, but once you heat it and drain it, it will still make farmer’s cheese.
When using yogurt, I would use at least 1 to 2 cups yogurt per gallon of milk.
But if you did want to make yogurt, you would heat the milk, stir in yogurt and let it sit at room temperature until it’s thickened – that’s it.
To make cheese, you heat this yogurt until the whey separates from the curds.
Hi Marina,
I live in MN and am not familiar with dairygold buttermilk. Do you know of anything else I could use that would work as well? -Ally
Organic Valley has buttermilk and it’s from Wisconsin. That’s what I am planning to use to make cheese.
Would it work to use goats milk? Is there a goat buttermilk?
I can’t think of why it wouldn’t, but can not guarantee success since I have not done it myself.
I didn’t have that brand of buttermilk at my store. My milk mixture has been on the counter over 24 hours now and it’s not thick enough to cut. I just read through the comments and saw the buttermilk needs to have live cultures so I checked mine and it doesn’t say that it has those. 🙁 Any idea what I should do?? It’s the consistency of regular yogurt right now. ~christine
If it’s thickened to yogurt consistency just start heating it over low heat and stirring it about every 7-8 minutes until you see curds form. When you see cheese curds form, stir a little bit more (follow the guide with the temperature in the recipe), then allow to cool and follow with the rest of the recipe. While it’s easier to figure things out when you use the mentioned buttermilk, it will still work with other buttermilks. I am just not a fan of that consistency that’s why I go with the one I mentioned in the post. Let me know how it all goes.
Is this truly cheese or more like a glorified yogurt? What’s the taste like?
Thanks for the tutorial, this is really interesting.
Hi Tina, Thanks for the question! It’s definitely not glorified yogurt. It has the consistency of ricotta cheese, but it’s not as bland as ricotta, because it has the tang of a yogurt.
I use leftover whey to make russian pancakes… just add a lil baking soda, flour, and sugar… they are amazing
That’s a great idea Diana! Thank you!
I use leftover whey as a substitute for the liquid when I make bread or buns. The bread tastes a little like sourdough but is absolutely delicious.
What a great idea for using the whey! Thank you for sharing!
The images are beautiful! It looks delicious! Thank you for sharing Marina. Glad to hear our buttermilk works well 🙂
Oh thank You! I’m happy your buttermilk works for my cheese 🙂 thank you for making it!!
Marina, THANK YOU for this recipe! I wonder if the fatter buttermilk is better (like that Darigold 3.5% Buttermilk instead of a low fat 1% one)
No problem Marina! Milk with higher fat content does produce more delicious cheese and yields more cheese, as well, but because there’s such small amount of buttermilk being added to the milk, I doubt it makes much of a difference on the flavor.
This cheese is really beautiful! I cannot wait to make it. My Mom used to make cheese similar to this and I remember loving it!
Thanks Caroline!
Whole milk or raw milk? Isn’t most milk pasturized? What do you recommend if Dairy Gold buttermilk isn’t available.
Whole milk. In this recipe pasteurization does not negatively affect final product. If Dairy Gold is not available, just look for buttermilk that contains live cultures, and then experiment with different brands for the best quality, but as long as it has live cultures it will work.
Where is the recipe for that nut & seed bar lying below the dish of cheese w/ raisins in that photo? Looks delicious! 🙂
Also, I make raw, organic yogurt with my Probiotic 11. How would I do it differently to make buttermilk, but still raw & w/ my culture?
I also have some Kirovskaya Russian kefir grains. Can I use kefir in place of the buttermilk?
Can I make tvarog raw? I make a raw yogurt cheese but it comes out more like a cream cheese.
🙂
Thanks for the great recipes.
Sorry, the nut and seed bar was purchased from the store, not something I made 🙁 I bought it at the Russian store, by the way.
Anything that has live and active cultures will be a good replacement for buttermilk, as it will do the same exact job.
To make tvorog you need to heat the cultured milk to about 110F – 120F, it’s well below the boiling point but still uses heat. There’s not way to make tvorog with unheated milk. The cultured milk curdles to the right consistency (of tvorog) only when heated. You can make cream cheese consistency cheese with completely raw milk, but not the tvorog consistency.
Yummy!!! I love tvorog any where in any foods. I always wanted to try making it with buttermilk. Thanks for the recipe Marina 🙂
I wonder if you’ve tried it yet 🙂
Marina! thank you so much for this recipe. I just discovered your blog today you are awesome!!!!! I browsed all of your recipes cant wait to try some of your creations.
Thank you Galina!
This cheese is gorgeous! Love the photos where honey is dripping and where cheese is mixed with raisins – I want that for breakfast.
Thank you! I actually took pictures two separate times because I wasn’t sure I liked the cheese where it’s mixed with raisins)) in the end I included photos from both times 🙂
Where is the recipe for that nut & seed bar lying below the dish of cheese w/ raisins in that photo? Looks delicious! 🙂