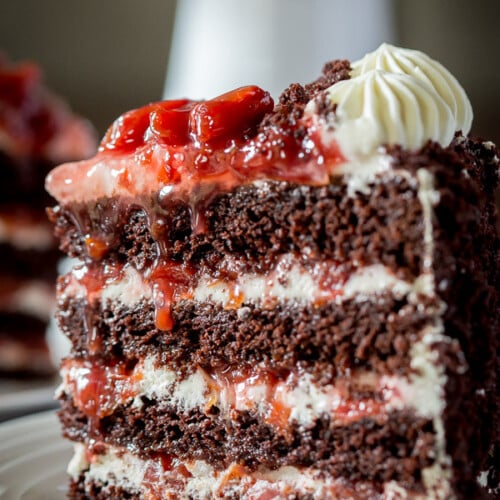
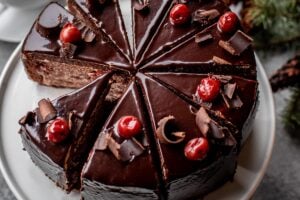
Chocolate Cherry Cake (Drunken Cherry Cake)
This amazing Chocolate Cherry Cake is all the best things you can imagine in the best chocolate cake. Rich, chocolatey, spiked with liquor, and with a pleasant tang from the drunken cherries, you’re going to be blown away with all the flavors, at least I know everyone who’s tried it has been!
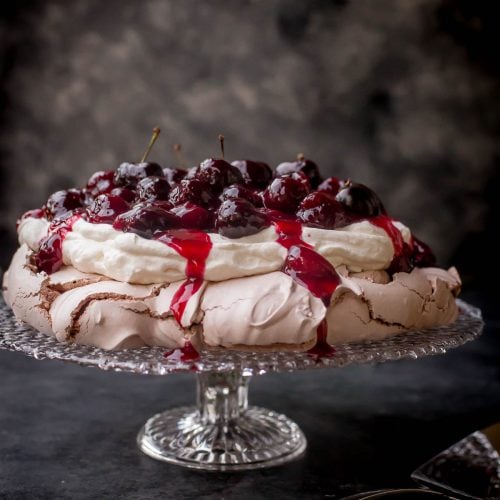
If you like this Drunken Cherry Cake, you’ll also like Cherry Chocolate Pavlova Recipe – Meringue Dessert Cake, Honeycomb Cake – Puff Pastry Cherry Cake, or this delicious Marble Cake {“Торт “Пинчер”}.
 This Chocolate Cherry Cake is always a popular choice for a New Year’s celebration. It might be the drunken cherries or the beautiful shiny chocolate glaze that make this the perfect cake to celebrate the end of one year and the beginning of the next.
While I was testing out different variations of this classic, I truly came up with the best way to make it to achieve the perfect texture, flavor, aesthetic as well as a fail-proof method to get there. I hope you find my tips and tricks useful.
Chocolate Cherry Cake
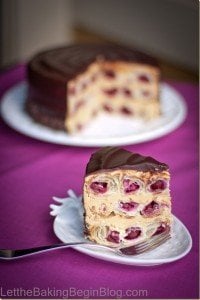
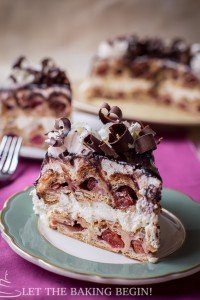
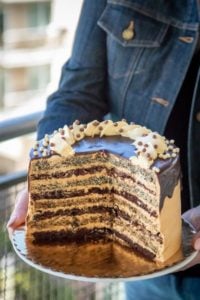
If you’ve never had this version of the Drunken Cherry Cake then let me give you a quick rundown. First, a chocolate cake is baked, then it is hollowed out to create a sort of a bowl that later will hold the filling.
The filling is made by combining the hollowed-out crumbs with dulce de leche cake cream, drunken cherries and then returned back into the chocolate cake “bowl” as the filling.

The filling is made by combining the hollowed-out cake crumbs with dulce de leche cake cream, drunken cherries, and then it is returned back into the chocolate cake “bowl” as the filling.
Finally, the cake shell is soaked with the spiked cherry syrup before being filled with the filling. Once the cake is assembled, a beautiful chocolate glaze covers the whole cake. Not only does it look beautiful, but it also adds an additional layer of flavor. The combination is truly heavenly!
Drunken Cherry Cake
If layered cakes are not your thing, this one just might be 😉
Eaten at room temperature this drunken cherry cake is moist, slightly boozy, and just the perfect combination of sweet, tart, and bitter (from the chocolate glaze). I hope you give my version of the delicious Chocolate Cherry cake a try, I am sure you’re going to love it!
I would love to hear your thoughts on my version of the Chocolate Cake in the comments below.
Chocolate Cherry Cake
Makes 8 inch round cake, 12 servings.
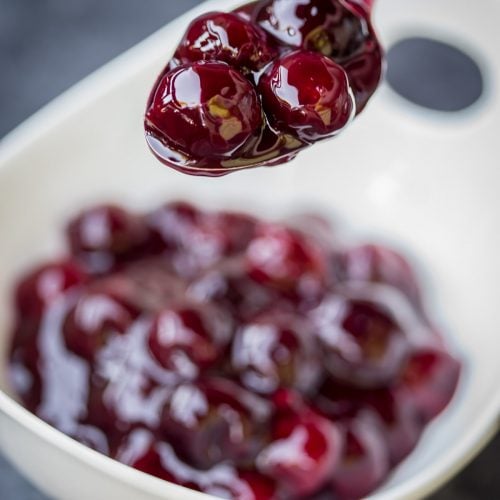
Soak the cherries in liquor
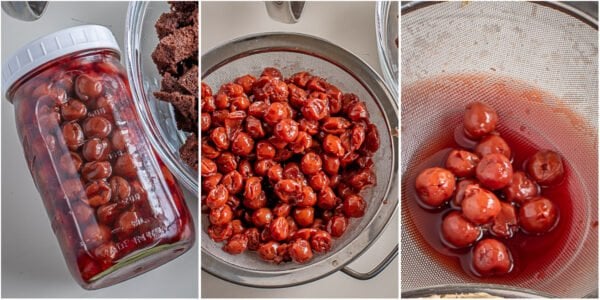
Start making this cake at least 2 days before you plan to serve it to allow all the flavors to mend.
Soak the cherries at least several hours before starting the cake, or up to several weeks for cherries to soak up the alcohol.
- Drain the canned cherries through a sieve, then add them to a 1-quart jar. Add sugar and 1/2 cup of liquor, then add enough of the drained cherry juice to barely cover the cherries. Tighten the lid and gently rotate the jar until the sugar is mostly dissolved. Refrigerate until ready to use.
- Then, on the day of making the cake, drain the cherries through a sieve reserving the cherry syrup. Pick out about 14 best-looking cherries and set them into a cup, this will be used as decoration of the cake, later.
- Set everything aside.
Prepare the Chocolate Sponge cake
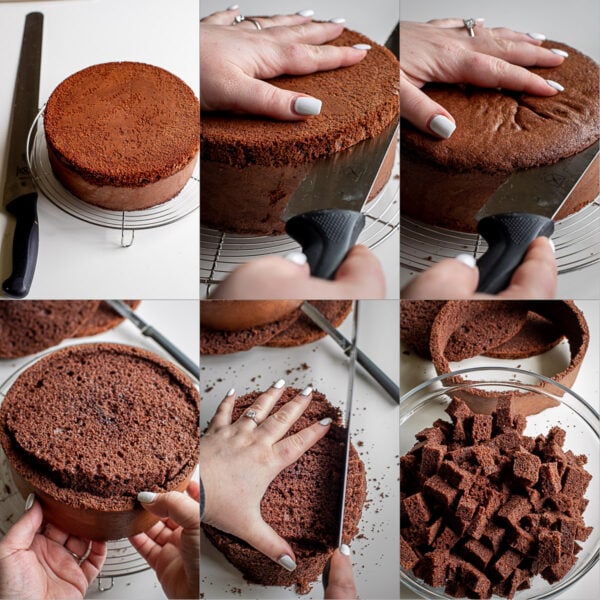
- Bake a double recipe of the Chocolate Sponge cake in one 8″x3″ inch tall baking pan. The baking pan should be 3/4th full before baking. If it’s fuller then 3/4ths transfer the batter to a bigger pan. Bake for about 1 hour or until a toothpick inserted in the middle comes out clean. Do not open the oven until you can smell cake in the kitchen, or the cake will deflate.
- Once cool, cut a ~ 1/2″ inch thick layer off the top and bottom of the cake, this will serve as the top and bottom of the cake, later.
- Then, hollow out the middle section of the cake only leaving a 1/2″ inch thick ring around.
- Cut the hollowed out part into 1/2 inch cubes.
While the Chocolate Cake is baking, make the dulce de leche cream.
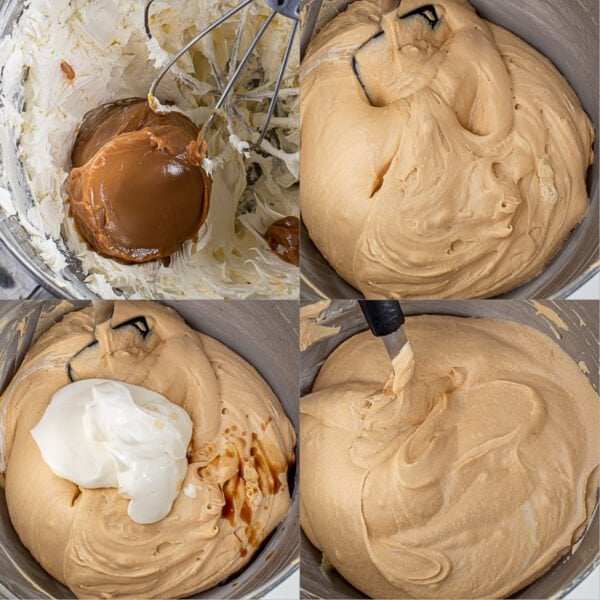
- Whip room temperature butter for about 5 minutes, scraping down the sides several times throughout until it is lighter in color and fluffy.
- Then, add dulce de leche in 2-3 additions, whipping in between. Do not discard 1 of the empty dulce de leche cans.
- Lastly, fold in a splash of vanilla and sour cream until fully incorporated.
- Fill the reserved empty dulche de leche can with prepared cream and set aside.
Make the Drunken Cherry Cake Filling
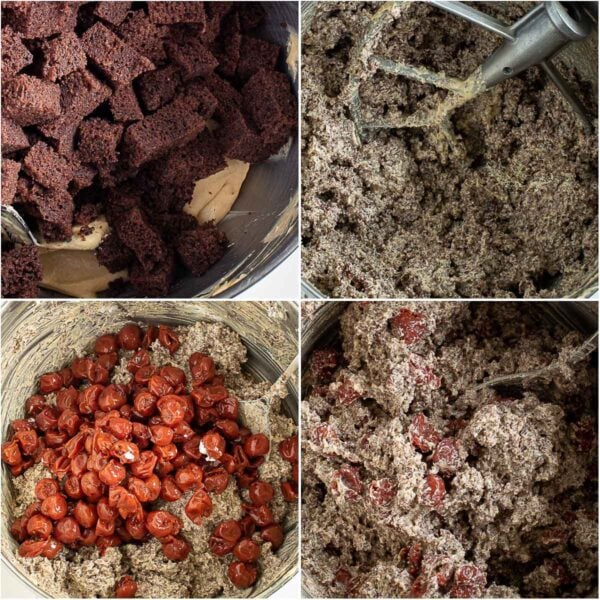
- Add the cubed cake pieces to the remaining prepared cream, sprinkle it with 1/4 cup of the cherry syrup. Add the paddle attachment and mix on low speed until a uniform mixture forms. Do not overmix or the filling will be tough.
- Lastly, add the drained cherries and carefully fold them in.
Assemble the Chocolate Cherry Cake

- Put a dab of frosting onto the serving platter and top with the top chocolate sponge layer, top side down. Press to adhere.
- Brush on a generous amount of the cherry syrup mixture drained from the cherries.
- Spread about 1/4 cup of frosting over there the cake.
- Soak the inside of the hollowed-out cake ring with cherry syrup being very careful not to break it.
- Set it on top of the cake and gently press to adhere. Then, spread a thin coating of the reserved cream on the inside of the cake (not pictured). This will help the filling to adhere to the sides and not separate when cutting into the cake.
- Fill the inside with 1/2 of the prepared filling, then using a vegetable peeler to shave some chocolate on top. Spread the other half of the filling on top. Gently press the filling in until the ring is full. Do not press too hard, as not to tear the sides of the cake. If there’s any leftover, consider it your sample and enjoy :D.
- Spread another 1/4 cup of frosting on the cut side of the last remaining cake layer. Top the filled cake with this layer, frosting side down.
- Brush on a generous amount of the cherry syrup on top of the cake.
- Cover the cake with a plastic wrap, then fit a cake ring or the baking pan that Chocolate Sponge Cake was baked in over the top of the cake. This will keep the cake from falling apart or cracking as it sits in the fridge. Alternatively, you can start to assemble the cake in a lined with plastic wrap baking pan.
- Refrigerate for at least 4 hours or overnight before moving to the next step.
Decorate
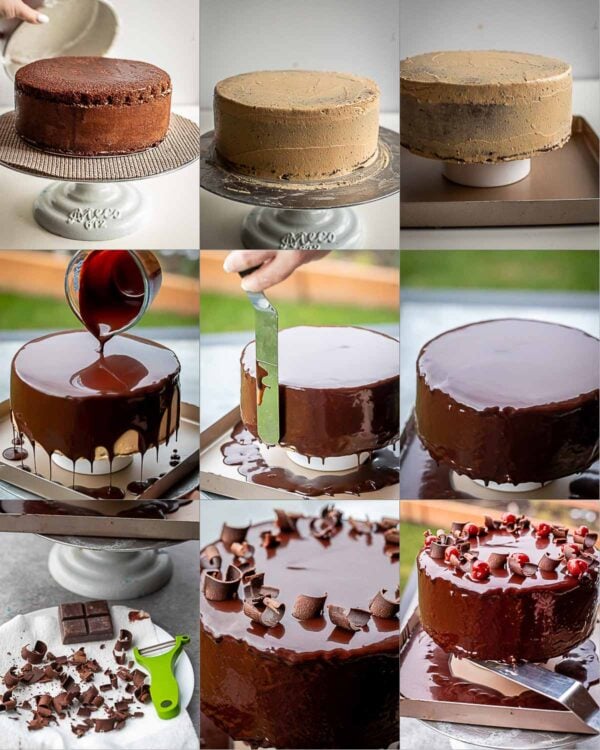
- Make chocolate ganache and let it cool until it is thickened.
- Meanwhile, remove the cake from the fridge, remove the cake ring/pan and cover the outside of the cake with the remaining reserved frosting trying to create a smooth coating.
- To cover the cake with chocolate ganache set a cooling rack or a bowl over a baking sheet and set the cake on top.
- Pour the chocolate ganache or glaze over the cake and spread with a spatula until it covers the sides of the cake. Let the cake sit undisturbed for at least 10 minutes to allow the chocolate to set.
- Then, using a spatula or a knife run it underneath the edge of the cake to scrape excess of the chocolate glaze.
- Refrigerate at least overnight or up to 48 hours before eating.

Chocolate Cherry Cake
Rich, chocolatey, spiked with liquor, and with a pleasant tang from the drunken cherries, you're going to be blown away with this Chocolate Cherry Cake.
Ingredients
Drunken Cherries
- 2.5 cups Canned Red Tart Cherries (drained)
- 1/2 cup granulated sugar
- 1/2 cup Bacardi Gold Liquor
- 1/2+ cup juice from draining the red tart cherries
Chocolate Cake
Chocolate Cherry Cake Cream
- 12 oz unsalted butter, room temperature
- 1 1/2 cans dulce de leche
- 1 cup sour cream
- 2 tsp vanilla extract
- 3 oz chocolate bar
Chocolate Ganache
- 1/2 cup heavy cream
- 1/2 cup semi-sweet chocolate chips
- 3 tbsp corn syrup
Instructions
Soak the cherries in alcohol
-
Do this at least several hours before starting the cake for best results, or up to several weeks.
Drain the cherries through a sieve, then add them to a jar. Add sugar and 1/2 cup of liquor, then add enough of the drained cherry juice to barely cover the cherries. Gently mix until the sugar is dissolved, cover with a lid, and refrigerate.
-
Then, on the day of making the cake, drain the cherries through a sieve, reserving the cherry syrup. Pick out about 14 best-looking cherries and set them into a cup, this will be used as decoration of the cake. Set everything aside.
Prepare the Chocolate Sponge cake
-
Bake a double recipe of the Chocolate Sponge cake in one round 8"x3" baking pan.
-
Once cool, with a long serrated knife cut a thin layer (~ 1/2 inch thick) off the top and bottom of the cake, this will serve as the top and bottom of the cake, later.
-
Then, cut out the inside of the middle layer, leaving only about a 1/2 inch thick "ring" of the cake layer.
-
Cut the cut-out inside of the middle layer into small cubes and set aside.
How to make the dulce de leche cream.
-
While the Chocolate Sponge Cake is baking make the cream.
Whip room temperature butter for about 5 minutes, scraping down the sides several times throughout.
-
Then, add dulce de leche in 2-3 additions, whipping in between.
-
Lastly, fold in a splash of vanilla and sour cream until fully incorporated.
-
Fill the empty dulce de leche can with cream and set aside.
Make the Drunken Cherry Cake Filling
-
Add the cubed cake pieces to the remaining prepared cream, sprinkle with 1/4 cup of the cherry liquor syrup, and mix until a uniform mixture forms.
-
Add the drained cherries and carefully fold them in.
Assemble the Chocolate Cake
-
Put a dab of frosting onto the serving platter and top with the top layer, top side down. Press to adhere.
-
Brush on a generous amount of the cherry syrup and liquor mixture drained from the cherries.
-
Spread about 1/4 cup of frosting over the cake.
-
Set the middle cake "ring" section of the cake on top and gently press to adhere. Brush some of the soaking syrup on the inside of the cake ring, then cover the inside with a thin layer of the reserved cream.
-
Fill the inside with 1/2 of the prepared filling, then using a vegetable peeler shave some chocolate on top. Cover with the other half of the filling and spread into an even layer. Gently press the filling in until the ring is full. If there's any leftover, consider it your sample and enjoy :D.
-
Spread another 1/4 cup of frosting on the cut side of the last remaining cake layer. Top the filled cake with this layer, frosting side down.
-
Brush on a generous amount of the cherry syrup on top of the cake.
-
Cover the cake with a plastic wrap, then fit a cake ring or the baking pan that Chocolate Sponge Cake was baked in over the top of the cake. This will keep the cake from falling apart as it sits in the fridge.
-
Refrigerate for at least 4 hours or overnight.
Decorate
-
Make 1 recipe of chocolate ganache (or you can also make chocolate glaze from this recipe (Note 1)) and let it cool slightly until it is slightly thickened.
-
While it is cooling, remove the cake from the fridge, remove the cake ring and plastic. Then cover the cake with the remaining frosting and make the covering as smooth as you can.
-
Place a cooling rack or a bowl over the baking sheet, then place the cake on top. Make sure the baking sheet is larger than the cake to catch the chocolate glaze drippings.
-
Pour the chocolate ganache over the cake and spread it until it covers the sides of the cake. Use a spatula dipped in hot water, then wiped dry to patch up any mishaps. Leave the cake undisturbed for at least 10 minutes before moving the cake to ensure that the chocolate stays smooth and without ripples.
-
Using a vegetable peeler go along the rib of a chocolate bar to shave chocolate right over the top edge of the cake (Note 2). Then, add the reserved cherries to the edge of the cake as well.
Refrigerate the cake overnight to 48 hours or until ready to eat. Remove from the fridge about an hour before eating.
Recipe Notes
- Note 1:
- Making chocolate ganache is easier, but the covering will not stay as shiny after refrigerating. Also, the cake doesn't need to be frosted smooth before covering with ganache for it to lay down in a smooth layer.
- Making the chocolate glaze is a little more tricky, but the covering will stay shiny even after being refrigerated. For the best results, the cake needs to frosted as smooth as possible for the chocolate glaze to cover the cake smooth. Also, it is best if the cake is frozen for at least 30 minutes before pouring the glaze over the cake.
- Note 2:
- If the chocolate curls break as they're being shaven, heat the chocolate bar in 5 second intervals until the curls are more pliable and do not break
-
Note 2

Thank you for following me on Instagram, Facebook & Pinterest!
Hashtag your photos #LetTheBakingBeginBlog so I can see your creations and for a chance to be featured!
Marina | Let the Baking Begin


The longer this cake a made in advance,the more delicious it becomes.
For the filling next time, I would only use 1 can of dulce de leche, and 1/2 cup of sour cream because I had left over filling.
Thank you for the recipe Marina! It most closely resembles the true drunken cherry cake that I’ve found on the web.
Can you make this cake from frozen cherries?
Yes.
I was wondering if you bake the chocolate cake in one pan what would the bake time be? The same as in the original recipe?
Hi Karina,
This chocolate cake IS baked in one pan, so whatever the time it says here is what it should be, or may be I didn’t understand your question?
This looks amazing! I’m wondering about the baking time too, as I don’t see where it says any time. It just says to make double of the chocolate cake recipe and gives a link.
Thank you Bronagh!
If you go to that link it will include all of yeh details of how to prepare and bake the chocolate cake. It’s a detailed recipe so I didn’t want to write the same thing twice if that recipe already exists on my site.
Hi Marina,
Sorry I’m just seeing your reply now for some reason!
That’s totally understandable, your other recipe is great! Maybe this a totally beginner’s question but if I double the recipe how does that affect the baking time?
Thanks again!
Wow, Marina, this looks INCREDIBLE! your description of this cake has me drooling already.
I tried this cake once before a while back, and remember really liking it. I’ll have to bake this up for our New Year’s party… on the other hand, maybe I’ll bake it for Christmas – less people to share it with!
Thank you, so much! I hope you loved it!