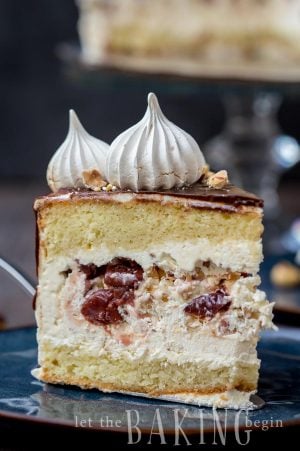
Kyiv Cake – {Hazelnut Meringue, Cherry, Russian Buttercream}
Kiev Cake – Yellow Sponge Cake combined with Hazelnut Meringue, Russian Buttercream, and Tart Cherries. A very loose, but incredibly delicious interpretation of a classic Ukrainian Kiev Cake.

Original Kyiv Cake
I say loosely because the original Kyiv Cake, which was first made in Kyiv in December of 1956, featured two nut-filled meringue disks (Daquoise), sandwiched with some custard buttercream. That recipe was kept a secret by the bakery that produced it, and that is why people started to make ‘knock-offs’.

Or at least that is my theory, as there’s no other reason to call this cake, which barely resembles the original Kiev cake, a Kiev Cake. Are you confused yet? 😀

A homemade version of the Kyiv Cake
People at home made the cake with two layers of sponge cake, some kind of meringue, and nuts in the middle, all sandwiched with Russian Buttercream.

This version of the knock-off Kiev Cake has deviated from the original knock-off even further with the addition of tart cherries. I added them on a whim as I was making the cake and, upon trying the cake, found that cherries added a very nice tartness to the cake.
Try it with cherries, and let me know what you think.

Which one is your favorite? With cherries? Without? Or maybe a chocolate version is the one you fancy the most?
Kiev Cake
Kiev Cake Ingredients:
- Yellow Sponge Cake
- Russian Buttercream
- Meringue
- roasted hazelnuts, chopped
- tart cherries, frozen or canned, juice drained
Soaking Syrup (just mix together)
- sugar
- warm water
- vanilla extract
When making this cake, follow this order of preparation:
-
- Make the Yellow Sponge Cake first
- Whip up the Meringue (follow the adjustments below)
- Make the Russian Buttercream
- Mix the ingredients for the Syrup
- Assemble the Cake and refrigerate
- Make the Ganache
- Cover the cake in frosting.
- Pour the Ganache on top.
- Top the cake with Meringue.
- Refrigerate
Make the Meringue with Hazelnuts:
Once the meringue is whipped, pipe it on a parchment-lined baking sheet using a pastry bag and a large French star piping tip.
Sprinkle half of the meringues with as much hazelnut as you can make stick. The meringue without the sprinkling of hazelnut will be used to decorate the top of the cake. If you wish, you can sprinkle the hazelnuts over all the meringues.

Dry on the middle rack for 2 hours @225F. Allow to cool in the oven for 30 minutes, then remove and allow to completely cool.
Assemble the Kiev Cake:
Split the baked, cooled cake horizontally into 2 even layers.
Put a dab of Russian Buttercream frosting onto a serving platter or board. Place the top layer of the cake, top side down, and press to adhere.
Reserve about 1.5 cups of buttercream to cover the outside of the cake.

Sprinkle the cake with half the soaking mixture and spread about 2/3 cup buttercream on top.

Take the hazelnut-topped meringue and dip them into the buttercream, collecting as much frosting as will stick and stick them to the cake.

Keep dipping and arranging the meringue mounts with cream until most of the spaces are filled with the meringue. Crumble meringue pieces if you need to fill smaller crevices.
TIP: It is a lot easier to assemble this cake with a cake ring, so I suggest you use it if you have one. If not, the cake will not be as even, but still be OK. To use the ring, adjust it around the cake and tighten it.

Cherries are an optional addition, so use them if you wish, or not.
Sprinkle the cherries and the remainder of the hazelnuts on top of the meringue.

Take the other half of the sponge cake and soak the cut side with the remainder of the soaking mixture. Spread the remainder of the Russian Buttercream (not the one that we will use for the outside).

Place this cake layer, the frosted side towards the cherries and press with your hand to adhere. Refrigerate for at least one hour before proceeding.
Run a knife on the inside of the ring to loosen it from the cake. Cover the cake in the 1.5 cups of buttercream that we reserved in the beginning, trying to smooth the outside as much as possible.

Make the ganache:
Pour 3 tablespoons of hot, heavy cream over 3 tablespoons of chocolate chips or chopped chocolate. Let sit for 2 minutes. Stir until smooth. Allow to cool until it is a pourable consistency.
Pour the ganache on top of the cake and spread it with a spatula until it pours down the sides.
Top the cake with the remaining meringues in a half-moon shape. Sprinkle more chopped hazelnuts if you wish.

Refrigerate the cake for at least 4 hours before serving. Best served within 24 hours of assembling.
Serving suggestion: for neat slices, dip a long thin knife into hot water, wipe, and slice. Repeat after each cut.
Try these other CAKE recipes:
- Markisa Cake – Beautiful shortbread cookie layers and buttercream cake!
- Peaches and Cream Cake – Sponge cake with spiked peach syrup and sweetened whipped cream.
- Esterhazy Cake – A cake made of Hazelnut Meringue layers and rich Custard Buttercream
Kiev Cake - Hazelnut Meringue, Cherry, Russian Buttercream
Yellow Sponge Cake combined with Hazelnut Meringue, Russian Buttercream, and Tart Cherries. A very loose, but incredibly delicious interpretation of a classic Ukrainian Kiev Cake.
Ingredients
Kiev Cake Ingredients:
- 1 recipe Yellow Sponge Cake
- 1.5 recipe Russian Buttercream
- 1 recipe Meringue Cookies
- 1 cup roasted hazelnuts chopped
- 1/2 cup tart cherries frozen or canned, juice drained
Soaking Syrup
- 1/4 cup sugar
- 1/4 cup water
- 1 Tbsp vanilla extract
Instructions
Make the Meringue with Hazelnuts
-
Once the meringue is whipped, pipe it on a parchment lined baking sheet using a pastry bag and a large French star piping tip. Sprinkle half of the meringues with as much hazelnut as you can make stick. The meringue without the sprinkling of hazelnut will be used to decorate the top of the cake. If you wish, you can sprinkle the hazelnuts over all meringues.
-
Dry on the middle rack for 2 hours @225F. Allow to cool in the oven for 30 minutes, then remove and allow to completely cool.
Assemble the Kiev Cake
-
Split the baked, cooled cake horizontally into 2 even layers.
-
Put a dab of Russian Buttercream frosting onto a serving platter or board. Place the top layer of the of the cake, top side down and press to adhere.
-
Reserve about 1.5 cups of buttercream for covering the outside of the cake.
-
Sprinkle the cake with half the soaking mixture and spread about 2/3 cups buttercream on top.
-
Take the hazelnut topped meringue and dip them into the buttercream, collecting as much frosting as will stick and stick them to the cake.
-
Keep dipping and arranging the meringue mounts with cream until most of the spaces are filled with the meringue. Crumble meringue pieces if you need to fill smaller crevices.
-
TIP: It is a lot easier to assemble this cake with a cake ring, so I suggest you use it if you have one. If not, the cake will not be as even, but still, be OK. To use the ring, adjust it around the cake and tighten it. Sprinkle the cherries and the remainder of the hazelnuts on top of the meringue. Cherries are an optional addition, so use them if you wish, or not.
-
Take the other half of the sponge cake and soak the cut side with the remainder of the soaking mixture. Spread the remainder of the Russian Buttercream (not the one that we will use for the outside).
-
Place this cake layer, frosted side towards the cherries and press with your hand to adhere. Refrigerate for at least one hour before proceeding.
-
Run a knife on the inside of the ring to loosen it from the cake. Cover the cake in the 1.5 cups of buttercream that we reserved in the beginning, trying to smooth the outside as much as possible.
Make & Pour the ganache
-
Pour 3 tablespoons of hot heavy cream over 3 tablespoons of chocolate chips or chopped chocolate. Let sit for 2 minutes. Stir until smooth. Allow cooling until it is a pourable consistency.
-
Pour the ganache on top of the cake and spread it with a spatula until it pours down the sides.
Decorate
-
Top the cake with the remaining meringues in a half moon shape. Sprinkle more chopped hazelnuts if you wish.
Refrigerate
-
Refrigerate the cake for at least 4 hours before serving. Best served within 24 hours of assembling.
Serving suggestion:
-
For neat slices, dip a long thin knife into hot water, wipe and slice. Repeat after each cut.
Recipe Notes
When making this cake follow this order of preparation:
- Make the Yellow Sponge Cake first
- Make the Meringue (follow adjustments below)
- Make the Russian ButtercreamMake the Syrup
- Assemble the Cake & Refrigerate
- Make the Ganache
- Cover the cake in frosting.
- Pour the Ganache on top.
- Top the cake with Meringue.
- Refrigerate

Thank you for following me on Instagram, Facebook & Pinterest!
Hashtag your photos #LetTheBakingBeginBlog so I can see your creations and for a chance to be featured!

Marina | Let the Baking Begin


Greetings Marina,
I’ve been craving Kyiv cale for at least a decade now, but couldn’t find a recipe to my liking. I’ve read your 3 Kyiv Cake recipes, and Meringue cookies recipes. The Kiev Cake – Киевский Торт from year 2013, and Kyiv Cake [Hazelnut Meringue, Cherry, Russian Buttercream] year 2017 are what I’ve been comparing, and want to create a combination of both. If I may ask a few questions regarding these 2 recipes.
1. In year 2013 recipe you have 2 sponge layers baked in 10 inch round, and in year 2017 you refer to one Sponge recipe which is 8 inch. Does the 2017 recipe create 1 sponge layer that you cut in half, or 2 sponge layers baked separately. Will it be possible for me to bake it in 9 inch pans and use the sponge from recipe 2013? Also, the recipe from 2013 has butter and water in it, and the 1017 doesn’t. Is there a significant difference between the sponges?
2. In year 2013 recipe you suggest 2/3 cups sugar for Meringue but in 2017 you refer to 1 Meringue Cookies recipe and it asks for 1 cup of sugar. What would be your suggestion for amount of sugar for 9 or 10 inch cake?
3. In year 2013 you suggest 1 3/4 can sweetened condensed milk and cool whip, and in 2017 it’s 14 oz condensed milk only. Which one in your opinion makes more stable frosting?
Thank you very much for bringing us these beautiful recipes, and I hope to hear from you soon. I am excited to bake this cake for this weekend
another russian fascist appropriating Ukrainian food , nothing new under the sun
Hi! Born and raised in Ukraine. Nice to meet you, too 🙂
I am always visiting here to check which cake I can make from your recipe. I made this kiev cake today and you butter cream frosting recipe is absolutely delish! Since I found you sponge cake recipe, I’ve always making only your recipe. It’s fabulous! Thank you!!!! 5 stars!!
Here in Vancouver, BC, I’ve been feeling helpless watching the war footage. I was looking for a Ukrainian recipe just to keep Ukraine in mind. I found your recipe for a Kyev Cake and thought I could make it in honour of the fighters in Ukraine and Kyev. I modified it slightly – I made the top sponge with blue and the bottom sponge with yellow food colouring to represent the Ukrainian flag. So I am calling it a Victory in Kyev Cake! May there soon be peace in Ukraine. Would love to send you a picture if you like
It’s crazy watching the insanity. Thank you so much for your support. I would love to see you creation! If you’re on social media, you can send it there or just email letthebakingbeginblog @ gmail . com (spaces removed).
May Ukrainian soil see freedom and peace soon.
Hi! Good receipt, but….bad transliteration. Kyiv, not Kiev 😉
Kyiv, but not Kiev. It’s Russian, not Ukrainian translitaration. It, first.
Other your mistake – its Ukrainian recipe!!!
Where you have seen Russian butter cream?
It’s simple butter cream that make every confectionary in different countries. So why Russia?!!!
Your recipes are amazing. I love this cake. This is the third dessert recipe that I’ve used from your blog and they all are delicious.
Music to my ears 😀 Thank you so much Marta!
I love your blog, you have very beautiful cakes! Thanks for sharing.
Thanks Anna! I appreciate it!
At this time I am ready to do my breakfast, later than having my breakfast coming yet again to read additional news.
First of all I would like to say excellent blog! I had a quick question that I’d like to ask if
you don’t mind. I was curious to know how you center yourself and clear your thoughts before writing.
I’ve had a hard time clearing my mind in getting my thoughts out there.
I truly do take pleasure in writing but it just seems like the first 10 to 15 minutes are generally
lost just trying to figure out how to begin. Any recommendations or hints?
Thanks!
This sounds delicious and I want to make it over the weekend. I wonder if I can make chocolate cake base instead of yellow sponge? Do you think it will work for this cake? We are big chocolate and meringue fans here!
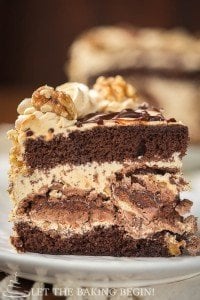
Yes, I think in this recipe either yellow or chocolate sponge will work. If you’re looking for the chocolate Kiev Cake, check out a recipe that is already posted with the chocolate sponge. I think you’ll love it! Click the link HERE for the recipe. If you still want cherries, just add cherries to that recipe, but it’s up to you if you want to add them.
I love your site, but I am getting frustrated when you just use links to your different components of the recipe, and I have to keep going back and forth to get them., I feel you would get more traffic if you just copied and pasted it yourself, so that we could all get it all at once, without having to click, click, click!
Hi Janet,
Thank you so much for your suggestion and I’m truly sorry for the inconvenience this is causing. I want to explain why the recipes are posted in this way, so you don’t think that I am just doing this to give my readers the runaround.
There’s a set of basic recipes that are used in many desserts and by changing or twisting the recipe a little bit, you get a new recipe. If there’s a recipe for meringue, it probably gets used in more than just one recipe.
By having a separate recipe for just meringue, I don’t have to re-write the instructions and re-take the pictures of a process that is the same from one meringue recipe to another. This allows me spend the time I have for blogging, to create and test new recipes.
It would’ve been easier if I could just copy and paste the recipe and include it on multiple pages, but if I do that, my website will be seen as bad quality website by search engines, and recipes that I put a lot of work into will not show up in google.
Hope this helps a little~!
I am not sure I understand your philosophy in this way to do it, It would be so much easier for you, but not for us, copy and paste would be the way to go, and then you could say that if you want to see pictures and in depth directions go to this link, but when it is the same recipe used over and over again, it would make more sense to help us at the followers, and not just easier for you., I understand your tweaking the recipes to make them different, but when it is the same until the tweaks, you could add that at the changes, but I have found this way to be cumbersome, and I think that maybe you do this, so it looks simple to the not-so experienced baker, until they have to click, click, to get all the different recipes to be on just the recipe posted, I am not sure that it is easier for us, just you? I don’t mean for this to sound mean spirited, just an observation in so many of your recipes.
Another beauty 🙂 Thank you so much for this creation ! Will definitely be back !
You’re welcome, come again! 🙂