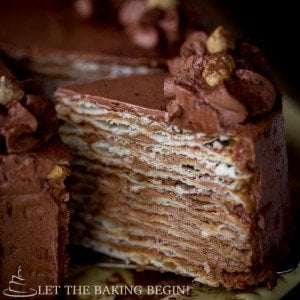
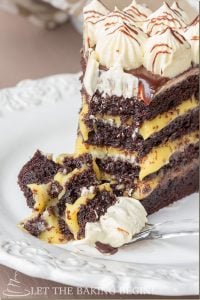
Mikado Layer Cake with Chocolate Custard Buttercream

Hey, hey! It’s Friday and the weekend is ahead of us! I’m here to tempt you with this delicious Armenian Mikado Cake in hopes that you will make it for this weekend. You know, it’d be great on your Easter Table 😉 It’s not just any chocolate cake though, this one is made of thin, flaky cake layers that are then frosted with Chocolate Custard Buttercream.

That buttercream though. I. Could. Eat. It. With. A. Spoon. I might or might not’ve licked the spoon like a hundred times. No calorie counting that day… #NoRegrets

I first heard about this cake from a reader who contacted me on Facebook to see if I had a recipe for this cake. At the time I’ve never heard or tried anything like this. So when I saw Mikado Cake on this blog here by Armine (thank you Armine!!), I knew I had to make it and see why that reader was so eager to find the recipe for this cake.

I knew I like chocolate and I knew that I liked the cake layers of this cake, so even before I started making it I knew that it would be a hit! and a hit it was! I hope you give this cake a try!
Mikado – Layer Cake with Chocolate Custard Buttercream
Credit: Armine @ http://armushik.livejournal.com/
Yield: One 8 inch round cake
Ingredients for Chocolate Custard Buttercream:
- egg yolks
- sugar
- milk
- cocoa powder
- cooked sweetened condensed milk or dulce de leche
- 3unsalted butter, room temperature

How to make Mikado Cake:
- In a saucepan whisk together egg yolks and sugar, then slowly add milk continuously whisking and trying to dissolve the sugar and egg in the milk.
- Add sifted cocoa and mix until fully incorporated and no cocoa streaks are seen. If you’re having a hard time incorporating cocoa into the egg and milk mixture, run it through a sieve.
- Now set over medium and heat until the mixture thickens and coats the back of a wooden spoon. Do not stop whisking or the custard will scorch. Do not boil or the eggs will curdle and separate. You know the custard is cooked if you run your finger over the back of the dipped spoon and the streak stays clean, and no custard runs into it.
- Remove from heat and cool completely before adding to the butter mixture in the next step.

- With a mixer whip the room temperature butter for 5 minutes, or until whiter in color and fluffy. Scrape the sides of the bowl several times throughout the process to prevent chunks of butter being unwhipped. Add dulce de leche in two additions, whipping after each one to incorporate one.
- Then add the cooled chocolate custard in 2 additions until fully incorporated.
Set aside until needed.

Mikado Cake Ingredients:
- unsalted butter, room temperature
- eggs
- sour cream
- baking soda
- all-purpose flour (450 grams)

- With a whisk whip the room temperature butter for about a minute, add the whisked egg and thoroughly mix again.
- Mix the sour cream with baking soda, then add it to the butter mixture. Add flour in two additions and mix until dough forms. Do not handle too much.

- Split the dough into 13-14 pieces and form balls. Cover the dough with plastic wrap and keep covered while you work with each dough ball.
- Roll two balls on a floured surface to a circle a bit bigger than a 8 inch round baking pan. Place two rolled out balls onto the back of the jelly roll sheet or a cookie sheet and bake in a preheated to 400F oven until slightly golden in color, about 5-7 minutes. Repeat with the rest of the dough.

- As soon as the cake is baked place the 8 inch round baking pan on top of the cake and trim right around the pan. Discard the trimmings or crush and keep in a ziplock in the freezer for next time when you need to decorate the sides of the cake with something.
- While the cake layer is still warm put a dab of frosting on a plate, put the warm cake layer on top and add a generous spoon of frosting, spreading it around into an even layer. Reserve about 1/2 cup of frosting for covering the sides of the cake at the end.
- Continue baking the layers, trimming them and then stacking with frosting until all cake is baked and frosted.\Cover the sides and top of the cake with reserved frosting, put a cake ring around the cake and secure it (if you have one). (The cake ring will help keep the sides straight and even as it sits. If you don’t have one, don’t worry about it, it’s not crucial). Cover with plastic wrap, then set a cutting board on top, next set something heavy on top of the cutting board to help the cake set. Let sit at room temperature for up to 24 hours before continuing.

- Next day whip together 1.5 cup heavy whipping cream with 1/3 – 1/2 cup powdered sugar & 1-2 tablespoons sifted cocoa powder until fluffy and increased in volume.
- Use some of this frosting to cover the cake in a thin layer, smoothing out the top.
- Fit a ziplock bag with a large star tip. Fill the bag with leftover frosting. Pipe stars all along the border of the cake.
- Place a peeled hazelnut in the middle of each star. Dust the cake with powdered cocoa if desired.

- The cake is best served at room temperature.
Try these other CAKE recipes:
- Russian Royal Cake – Cake made with walnuts, poppy seed, and a dulce de leche cream.
- Hazelnut Meringue Cake – Meringue cake with toasted hazelnuts and a dulce de leche cream.
- Birds Milk Cake Recipe – Chocolate sponge cake layers and a deliciously luscious Custard Buttercream.
Mikado Layer Cake with Chocolate Custard Buttercream
The best Mikado layer cake recipe with thin layers of flaky
layers that are covered in a chocolate custard buttercream.
Ingredients
Frosting Ingredients:
- 3 egg yolks
- 2/3 cups sugar
- 1 cup milk
- 4 Tbsp cocoa powder
- 1 full can + 1/4 cup from the second can of cooked sweetened condensed milk or dulce de leche
- 3 sticks unsalted butter 340 grams, room temperature
Cake Ingredients:
- 7 Tbsp unsalted butter room temperature
- 2 eggs
- 1 1/2 cups sour cream
- 1 tsp baking soda
- 3 1/2 – 4 cups all purpose flour 450 grams
To Decorate
- 1.5 cups heavy whipping cream at least 33% fat content
- 1-2 Tbsp powdered cocoa powder sifted
- 1/3 - 1/2 cups powdered sugar
Instructions
Make the frosting first
-
IIn a saucepan whisk together 3 egg yolks and 2/3 cups of sugar, then slowly add 1 cup milk continuously whisking and trying to dissolve the sugar and egg in the milk. Add 4 tbsp sifted cocoa and mix until fully incorporated and no cocoa streaks are seen. If you're having a hard time incorporating cocoa into the egg and milk mixture, run it through a sieve. Now set over medium and heat until the mixture thickens and coats the back of a wooden spoon. Do not stop whisking or the custard will scorch. Do not boil or the eggs will curdle and separate. You know the custard is cooked if you run your finger over the back of the dipped spoon and the streak stays clean, and no custard runs into it. Remove from heat and cool completely before adding to the butter mixture in the next step.
-
With a mixer whip, 3 sticks room temperature butter for 5 minutes, or until whiter in color and fluffy. Scrape the sides of the bowl several times throughout the process to prevent chunks of butter being unwhipped.
-
Add dulce de leche in two additions, whipping after each one to incorporate one.
-
Then add the cooled chocolate custard in 2 additions until fully incorporated.
-
Set aside until needed.
To make the cake layers
-
With a whisk whip 7 tbsp room temperature butter for about a minute, add 2 whisked egg and thoroughly mix again. Mix 1 ½ cups sour cream with 1 tsp baking soda, then add it to the butter mixture. Add flour in two additions and mix until dough forms. Do not handle too much.
-
Split the dough into 13-14 pieces and form balls. Cover the dough with plastic wrap and keep covered while you work with each dough ball.
-
Roll two balls on a floured surface to a circle a bit bigger than a 8 inch round baking pan. Place two rolled out balls onto the back of the jelly roll sheet or a cookie sheet and bake in a preheated to 400°F oven until slightly golden in color, about 5-7 minutes. Repeat with the rest of the dough.
-
As soon as the cake is baked place the 9 inch round baking pan on top of the cake and trim right around the pan. Discard the trimmings or crush and keep in a ziplock in the freezer for next time when you need to decorate the sides of the cake with something.
-
While the cake layer is still warm put a dab of frosting on a plate, put the warm cake layer on top and add a generous spoon of frosting, spreading it around into an even layer. Reserve about 1/2 cup of frosting for covering the sides of the cake at the end.
-
Continue baking the layers, trimming them and then stacking with frosting until all cake is baked and frosted.
-
Cover the sides and top of the cake with reserved frosting, put a cake ring around the cake and secure it (if you have one). (The cake ring will help keep the sides straight and even as it sits. If you don’t have one, don’t worry about it, it’s not crucial). Cover with plastic wrap, then set a cutting board on top, next set something heavy on top of the cutting board to help the cake set. Let sit at room temperature for up to 24 hours before continuing.
To decorate:
-
Make the chocolate whipped cream first: Next day whip together 1.5 cup whipping cream with 1/3 cup powdered sugar & 1-2 tablespoons sifted cocoa powder until fluffy and increased in volume. Use some of this frosting to cover the cake in a thin layer, smoothing out the top. Fit a ziplock bag with a large star tip. Fill the bag with leftover frosting. Pipe stars all along the border of the cake. Place a peeled hazelnut in the middle of each star. Dust the cake with powdered cocoa if desired.
-
Cake is best served at room temperature.

Thank you for following me on Instagram, Facebook & Pinterest!
Hashtag your photos #LetTheBakingBeginBlog so I can see your creations and for a chance to be featured!
Marina | Let the Baking Begin


This looks really good but there seems to be a bit of an assumption that everyone knows how to make dulce de leche.
Could you clarify. Is that something you can get premade in a can or something you have to make ahead of time with sweeten condensed milk. If the latter, can you add a how to?
Thanks! 🙂
Hi Erica,
Dulce de leche is commonly purchased canned at the store.
But, if you’d like to make your own just get sweetened condensed milk, place in a pot and cover with water. Simmer on low for 3 hours. Then, submerge in cold water and allow to cool. Then use as you wish. Hope this helpS!
Similar to the Mexican “Carlota Negra” (Black Charlotte) that is made with a crisp chocolate pastry filled with chocolate and orange buttercream and dusted with cocoa
Delicious, lots of work but worth it
Hi,
I want to make this cake for a wedding, so i’m wondering if it can be made in a square form?
Thank you!
Sure, Jenna, I think it would work fine.
I would roll it out larger than what you need and trim it after it comes out from the oven.
I’m Kind of puzzled! You’ve titled this as “Mikado” Layer Cake but listed the cuisine as Armenian. I am Japanese. Mikado is a Japanese word translated Emperor. My Armenian friends have told me “Mikado” is not an Armenian word.
Hi Deane,
To be honest, I am not sure as to the origins of the name of this cake, but if you google Mikado cake you’ll see actual Armenians posting a version of this cake with the same exact name. I also had a reader introduce me to this cake, who said that their grandma used to make it (in Armenia) and they would love to have the recipe. Thank you for sharing what it means in Japanese, I never knew that! By the way, ask your friend if they know a cake by this name, even if they don’t know what Mikado means 😉
Can I substitute buttermilk to sour cream?
In this particular cake, I would not.
Hi Deanna,
So sorry to hear about your troubles with this cake 🙁
I’m not exactly sure what happened, but I can help you troubleshoot.
The cake layers are supposed to be very thin, and flaky once baked. Did the cake layers shrink a lot during baking? If that’s the case, the dough was overmixed and when the cake layers shrunk in the oven, they became much thicker than they needed to be.
The cake layers ARE supposed to be dry, but once they sit with the frosting, they should soften up. I wonder if because the cake layers were too thick, they never softened up 🙁
Kinda like a Napoleon, eh .
yeah, just chocolate 🙂
Hi Marina. Does the cake need to refrigerate while its settling for 24 hours? And also do we put it on fridge after you put whipping cream on it?
No, do not refrigirate the cake while it’s settling. It IS better to refrigerate it once you put the whipping cream though, since it spoils easier.
Hi Marina –
Thanks for the recipe, have ?
My frosting look like маленькые пузырки, как манная каша когда свариш то мой крем так вышел, that normal, or what i did wrong?
Thank you so much
Hmm… I am a little puzzled.. at what point did it turn grainy? when you got to the end or when you cooked the egg yolks, milk & cocoa? If you give me a little more details may be I can help…
When I whip butter for 5 min, than I add dulce de leche, and after that when I mixed the frosting turn grainy :(, but cake turn very good, didn’t know what to expect the taste. Thanks for the recipe. Good work, keep going that way, good job.
Thanks Nataliya for your feedback.
When you say that it turned grainy, I am assuming that it separated. This usually happens when the buttercream is overwhipped. This sometimes happens when the butter is too soft before whipping, so then when you add the dulce de leche it just can’t hold on to it and separates. Was your butter very soft before you started whipping? If you were to push on it with your finger would it easily just sink in or did it have some resistance to it?
Hi. If i have grainy creme, ussually after adding dolce leche, i am sticking the bowl to microwave for 20 sec and lightly whipping again. Ussually it works 🙂
Hi,
does the cream become very runny after you heat it?
yeah the butter was too soft, next time i would know what to do, thanks for answering my ? 🙂
I grew up on this stuff. In fact, there was a very popular bakery in Tehran that specialized in the best mikado.
I’ve never tried to make it myself, but now I will!
Really?? I wonder how authentic this recipe is. The reader that asked for the recipe was describing a very particular flavor and this cake does not sounds like what he described (he said his grandma was a pro at making this cake and it was the best) although very delicious.
How do you remember the flavors of the cake? or, do you? 🙂
i wish this recipe was more detailed, I had to reread the instructions a few times, you never mentioned to add the coco in the first part of frosting, I figured it out by the picture, and the last next day cream wish you had pics of what kind of whipping cream and pics in the making. making it now, cant wait to try it though thank you for the recipe
What degrees to bake on?
400F 🙂
This cake looks so good! Such a perfect timing, I wanted to make something new for this Easter. Do you think that cream would be good for Waffle Cones/Tubes {Вафельные Трубочки} ?
Thanks Zoya! I think it would work for trubochki as well, yes 🙂
This cake looks delicious! Would love to have that cut off piece right now. Have a great Easter Marina!
This cake is a killer!!! Wow, I can’t believe how gorgeous it is in every single way! Beautiful photos too as usual. Happy Easter, my friend.