Bread Machine Pizza Dough Recipe
This bread machine pizza dough is a weekend staple at our house! The outside of the crust is slightly crispy, but your teeth will quickly sink into the pillowy soft, airy layer underneath. Simply whip up this dough and let your bread machine do the hard work for you!
Are you drooling yet? Me too! You might also enjoy my 15 minute easy Margherita flatbread and this yummy mini pizza recipe. Don’t have a bread machine? Scroll to the bottom to see how you can make it by hand.
Pizza Dough Recipe for a Bread Machine
Making pizza dough in a bread machine (here’s the Bread Machine I use) – might sound intimidating at first (or maybe even impossible). But don’t worry – there are some tricks that will help make this process easier and I’m about to share all you need to know to become a bread machine pizza dough pro!
The process of making pizza dough in a bread machine takes very little effort from you. Just add the ingredients into the bread machine and remove the perfect pizza dough 1.5 hours later. No kneading, no sink full of dishes. Just perfection. Every. Time.
What makes the best Pizza Dough?
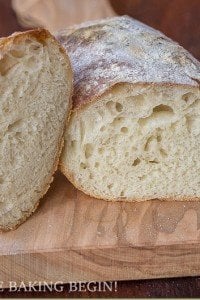
Traditional pizza dough is made with only finely ground wheat flour, water, yeast, and salt. The yeast amount is minuscule to allow for a long, cold fermentation process, which helps the flavors deepen, mature, and get complex. Once the dough is ready, the dough is stretched, loaded with toppings, then baked in a ripping hot wood fire oven in a matter of 60-90 seconds for the crispiest crust.
The short bake time doesn’t allow for too much moisture to be lost, so the pizza is deliciously crispy on the outside while still soft, chewy, and moist on the inside. The perfect combo of flavors, texture, and aromas is what makes the authentic pizza a favorite with so many.
The idea with the bread machine pizza dough though, is that we are able to create a comparable flavor and texture to that of the original. Since in the bread machine the pizza dough is all done in only 1.5 hours there are several things that need to change to compensate for the lack of prolonged fermentation, as well as longer bake time since home ovens do not reach the same high temperatures that brick or stone pizza ovens do.

How to make this EASY Bread Machine Pizza Dough taste like the real deal
To get this EASY bread machine pizza dough as close to the original as possible changes to the original recipe ingredient list needed to be made. Those changes were the addition of oil, sugar, and an increase in the yeast amount.
- YEAST: The increase in the yeast amount was needed to speed up the rising time since this pizza dough won’t be fermenting in the fridge for days; instead, the whole process is sped up to 1.5 hours.
- OIL: Next, the oil. Baking pizza for longer than just several minutes means that the dough has more time to lose moisture, and the crust can get really hard. The oil is what keeps the crust from getting hard as it bakes.
You can experiment and decide the perfect amount of oil for your taste buds, but anywhere between 1-4 tablespoons is where you want it to be. If you’re using less than 4 tablespoons, make sure to replace it with water. With 4 tablespoons, the flavor is very soft and tender, somewhat similar to the cafeteria pizza style. With 1-2 tablespoons, the crust is more crispy on the outside and a bit chewier on the inside, closer to what my tastebuds prefer. - SUGAR: Now, onto the sugar. Sugar is needed to help the crust brown in the oven and gain more flavor through the Maillard reaction (aka chemical reaction responsible for the browning and thus better flavor profile). The addition of sugar also helps retain the moisture in the crust and helps the yeast rise quicker.

Secrets to Perfect Bread Machine Pizza Crust
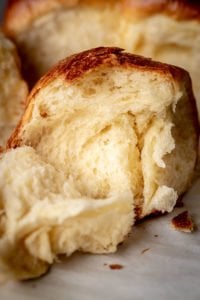
One of the most magical things about pizza is the crispy crust with leopard-like charring. That type of charring on the bottom of the pizza is achieved by baking the pizza at extremely high temperatures in wood-fired brick pizza ovens. The extreme temperatures aid in creating the crispy, non-floppy crust that allows you to hold a slice in your hand without the slice bending and all toppings and cheese falling off.
But, how do we achieve the same result if the home oven doesn’t retain heat the same way, since as soon as you open the oven all heat escapes? There are several tricks that we can utilize to get as close to the real deal as we can.

Build up heat
First and foremost, you have to allow the oven to build up heat which will help with heat loss every time you open the oven door. When I started making pizza, I noticed that the pizzas I baked first took longer to cook than those I baked last. Also, the pizza that I baked last had a crispier crust with better looking leopard-like print bottom.
So now, I preheat the oven for 1 hour at 550F before baking my first pizza to get the best, crispiest crust.
Preheating the oven about 30 minutes before the dough cycle on your bread machine is complete will allow enough time to get the home oven as hot as it can get.
When the dough is rested, stretched, and loaded with toppings, your oven will be ready to bake the best pizza a home oven can give you.
Use Stone or Steel for the best crust on Homemade Pizza
Preheating the oven is the first step to getting the best crust on your pizza. Another thing you can do to build on that is to use either pizza stone or pizza steel. Both help with heat loss and heat retention.
A pizza stone will give you a better result than baking the pizza on a baking sheet, but pizza steel will do even better than either. Read this article by SeriousEats that explains the difference and why one works better than the other.
Baking the pizza on a pizza stone or steel means that the crust is hit with an immediate blast of heat as soon as it goes in the oven, which doesn’t allow it to get soggy or limp, but instead creates super crispy crust with huge air pockets. I have been using pizza steel for a while and ever since I got it, bread machine pizza is on regular menu rotation. It’s just too easy and too good not to make!

Tips For Making the Best Bread Machine Pizza Dough Ever
Ready to get started? Let’s get into some of those helpful tips for making pizza machine bread dough.
- Flour: best pizza is made with bread flour as it yields a crispier exterior, chewier crumb (thanks to the higher protein content), and that more authentic flavor. But, all-purpose flour will work as well if that is all you have.
- To make the crust whole wheat, I recommend doing a mix of 75-25 all-purpose and wheat flour.
- Add the bread machine pizza dough ingredients to the machine in the order listed. Each ingredient interacts a certain way with the other ingredients so adding the ingredients in the order listed will ensure that everything goes perfect.
- Preheat the oven with your pizza stone inside of it. This is how you get that perfectly crispy crust!
- To make a thin crust, stretch the dough out thinner and reduce the cooking time by several minutes. Prefer a thicker crust? Make the pizza smaller in diameter, add a few minutes of bake time and keep a close eye!
As you can see, once you get this bread maker pizza dough recipe down, the possibilities are endless! Now lets get to it!
Pizza Dough Ingredients
- Flour – Bread flour will give you the best results, but even all-purpose flour will give you better results than many store-bought pizza dough options.
- Salt adds flavor to the pizza dough keeping the flavor well balanced.
- Warm Water – warmer water will speed up the yeast activity. Do not go above 100F though to ensure that yeast is not killed and thus renders it useless. Most bread makers will heat the dough as it’s being kneaded so room temperature water is fine too.
- Granulated Sugar – the sugar will add flavor to the pizza dough, help the crust brown and keep it moist. Sugar can be replaced with honey as a natural alternative.
- Yeast – either active dry or instant dry yeast will work for this dough.
- Oil will keep the pizza dough soft and prevent the crust from getting too hard as it bakes. Adding 4 tbsp as the recipe recommends will give you a very soft crust. If you’d rather have a bit more chew add only 2 tbsp and replace the other 2 with warm water.

How to Make This Bread Machine Pizza Dough
For detailed recipe instructions, see the recipe card at the bottom of the post.
- Add all the ingredients to the bread maker in the order listed. Close the lid and choose the cycle that says leavened dough. This is typically a 90-minute dough cycle.
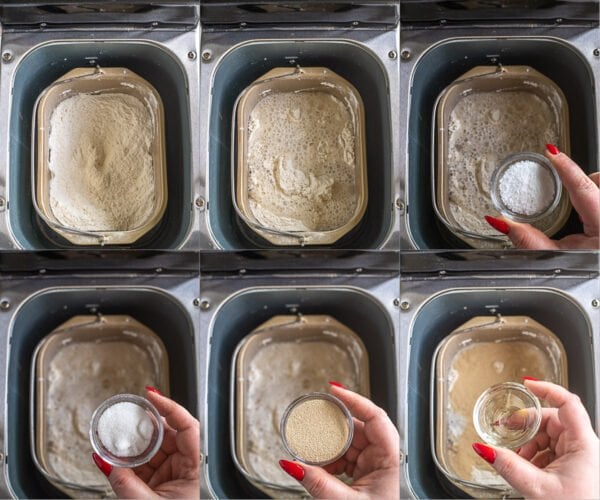
- About 20 minutes into the dough cycle, check the texture of the pizza dough. You want to see a smooth, soft ball of dough that has all the flour incorporated. If it looks too runny, add a tablespoon or two of flour at a time until the texture looks correct. On the other hand, if it looks too thick, add a tablespoon at a time, then continue the dough cycle.

- Preheat oven: 30 minutes before the dough cycle on your bread machine completes preheat the oven to 500F with the baking rack in the top third. Add the pizza stone or steel if you have one to preheat together.
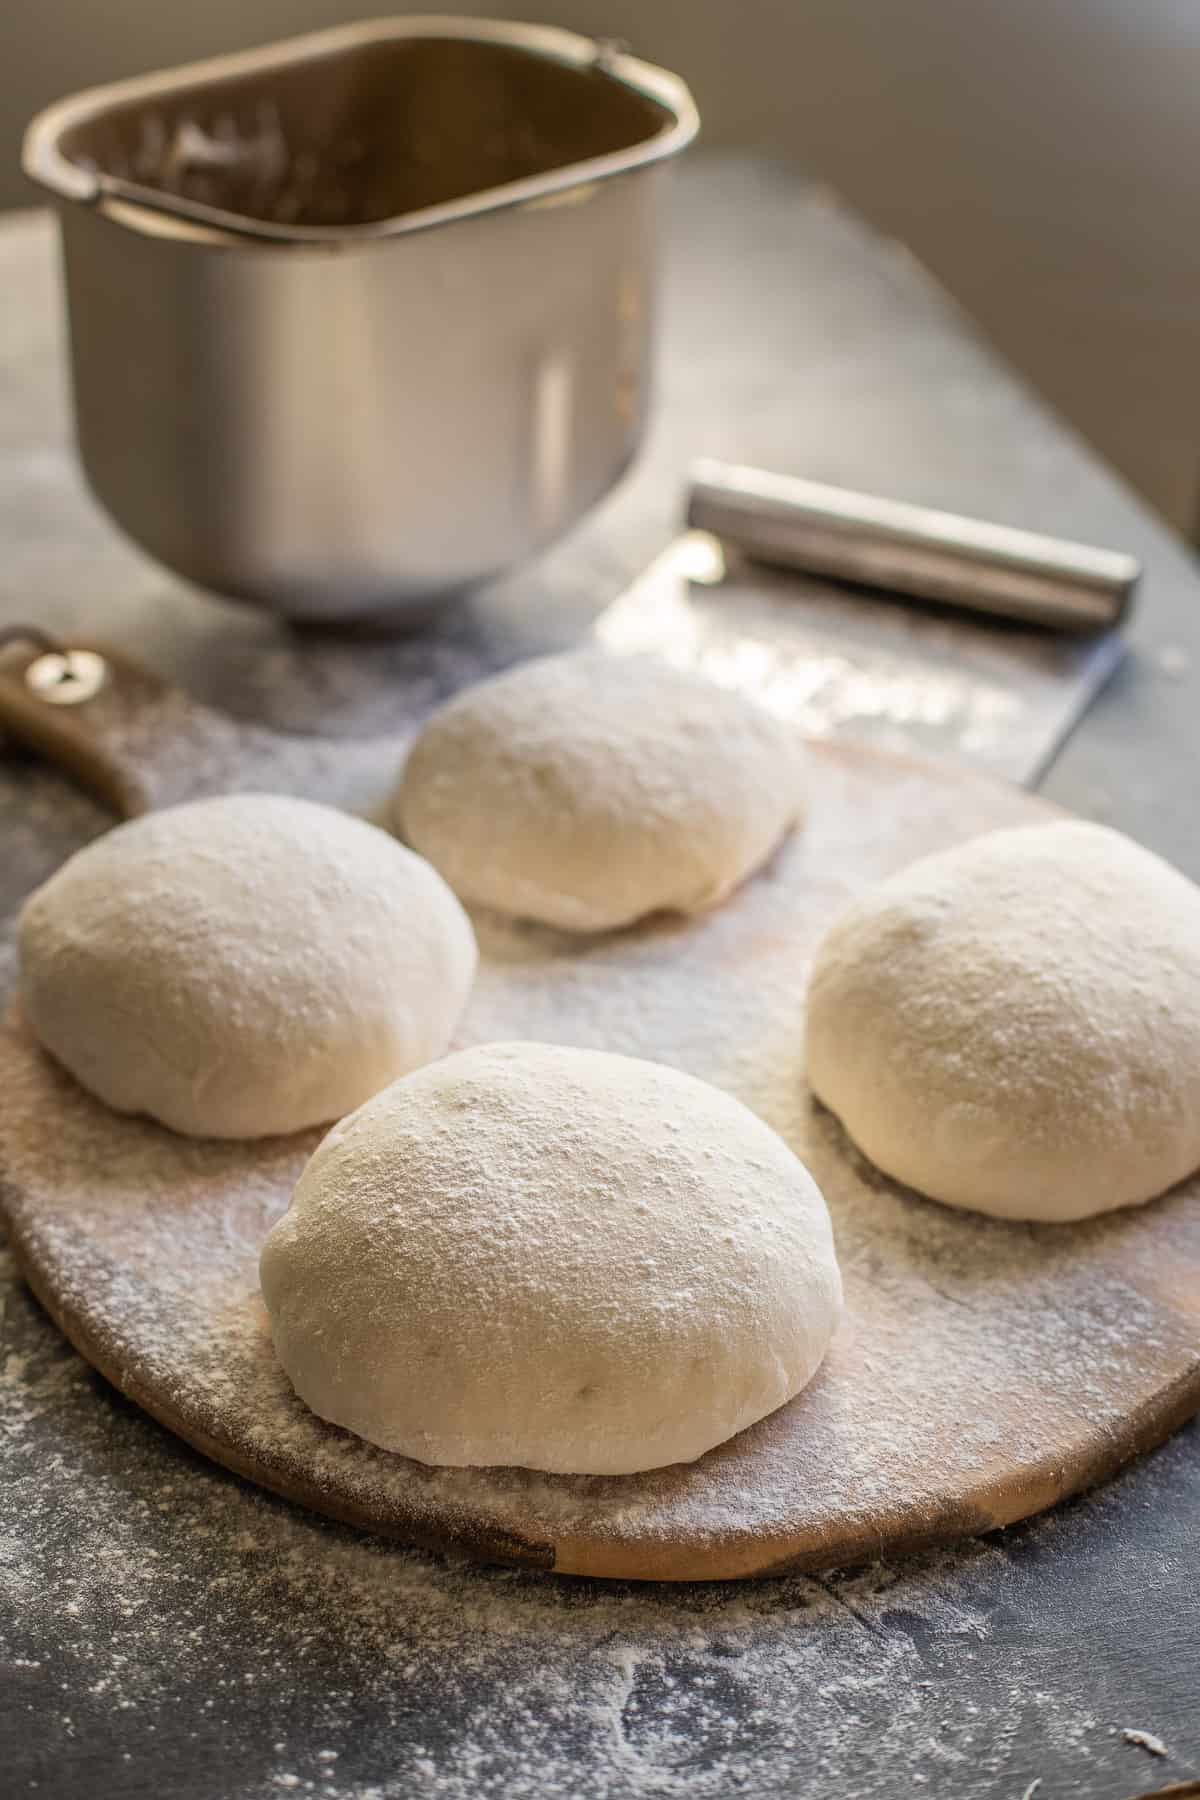
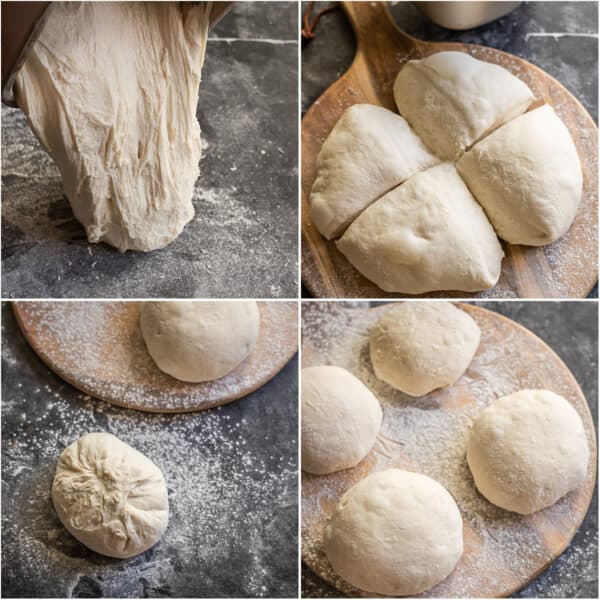
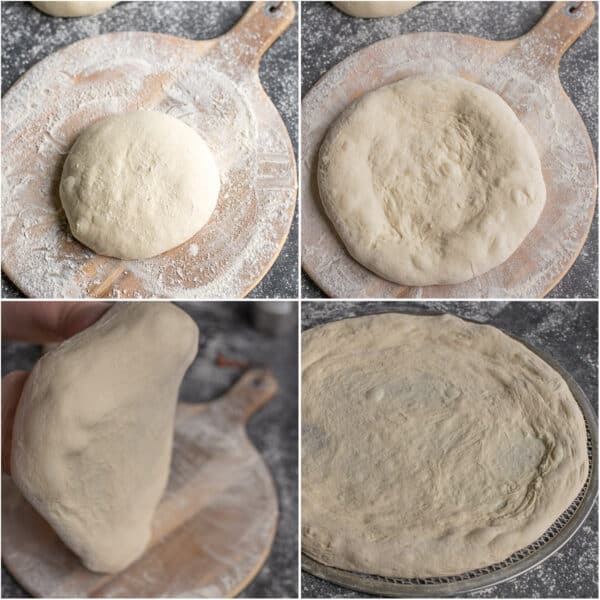
- Divide: Once the dough cycle is finished, remove the ball from the machine and dump it onto a lightly floured surface. Divide into four equal pieces.
- Make each of the four sections into a taut ball by flattening each into a patty and then folding in half over and over until you are no longer able to do so. Then tuck in the ends to form a ball shape out of the homemade pizza dough.
- Rest: Allows the dough to rest on a well-floured board or in an oiled baking dish allowing plenty of space for expansion, covered with either plastic wrap or a kitchen towel to prevent the skin from forming. Resting the dough will allow the gluten to relax and make it easy to stretch the dough into a pizza.
- Shape: flour the working surface well. Place the dough ball in the middle then with the flat part of your fingers start to flatten and stretch the pizza starting from the center and working outward, not touching the outer 1 inch of the pizza. Then stretch it over the knuckles of your hands into a 12 inch pizza pie.
- Add your favorite, sauce, cheese & toppings.

- Bake in a preheated oven for about 7 minutes or until the edges are well browned, and the cheese in the middle is bubbly. Remove from the oven, cut into wedges and serve immediately.
What Toppings Should I Put on My Bread Maker Pizza Dough?
One of the best parts about pizza is that it can be customized to your tastes. You can add any toppings you want to your bread maker pizza dough, but here are a few ideas.
Sauce
Want a “classic” pizza? Go with red sauce! I highly recommend using a good-quality tomato sauce (this is the base for your pizza, after all).
Don’t limit yourself just to tomato sauce, however. Some other pizza sauces include olive oil, pesto, alfredo, or even a white pizza sauce. I also really like bbq sauce on my pizza!
In a pinch, a mixture of half and half, cream cheese (I know, but trust me), pressed garlic and a good amount of grated parmesan cheese will save the day and make an amazing white sauce. Make sure to season with salt and pepper to taste too. Just use a whisk to bring it altogether and spread it over the pizza crust before adding the toppings.
Cheese
This bread maker pizza dough can be topped off with so many cheese options! The best cheeses for pizza include mozzarella, parmesan, and feta cheese. Some other good cheeses to add to the base of mozzarella are gouda or cheddar if you want to go with a sharper taste. Mix and match for extra flavor!
Meat
Meat pizzas are a favorite in my house. Some ideas are:
- pepperoni
- grilled chicken (hello leftover rotisserie chicken)
- ground beef
- sausage
- bacon
- Canadian ham
Veggies
Add some delicious vegetables to make it a veggie pizza. Ideas include:
- mushrooms
- artichokes
- onions
- peppers
- tomatoes
- olives
- spinach or arugula (to finish off the pizza)
- pineapple chunks
Herbs
This is your chance to get creative for even more flavor. My favorite herbs for pizza include:
- sauteed garlic
- oregano
- basil
- pesto (a combination of herbs, nuts & oil)
Can I Freeze This Recipe?
I like to keep a few frozen pizzas in my freezer for those busy weeknights. And thankfully, this homemade pizza dough freezes very well.
To freeze:
- Once the dough is done, divide it into portions, oil well, and place into a freezer-friendly plastic bag.
- Freeze for up to 2 months.
- To thaw, leave in the fridge for 8-12 hours, then continue from step 4 in the recipe.
Scroll to the bottom for the full recipe with precise ingredient amounts.
Can I make this recipe without Bread Maker?
Yes! You can use the same exact recipe to make pizza dough by hand with just a bowl, or a stand mixer.
- Mix & Knead: To convert the recipe just add all of the ingredients to a bowl and mix until it comes together. Then knead for about 5-10 minutes or until the dough becomes smooth and tacky to touch.
- Add oil: Next, add the oil, one tablespoon at a time and knead it in.
- Proof: Oil a large bowl and set the dough inside. Cover with a kitchen towel and leave in a warm place until it doubles in size.
- Use to make pizzas or calzones.
More Bread Recipes to Try:
- 4-Ingredient Artisan Dough Bread – if you have the time, make this dough for your pizza. The flavor will blow you away!
- Easiest Bread Ever (bread Machine Recipe) – fresh bread with no effort? You got it!
- Baguette Recipe – go fancy and make this baguette at home. The crunch, mmm..mm!
- Homemade Pita Bread Recipe – nothing beats freshly baked, soft pita pockets.
Bread Machine Pizza Dough
This bread machine pizza dough will make pizza night your favorite meal of the week! Perfectly crispy, chewy, yet pillowy soft this homemade pizza dough beats anything you'll ever get at the store. Plus, it's super simple!
Ingredients
- 4 cups bread flour or all-purpose flour
- 1 tbsp kosher salt (reduce by 1/3 if using table salt)
- 1 3/4 cups warm water (100°F or less)
- 1 tbsp granulated sugar
- 1 tbsp Active Dry Yeast or Instant Dry Yeast
- 4 tbsp olive oil
Instructions
-
Disclaimer :This recipe is for a 2 lb bread machine pan. Reduce the ingredients by decreasing the "servings" above the ingredients in the recipe card, to fit your bread machine pan size.
Add all ingredients to the bread machine's baking pan in the order listed (4 cups flour, 1 3/4 cups water, 1 tbsp salt, 1 tbsp sugar, 1 tbsp dried active yeast, 4 tbsp oil). Close the lid and turn the bread maker to the "leavened dough" cycle which typically runs for 1 hour 30 minutes.
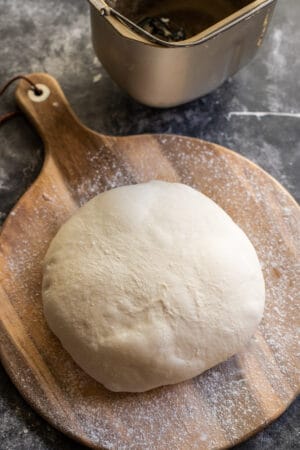
The dough will look very lose at the beginning, but will ball up around the kneading paddle into a very soft ball towards the end of kneading as the gluten is strengthened and the flour has absorbed the liquids.
After about 20 minutes of the cycle check on the dough to make sure that all flour is incorporated and you have a smooth soft ball. If the dough looks too runny, add a little more flour, one table spoon at a time, until the dough comes into a soft ball. Do not add too much flour or the pizza will be doughy and dense.
-
Preheat oven: Meanwhile, place the baking rack in the top 1/3rd of the oven, then put the baking stone or steel on top. You can also use several baking sheets stacked on top of each other for similar effect. Preheat the oven to 550F or as high as your oven will allow for 1 hour before baking.
-
Divide and Shape pizza dough: Once the dough cycle is complete turn the dough out onto floured surface and divide into 4 equal pieces, use a kitchen scale if you prefer to be precise.
Shape each piece into a taught ball. To do so, flatten the ball into a patty, then fold it in half, then in half again. Continue folding in half until it is too hard to fold it in half again. Now tuck all ends under until you have a smooth, taught ball.
-
Rest: Set aside, smooth side up to rest on floured surface for about 15 – 20 minutes or up to an hour, spacing the pizza balls about 4 inches. Allowing more rest time will make it easier to stretch the dough. Do not leave for too long or the dough will overproof and make the pizza edges flat.
Lightly dust the pizza balls with flour and cover with a tea towel to prevent a crust from forming. (See Note 1)
Tip: If you're not ready to bake after forming the pizza balls, you can place the dough onto a baking sheet pan, dust with flour and let for 15-20 minutes at room temperature. Then, cover with plastic wrap and transfer to the fridge for up to 5-6 hours.
-
Prepare the toppings: depending on your preference prepare the toppings & sauce for the pizza.
-
Stretch: flour your work surface well, then add 1 dough ball while keeping the remainder of the pizza dough covered.
Now, gently press in the middle of the pizza ball with the flat part of your fingers working around a circle from the inside towards the outer edges to stretch the ball into a 10" – 12" without deflating 1 inch of the outer edge.
You can also stretch the dough over your knuckles, moving the dough continuously to ensure same thickness of the dough throughout.
Tip: Avoid using a rolling pin to roll the pizza dough, while a simpler and quicker method this will deflate the dough, and the pizza will not be as airy and light as it would be if you stretch the pizza.
Transfer the pizza dough onto parchment paper (my preferred method), pizza pan (I use this one, but you can use any). If using a wooden or metal pizza peel generously sprinkled it with semolina first, then shimmy the pizza dough back and forth several times to ensure it's not sticking to the peel.
-
Add toppings: add about 1/4 cup of pizza sauce and spread it around evenly, staying off the edges. Then add about 1 1/3 cups of grated mozzarella cheese (full fat) followed by toppings of choice.
If using a wooden pizza peel to transfer the pizza make sure to shake the pizza on the peel back and forth every so often as you're adding toppings to make sure the pizza does not stick to the pizza peel.
-
Bake: slide the pizza onto the hot stone/steel and bake for about 7 minutes per pizza, or until the edges of the pizza are well browned and the cheese in the middle bubbles, keeping a close eye to make sure that it does not burn. Note the bake time and set the timer for the second pizza for that time. Using a timer is very helpful at preventing the pizza from burning.
If baking inside a pizza pan with no pizza stone/steel, bake for about 13 minutes or until the edges are well browned and the cheese is bubbly in the middle.
-
Remove from the oven: my favorite way to get the pizza out of the oven is to use a metal pizza peel, it slides under the parchment or pizza easily and is easy to clean and maintain.
Transfer to a wooden board, cut into wedges and serve immediately.
Recipe Notes
Note 1: Make ahead –
- If not planning to bake the pizza right away place each pizza dough ball into a well-oiled container that will allow the dough to expand at least 2-3 times the current size, cover with a lid and refrigerate for up to 5 days.
- When ready to use leave at room temperature for about an hour and then stretch into a pizza, top with sauce, cheese, and toppings, and bake.

Thank you for following me on Instagram, Facebook & Pinterest!
Hashtag your photos #LetTheBakingBeginBlog so I can see your creations and for a chance to be featured!
Marina | Let the Baking Begin


I’ve tried making this recipe as is twice, and each time, my dough looked like I just got done making slime. I even added in additional flour a few minutes into the process. It was just so sticky and tacky, and ended up having to throw away both batches. I’m not sure what or if I did something wrong , but for me, both times, ended up in failure.
Hi Holly,
So sorry to hear it went so bad 🙁
For future, anytime your dough isn’t coming together like you’re describing, let it rest for 10 minutes, then add a little more flour, and keep adding more until it gets to a very soft dough consistency.
And even if you don’t add too much flour and it doesn’t look like it came together since you’ve already spent the ingredients, just let it proof for 1-2 hours and see how it looks then. Sometimes, the rest allows the flour to be hydrated, the yeast helps the fermentation which further allows the texture to thicken up and become dough-like.
But, at the core I think what the issue was – the flour was too low-protein for this recipe, which can be remedied by adding more flour, or using higher protein flour (like bread flour), or from the beginning adding less water.
While it didn’t help with what happened already, hoping this can salvage ingredients in the future.
I made this last night and it was so good!! I can’t wait to make it again soon!!
Not clear why split into 4 pieces, even if I change from 8servings to 4 it still says 4 pieces.
Does this make 4 pies? Each ball separate.
Excited to try my first home made pizza
Just got a new bread machine, and this was one of the first recipies we tried. The Pizza was amazing!! It was so effortless too. I used to work at a pizza joint so I may have an unfair advantage compared to a complete beginner, but still I would rate this as just about as easy as it gets. And SO GOOD
That’s an awesome review! So happy you liked this pizza dough!
Can I used Artisian bread flour
Yep!
This recipe worked perfectly for me using King Arthur bread flour and my Cuisinart breadmaker. I did 2 tbsp each oil + water instead of 4 tbsp oil and otherwise followed the recipe exactly. This crust makes way better pizza than I can get near me or that I’ve ever made with store bought dough. Thank you!!
Question for you. Most bread machine recipes have you add the wet ingredients first, and keep the yeast away from the salt. Is there a specific reason I need to add the ingredients in the order you list?
You’re right, about the yeast usually not mixed with salt.
If you’re going to add the ingredients and start the cycle in awhile, then that is the best way to go for sure. If you’re adding the ingredients and starting the cycle right away, the salt doesn’t have the time to dissolve with just the water and effect the yeast’s leavening power, so in that sense it doesn’t matter. But, if you’d prefer to add the salt on top of the flour, away from the yeast, that is perfectly fine too.
This was the gooiest, messyest dough I’ve ever made and it turned out to be fantastic!! My best homemade pizza EVER!!
Haha, I love it! So happy when people find the recipes I create, delicious 😀 Thank you for sharing!
I followed the directions exactly as written and this pizza came out PERFECT. My only issue was that the outer crust was very very high, but I am assuming this is user error more than anything. I need to practice stretching dough more! Absolutely delicious pizza crust that will be a weekly staple moving forward.
I had high hopes to try something different, the website was well written and I was drawn by the many positive reviews. However – it was not great! Appreciate its a trial and error approach, perhaps bread machine performance. From the UK, so maybe the ingredients are different to US in some way.
Very loose and unusable dough, even with adding more flour to the process. Followed the instructions on the quantity and order of the ingredients. Had to chuck it all away as it was just unsalvageable.
Also for a bread machine, I usually add the wet ingredients first before the dry. This recipe said flour first, it just didn’t mix well and had unmixed flour at the base.
Hi Emily,
This dough is higher hydration than usual, so using bread flour might be a good idea if the flour you used didn’t make the dough come together.
I tried 4 or 5 different pizza dough recipes and this one tastes the best! The first time I used all purpose flour, it didn’t seem to support the toppings very well. (We like a lot of cheese.). The second time I used bread flour, it was too dense for the dough and hurt my stomach, it’s way too heavy! I tried different combinations of mixing all purpose and bread flours. If you follow the recipe using half of each flour for the full recipe it’s TOO much and over pours making a big mess of the machine. So, I found that 2 C of bread flour and 1 C of all purpose is perfect. Just be sure to cut your measurements of all the other ingredients to 3/4 as well.
Great recipe and simple. I’ve made lots of pizza dough recipes.
This dough was great – used the recipe just as written. I used KA bread flour. If you used all purpose without reducing the water it was probably way to wet. The amount of Kosher salt listed worked well- consider that it makes 4 pizza dough. The dough rise met the top of the breadmaker and I ended the cycle 5 minutes early. The pizza ended up thinking in the middle with higher edges that had some bubbles just like from the pizzeria. I cooked the pizza for 11 minutes. I will definitely use this recipe again. I’ve tried others that were much denser. Thanks Marina!
I’ve made this dough several times now and it’s wonderful! I’m not great at measuring flour in cups, so I use 512g of bread flour. And I add liquids and salt in my machine first before flour and yeast. Because it’s a relatively loose dough I can see that it might be hard for someone new to bread making to handle. I flour my dough for resting quite a bit, which helps. It’s taking me a bit of practice to stretch the dough without tearing while maintaining an outer inch, but I’m getting better with practice. By far the best pizza dough that I have worked with. Thank you!
Can I just say, THANK YOU!!!!!! I have been looking and trying dough recipes for the bread machine FOREVER and nothing worked. I followed every step from this recipe and I am never buying pizza again. This is absolutely the best bred machine recipe EVER!!!!
Great dough! I did have to add more flour at the check in stage, but that’s fine. My only issue was that my bread maker had a difficult time catching all of the flour into the dough from the edges and I had to get in there with a spatula to get it all to incorporate. Usually my bread maker calls for the water and yeast first, and the flour/salt/sugar on top, which I believe is so that it mixes properly. I might try that next time just to see if it helps and still turns out a great dough. But honestly, it’s really not a big deal to have to help it mix a bit at the beginning.
There is somehh to innocuously wrong with this recipe. This turned out terrible. It was so sticky you couldn’t even work with it. Total failure.
Terrible dough to work with. It was so sticky I couldn’t even make it into pizza. Just stuck to my hands despite adding flour.
Hi Lauren,
This happens when the dough is over-proofed and the gluten network that held the dough together and made it elastic and not sticky, broke down.
We followed the instructions and it was perfect.
Outstanding pizza dough, very easy to work with! I love your cheese danish recipe as well!
Thank you, so much!!
The dough came out so gooey for me! Should it be 1tsp of yeast not 1tbsp?
Thank you! I have made this recipe a few times and is the best crust/recipe ever!!!! The best!!!
Hi can I ask is 1 pizza 1 serving? Many thanks
I haven’t tried this yet. How many regular size pizzas will it make? I have a round pizza pan that’s probably 14″ in diameter. I usually make a sheet pan size pizza (Pillsbury roll out.) What should the weight of each ball of dough be?
Hello, I’ve made this dough twice as directed and it has come out exactly as described.
It’s easy too work with and tastes delicious. Thank you for the tips and the topping ideas. I will check out your other recipes!
Do you have the measurements in mls as I find this more accurate. I’m using bakers flour which has a high protein content
This dough came together perfectly for me. It was very good and so easy to make. We thought the pizza we made was even better the next day. It got crisp and the dough had even more flavor. Will definitely be using this again.
This is perfect.
My whole family gave the dough a thumbs up. It will be my go to recipe.
Carefully follow the recipe and you will be quite happy.
ALSO, read the whole article so you appreciate the recipe you are using. (Often I feel like articles are expanded just so more ads are scanned, but this article is a delight to read.)
Way too much water, the dough was almost soupy. I didn’t check it early enough so I’ve restarted the batch and will gradually add flour to try to save it. I should have trusted my instincts and checked another source before making this recipe. Many sources have almost 25% less water.
Hi Charlene, sounds you missed the step that said to check on the dough and add flour as needed.
It’s important to read the instructions thoroughly or you can miss a vital step and not get the desired results.
The reason why the instructions tell you to check the bread maker while it’s mixing – different flours will absorb different amounts of liquid. Sounds like the flour you used needed a little more flour.
Yes! I had a thick soup like consistency as well. Very disappointing as I didn’t notice until after dough cycle on my machine.
Fantastic recipe and thorough instructions, this turned out so good. Thank you!!
We love this recipe! Would you use the same amount of flour if you used the 00 flour?
Yes. 00 just means that it’s more finely milled and the gluten will form faster, but as long as the protein content is the same it should require the same amount of liquid.
I made this recipe a couple of times now and it does well I’ve found letting the dough rest for about two hours after you separated Into to half makes it much easier to roll out Also I’ve just added one tbsp of itiialin seasoning to the dough to add some great flavor to the dough and it also smells amazing
Great recipe! Worked great for me. I made two batches tonight for serving a bunch of make-your-own personal pizzas to family guests visiting during the Thanksgiving weekend.
One of the things I wonder about people who complain is if they make the necessary adjustments with water or flour. I live at high altitude in a dry climate. Flour simply keeps drier here and more liquid is usually needed.
this recipe has an absolutely idiotic amount of water in it. All it did was make a giant mess that was impossible to clean out of my bread machine and left me with maybe half of the dough which was just a useless liquid.
Absolutely worthless.
Hi NILZ,
Sounds like you might’ve measured the ingredients incorrectly, or used the wrong type of flour. Could any of these be the reason why the dough was so thin?
LOVE LOVE LOVE this recipe! Very very easy to work with, yes I added some flour in but honestly wasn’t much for me to question the recipe. Also confused with people saying the dough was too salty, I used table salt since that’s all I had on hand and it still turned out perfect.
Best pizza I ever had in my life!!!!
wow! that’s so awesome! thank you for sharing your feedback!
Hi, how much honey would you put to substitute the granulated sugar in this recipe?
Many thanks Ali
Hi Ali,
Just add the same amount as is listed for sugar.
I have made this dough every week since we got our wood fired pizza oven. It’s absolutely delicious and does enough for 4 big pizzas or 6 smaller ones.
I actually bought some shop bought dough to try and make life easier. Both me and my husband said your dough was nicer but also LESS EFFORT than shop bought. Thank you so much
Could you make this in advance and freeze this dough ?
This recipe turned out amazing. I used 2 1/2 cups all purpose flour and 1 1/2 cups durum wheat flour. I also went with the 4 tbsp of EVOO and the pizza turned out fantastic. It was very easy and pliable to work with and didn’t fight me to shape a round pizza on my stone. This recipe is perfect for me and the only one I’ll use in the future. Thank you for the recipe!
I got a New bread machine today, and this was the first recipe I tried! So easy! So yummy!
I was a little intimdated by the stretching instructions, as I’ve basically never handled dough before. Its why I got a bread machine of course. The first of the 4 dough balls got too stretched and ended up in the bin, but the next one went smoothly. I used silicone baking mats to stretch the dough and assemble the pizza, so I could easily tranfer it onto a hot cookie sheet. It worked great for me. I baked at 450 degrees for 12 minutes. I’d describe the crust as somewhere between digorno and papa johns, but tastier. Insanely delicious with garlic butter. Unless I’m specifically craving detroit style deep dish, I would be all too happy with this pizza anytime I’ve got that inkling for a good pizza.
This recipe has been wonderful! I dont know why there are any negative comments saying it didn’t work, it’s all about trial and error. Too watery add some more flour after 20 mins like it says, and all good! I’ve made this dough 3 times so far, first time came out perfect, I used quick ride yeast, the next time I used regular active dry yeast and the dough was SO sticky, didn’t come out nearly as well but it still made a really good pizza, third time I once again used quick rise yeast and it was perfection. So I highly recommend using bread flour and quick rise yeast 🙂
I just want to thank you for the recipe. I had packed my breadmaker away with the intent of selling it in the new year and discarded all my recipes, then me daughter asked if we could have home made pizza for Christmas dinner and yours was perfect ,it made the perfect crust the the everyone’s different pizzas. Again thank you and Merry Christmas
I’ve made this recipe several times, as written, with zero issues. I came by the comments today for the first time because I’m getting ready to use the recipe to make garlic sticks to go with our pasta later and wondered if anyone else had tried it and left a comment or tips. I’m very confused by these comments. I’ve made perfect pizza dough in my bread machine over and over with this.
As is, too salty and watery! BUT I experimented a bit and with 1 and a third cup of water, and 1.5 teaspoons of kosher salt, it was perfect!!! Loved finding this because it tastes like crust- not like bread with pizza toppings.
Recipe is too wet. If the instructions ask me to go back to the bread machine and add flour, the recipe is incorrect. If you’re looking to make this, I would use maybe 1 cup of water as opposed to 1 and 3/4. My dough overflowed in my bread machine as well. It is simply to large a mass for a 1.5 pound bread machine.
Hi Shannon,
The recipe is correct for my particular flour, water, bread maker, measuring tools and environment.
If you use all the same exact things I use, in the same exact environment you’ll get the same exact result. But, most likely we all are not using the same flour, or anything else, so while I give as much details as possible in the recipe so that you can replicate my success, I understand that your equipment and ingredient type/quality might be different which will have an impact on the end result.
To make sure that this recipe can work for ALL instances regardless of circumstances, etc. I give you ways to troubleshoot on the spot. Adjusting the recipes for your circumstances is what people do all the time.
You were smart to adjust to your circumstances, and that is something that we all have to do from time to time when trying a recipe. Doesn’t make the recipe wrong, just means that you weren’t in the 100% exactly the same circumstances that I had in my kitchen. Hope this makes sense.
Great flavor and a good crust once I added enough flour. Crispy on the outside and soft inside. I was out of Kosher salt and reduced the amount of table salt per the recipe.
I am an experienced home baker. I’ve made bread dough by hand and using using the dough function. I understand the challenges of humidity and how to properly measure my flour. My dough was wet, like added probably 1-2 cups of flour once I was done. I will be using this recipe again however I’ll probably start with more flour and go from there.
We cooked ours in my hubby’s green egg smoker. I was a bit concerned that the dough would hold up if the temp got too high. It was great and I can assure you it got way hotter than what was part of the recipe. If you have a smoker I highly recommend trying it.
Cooking pizza in a smoker/grill is such a great idea! The hotter, the better when it comes to pizza so I bet it was amazing!
I’m making this now, but I always read comments for just in case. I use sea salt & know how salty it is.
Just a thought. Your description for the bread machine dough did not give how many mins to let it rest after removing it from machine. I read your other recipe for hands on dough making & saw to rest it 15 – 20 mins. That’s what I’ll do. Hope it’s right. I hate when I’m forming it & it keeps pulling back.
Thanks…hope it turns out right! Easy recipe to follow . Plus, if your flour is old, you’ll lose moisture in it. (Read that in another cook “book” ) Always weigh it. I got an inexpensive scale on the big A.
This recipe can’t be right. I followed it exactly. I used bread flour. It was very wet so added flour one tablespoon at a time. I added so much extra flour just to get it to look right.
Delicious pizza dough! I add Italian spices to the dough for an extra punch of flavor. I highly recommend this recipe!
Yikes! Way too much salt & I love salt!.. Totally had to watch my machine & restart the dough cycle several times saying this I’m pretty much an expert with a bread machine ♀️Have owned one since they came out in the eighty’s
Hi Colleen,
Sounds like you might’ve used table or sea salt and not kosher salt in the recipe. Could that be the reason for oversalting? Kosher salt is a lot less salty than table or sea salt.
I used kosher and was also too salty. Also wayyyyyyyy too wet if flour is sifted. Does OP just scoop flour for this recipe???
The flavor was good, and it made enough for a 16 inch pizza. The problem I had in the bread machine was that it was much too liquidy, and I added almost a cup of flour to try to bring it up to par. I wasn’t sure how firm it should be, so I don’t think the crust was as airy as it could’ve been. Any advice on this would be appreciated thank you
Hi Christine,
There’s two things you can do to improve the texture of the dough. You can use a higher protein flour, which will allow you to use less of it, while making the dough airy and fluffy.
Or, you can do what you did already and add more flour. Although, I would start with whatever the recipe calls for and allow it to knead almost the whole cycle, if it doesn’t come together towards the end, then add more flour. Sometimes the dough will start out runny and will firm up as it’s kneaded and the gluten is developed.
Ok, haven’t tried yet but will soon. Just bought another machine (used) yesterday. I made first loaf and it turned out just fine. I would like to address the comments regarding too wet, I’m not going to babysit for 20 minutes! It’s chemistry folks. Did you sift when measuring flour? Did you scoop directly and pack it tight? I moved from Palm Springs 6% humidity to Arkansas 90% humidity. No kidding!
I turn on machine, give it 20-30 minutes and take a look. If the dough ball is slick, smooth and round swell. If there is loose flour in the corners, I add a bit of water. Maybe a few sprinkles from my fingers, maybe a tablespoon. Kinda depends. If it looks loose and gloppy then I add a bit of flour. Maybe a pinch, maybe a bit more. If you have to add cups, something is way wrong. I do this same routine even if I use a pre- packaged dough mix, as the slightest variable can make a difference.
Anyway, once I shop for toppings I’ll be using this recipe for sure. Thanks!
You said it perfectly!
When you say:
“ In a pinch, a half and half mixture of cream cheese (I know, but trust me), well mixed with pressed garlic and a good amount of grated parmesan cheese will save the day and make an amazing white sauce.”
Is this actual half and half dairy, or is it half cream cheese and half Parmesan?
Half and half in US is half milk and half cream.
I reworded it to make it easier to understand because upon re-reading it it did seem pretty confusing.
I don’t know what everyone’s problem is. Mine turned out just fine. I wish I could post a photo. I wish the bottom of the crust was just a little crispier, but the edges were perfect!
Can you use pizza flour in a bread machine pizza dough recipe?
I haven’t worked with pizza flour, so can’t tell you for sure. I’d use it and just keep an eye as it’s kneading that the dough ball comes together into a very soft ball. If it’s too thick, I’d add some water (1 tablespoon at a time) or flour (1 tablespoon at a time), until it gets to proper consistency.
I had to throw it out. I do like the olive oil addition, but the salt killed it for me….and l love salt. I used kosher salt.
Runny. Very runny and added about 1cup more, a bit sticky, but the salt.
Turned out great! To the people having trouble, I suggest you weigh your flour instead of using a measuring cup.
This was the worst pizza dough recipe ever. First of all I look up a recipe to have exact measurements, not have to keep adding ingredients to make it correct. Second this should not be a bread maker recipe, I use a bread maker to make my dough so I can put all the ingredients in, set the setting and walk away until it’s done. This recipe requires you to continuously watch it for the first 20 minutes, then add additional flour, don’t bother with a tablespoon at a time. I ended up adding over two cups more of flour just to get it to form a ball. Once it was done I used even more flour to be able to even work it because it was so sticky. Then it wouldn’t stretch at all because it keep ripping. I’ll never use this recipe again.
Super runny. I’ll add less water next time.
Depending on your flour you might need to add more flour than stated in the recipe, just like it instructs you to in the first step –
Higher hydration dough makes softer pizza crust so only add enough for the dough to come together.
Help! I have made this recipe twice and both times it was so runny I had to add almost 2 more cups of flour. Once I did that I loved the soft fluffy dough but I want to get the ingredients correctly. Can you help?
Dough turned out terrible. Wanted to try a different recipe. Sorry, this is not a good one.
Hi Kiki, thanks for sharing your feedback. Do you mind sharing what went wrong? I might be able to help you troubleshoot it.
Hi Kiki, if you share what went wrong I might be able to help you troubleshoot and get a better result next time. As you can see from other comments from people who made bread following this recipe, the recipe produces good, fluffy bread. If that is not an experience you had, I might be able to help you figure out what has caused it.
Can you freeze the dough?
Hi Stacey,
Yes, this pizza dough can be frozen. Just wrap it well and freeze for no more than 1-2 months. Make sure to put a date on the package so you know when it was frozen.
Also, keep in mind that there are drawbacks to freezing yeast doughs. Freezing yeasted doughs causes them to lose 30%-50% of the yeasts activity, which will prolong the rising process after thawing. To compensate you can double the amount of yeast that you start out with, or just allow for extra rising time after thawing.
Hi Marina,
I spend a lot of time experimenting with different cuisines and cooking styles. Your experienced based instructions on using a bread maker made a world of difference. Mine had been relegated to the garage about 9 years ago through lacklustre results.
The Covid lockdown (Sydney Australia) had me dust it off. The result; several impressive loaves in a row. I tried your pizza dough recipe, great result also but the salt seems to be a bit over the top. (I’m not an anti salt freak.)
I’m glad to hear it, Rick!
I use kosher salt which is the least salt of many salts so if you’re using g just table salt that might be too much.
Hi Rick! Great to hear from you! Making breads is one of the most therapeutic and rewarding experiences and it makes me happy when people find their way to making one themselves.
As to the salt content of the pizza dough, I wonder – did you use kosher or table salt for your recipe? Kosher salt tends to be less salty than table salt, so if you used table salt instead of kosher it might’ve lead to the dough being overly salty.
Best pizza crust ever ……
And you’re my favorite person today 😀
Thank yoU!
What bread machine go you have ?
Great question, Sue. I have this one – Bread Machine