4 Ingredient Artisan Bread Dough
This Artisan Bread Dough recipe starts with 4 classic ingredients for a lean yeast dough that you can prepare in a variety of ways. Keep it in the fridge for up to 7 days and make bread, pizza, English muffins, piroshki, focaccia bread, and even flatbread throughout the week. One dough – dozens of recipes to use it in. What’s not to love?! Incredible flavor, amazing texture, and versatility to boot.
Whether you cook for just yourself or you cook for a family, there are some recipes that you should just know by heart because they’re your staples in the kitchen. This Artisan Bread dough recipe with easy-to-remember ingredients and catchy 4 – 2 – 1 – 1/2 ingredient amounts is definitely one of those.
Even though the word artisan can sound intimidating, I’m here to make the process simple and easy for you to understand and accomplish at home.
Table of contents
What is Artisan Bread?
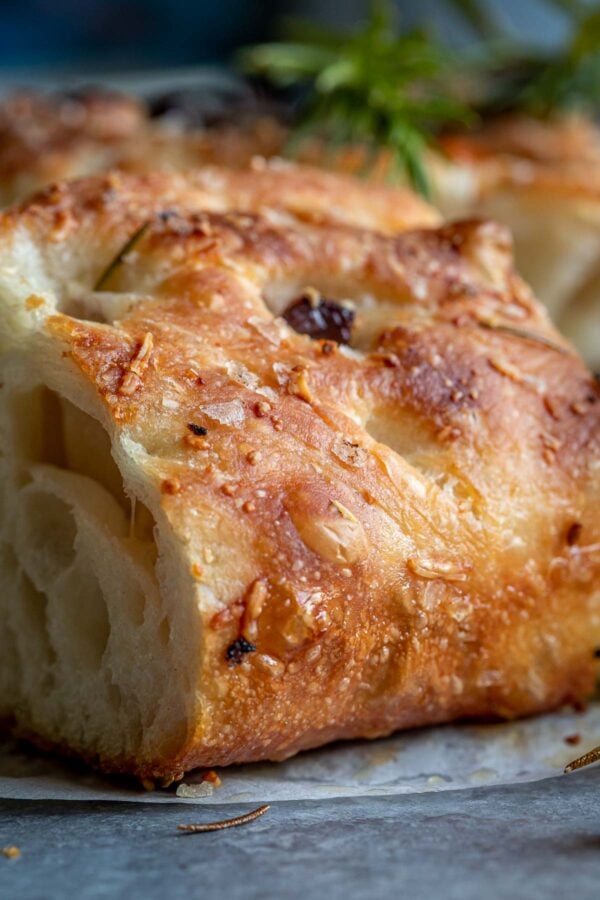
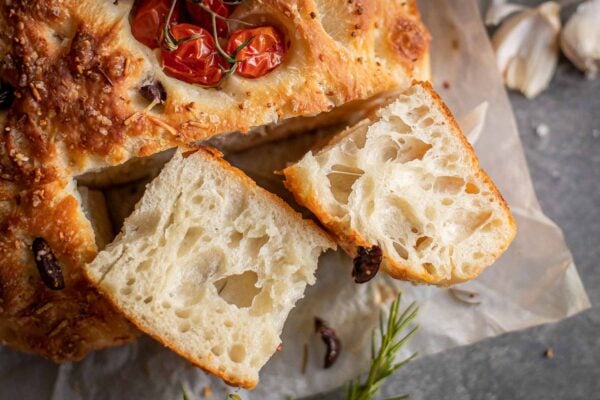
Artisan bread is highly coveted for its amazing texture, flavor, and appearance. Crackly crust, moist, open air pockets of inner crumb full of wonderful aroma make you just want to put your nose up to the slice of bread and inhale slowly.
While there’s no regulation for what makes the bread artisan, there are several things that are expected when referring to a loaf as an artisan.
Artisan bread is typically handmade with lean (no enrichments such as fat and sugar, etc.) ingredients such as flour, water, salt, yeast, and no added chemicals.
Artisan bread’s flavor and texture are enhanced through long fermentation in both cold and warm environments which allows for both good bacteria and yeast to thrive, deepening the complex flavors, improving texture, extending shelf life, and making it easier for our body to break it down.
Why you’ll love this bread dough
- Simple ingredients (flour, water, salt, yeast)
- Easy to remember the recipe (just remember 4, 2, 1, 1/2)
- Easy to scale up or down (even numbers make it easy)
- Highly forgiving (even if it “doesn’t come out,” it’s still going to be better than anything store-bought)
- Doesn’t need fancy equipment (just hands and a bowl)
- Wildly versatile (see the list of things to make with it below)
- Incredibly adaptable recipe (can be made by hand, mixer, or a bread maker if needed)
- Is ready to go, when you are (it can be kept in the fridge for up to a week, and you can pinch away from it to use it for whatever it is you would like)
- Complex flavors & easier on digestion – thanks to prolonged cold fermentation, the good bacteria thrive, helping to create better flavor. Another benefit is that during long cold fermentation, it gives time for enzymes to start breaking down gluten, which makes it easier on our gut.
- Longer shelf life – the cold fermentation extends shelf life by lowering the pH of the dough, which acts as a natural preservative.
- Incredibly delicious, any way you slice it!
How it works
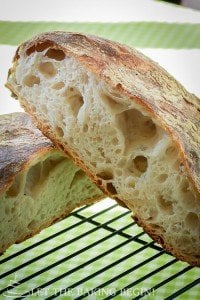
One of the best things about this dough recipe is the open crumb with large holes, chewy texture, and a crackly crust that it produces.
After the introduction of No-knead bread to the world by the New York Times, many people have tried their hand at the no-knead, no-fuss recipe. The simplicity of preparation was way too tempting and the end result was unbelievably good.
This artisan bread dough recipe is based on the same idea but takes it up a notch by adding a step: stretching and folding the dough in the first couple of hours after mixing.
This vital step will improve the texture of the bread, make air pockets larger and more uniform, and improve the crust. It also enhances the extendibility of gluten in the dough, which then helps it trap the air bubbles better, giving you an airier end result.
Another improvement to the well-known no-knead bread is to follow that recipe with a cold fermentation period (aka refrigeration) in addition to proofing at room temperature.
During the cold fermentation, the yeast activity slows down, which allows the bacteria to shine and do their thing. The lactobacilli lower the pH of the dough, increasing bread’s shelf life, flavor, and texture.
This is also the time that enzymes start to break down gluten bonds. This not only improves the extensibility of the gluten (a.k.a allowing the dough to hold on to larger air pockets without collapsing) but also makes it easier to digest, which is especially important to those that have gluten sensitivity.
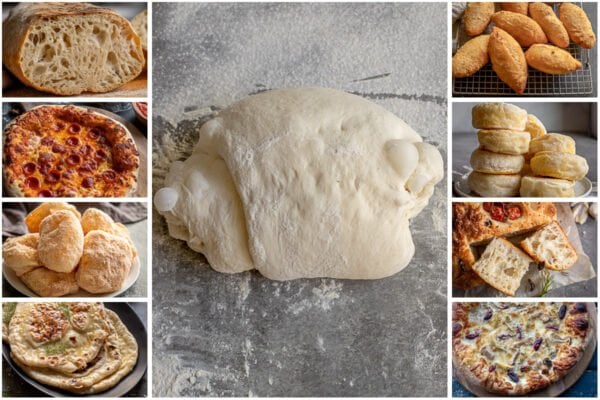
7+ other things to make with this lean yeast dough
I have tested this recipe for many things and here’re just a few things you can make with it: (the recipes of which are to follow). See instructions at the bottom of the recipe card below the post.
- Basic Rustic Round Loaf
- Ciabatta bread
- Focaccia
- Pizza
- English Muffins
- Piroshki
- Elephant Ear Style donuts


The way you shape, bake, or cook this yeast dough will make it taste different and nobody has to know that in essence, it all came from one single basic bread recipe. Make more than one batch of this at once and keep taking away from it to make different recipes throughout the week. How convenient is that?
Artisan Bread Dough Ingredients
***Scroll to the bottom for a recipe card for precise ingredient amounts and instructions.
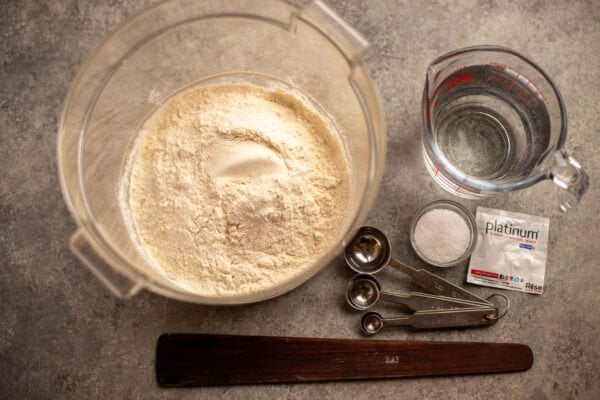
4 – 2 – 1 – 1/2 is what you need to remember when trying to remember the amounts of ingredients that we use in the recipe.
So, 4 cups flour, 2 cups water, 1 Tbsp kosher salt, and 1/2 tsp active dry yeast. How do you remember the ingredients? Well, whatever the number you start with, you’ll have to keep dividing it by two as you go to the next number.
Yes, I know they’re not all the same measurement amounts (going from cups to tablespoons to teaspoons), but once you understand the logic behind the recipe, it will be easy to remember.
- Bread flour or all-purpose flour will both work, but bread flour will give you a better texture.
- Water – room temperature; filtered is best. Otherwise, tap water will work.
- Salt – nothing fancy, but kosher salt is what I typically have on hand, so that is what I use. I use table salt or sea salt; use 1/3 less.
- Yeast – dry active yeast or instant yeast will work for this recipe. I use Platinum superior baking yeast because it always gives me better risen baked goods.
How to make the Artisan Bread yeast dough:
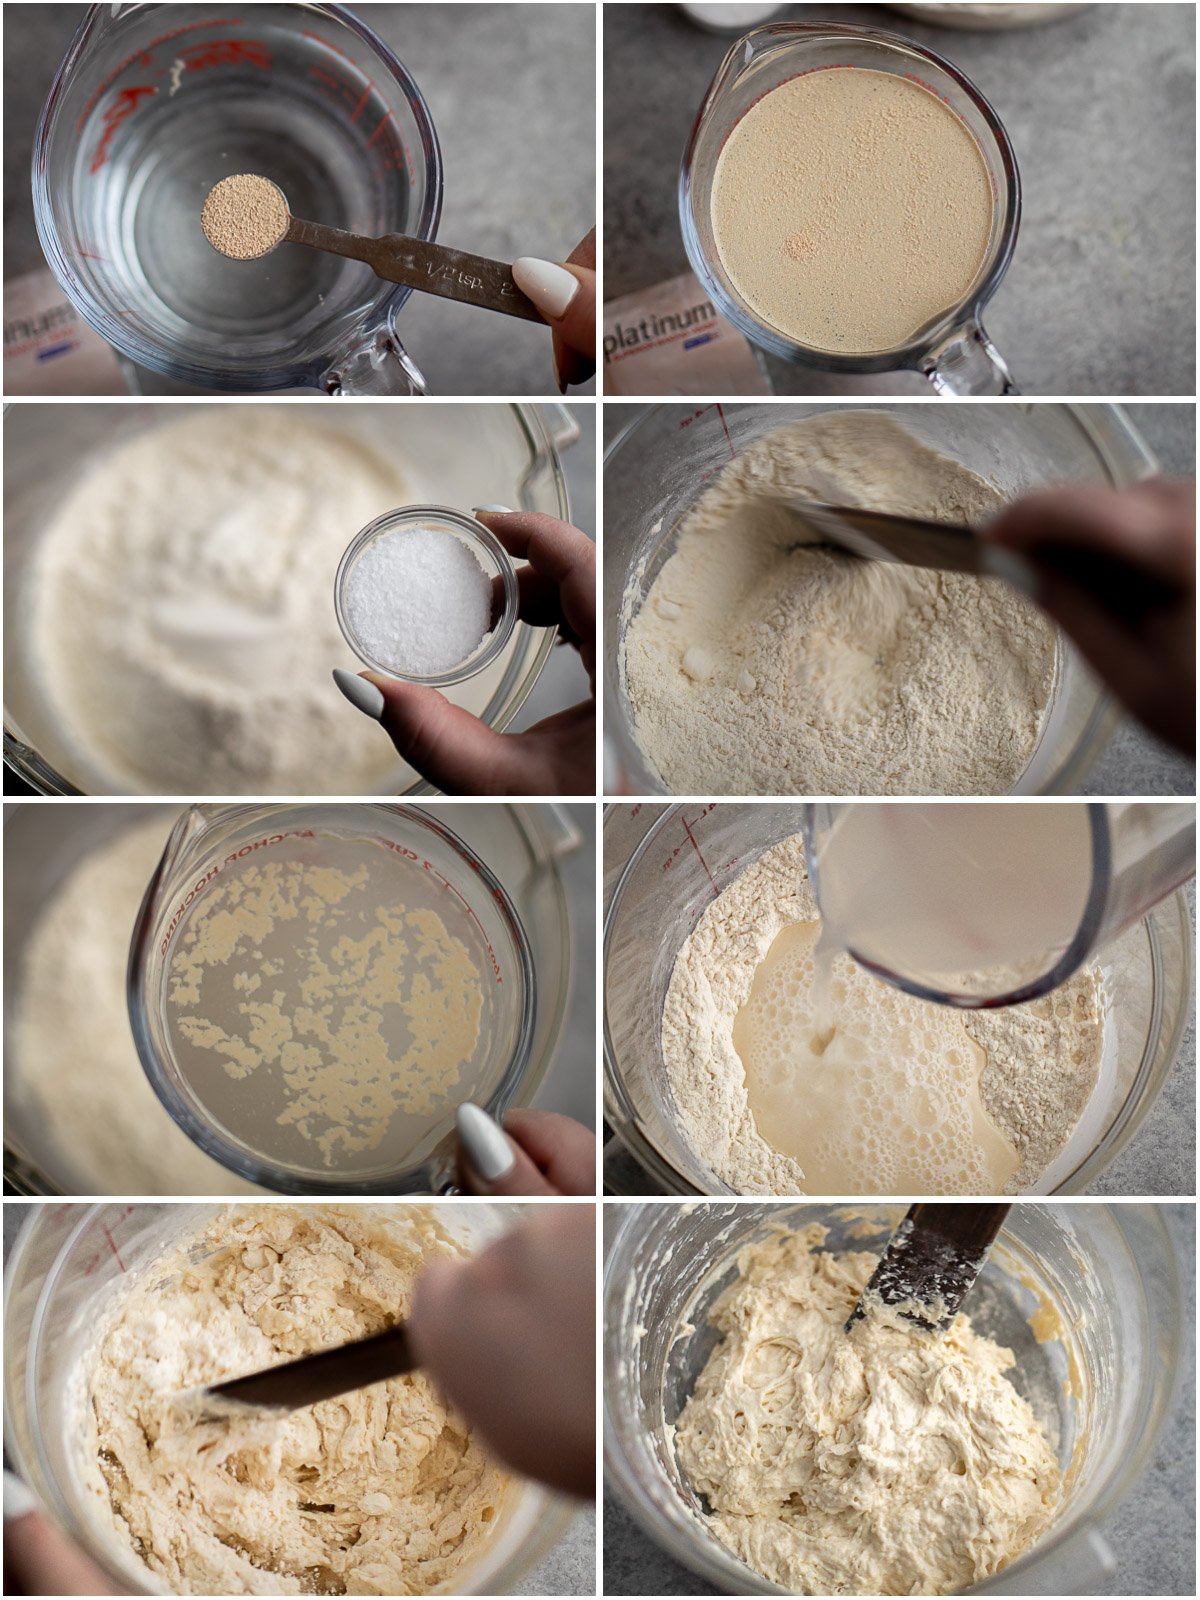
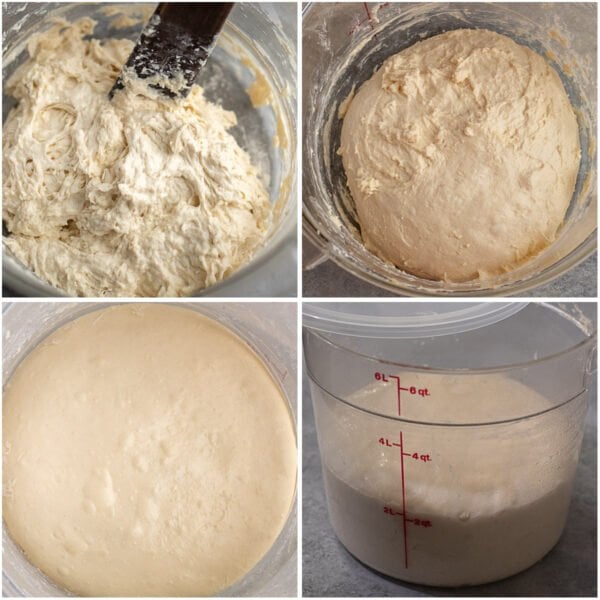
- Combine ingredients: In a cup stir water and yeast until dissolved. In a large bowl stir the flour and salt. Now add the yeast and water mixture into the flour mixture and using a wooden spoon or spatula stir to quickly bring the ingredients together into a shaggy dough.
- Rough mix & knead: Using your hands knead/mix everything together for about 2-3 minutes or until all flour is incorporated and all ingredients are well distributed through the dough.
The dough will look wet and rough at this point. Scrape all dough off your hands with the dull side of the butter knife and add it to the dough.
- 1st rest: Cover the bowl with a kitchen towel and leave the mixed dough to rest for 30-60 minutes at room temperature. This further hydrate the flour and activate the gluten formation.
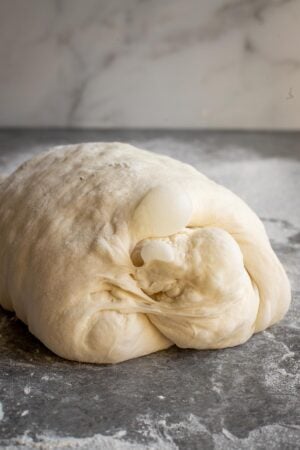
Stretch & Fold: Now, grab the side of the dough and pull it up until it stretches, but before it starts to tear, and fold it over the dough. Go around the bowl and continue with stretches and folding. Turn the dough over, smoother side up. Cover and allow to rest again.
- 2nd & 3rd Rest & Fold:
Repeat the stretch & fold 2 more times over the next 2-3 hours allowing about 30 minutes to 60 minutes between each. - Bulking period: Cover the dough and let rise until almost doubled in size. This is called bulking period, or the period after adding the yeast and before the dough is pre-shaped for baking, about 12-18 hours.
- Cold fermentation: then, cover and transfer to the fridge for at least 12-24 hours or up to 5-6 days. The dough’s flavor profile, gluten’s extensibility and flexibility, and the final product’s shelf life will be improved through this process.
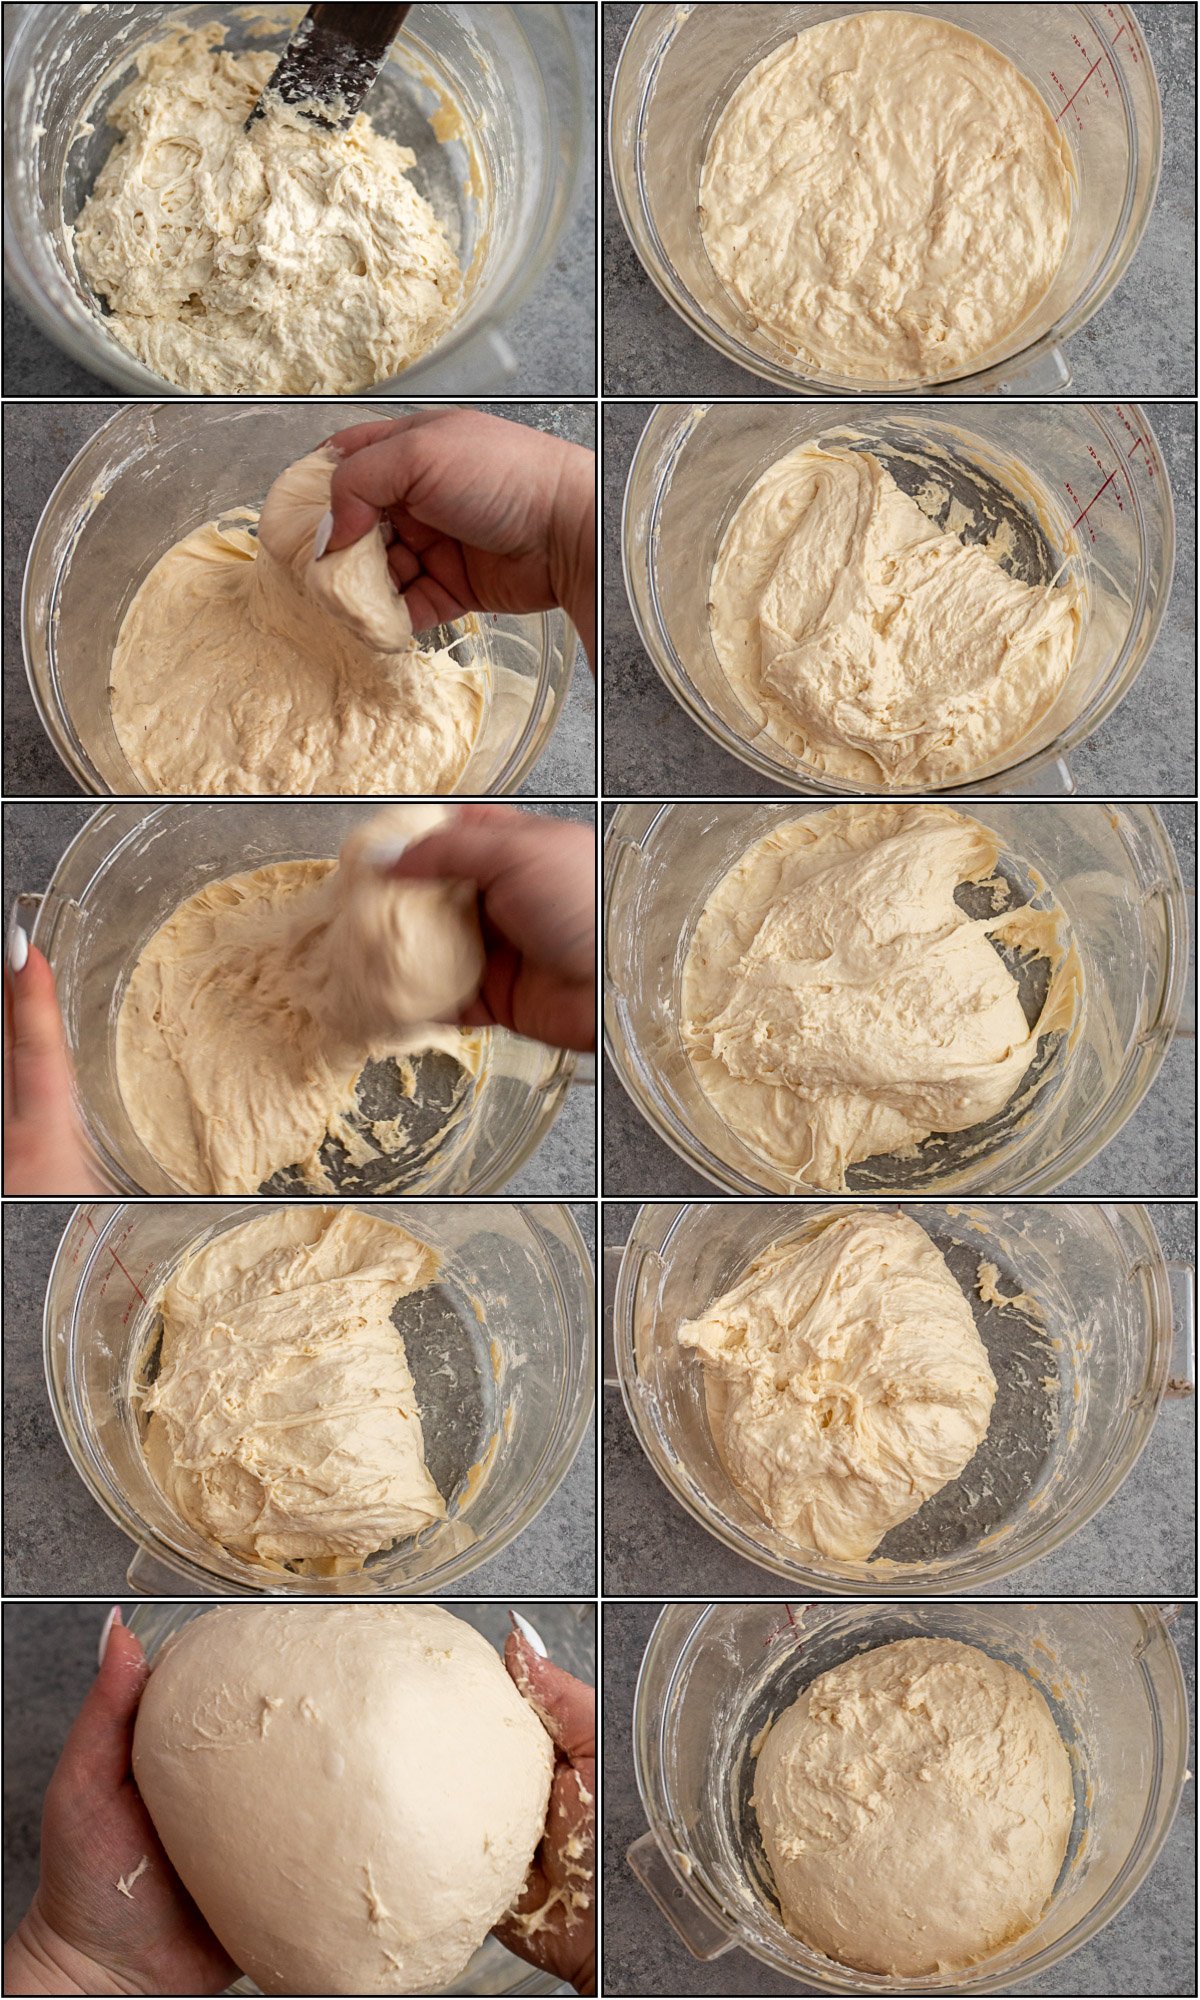
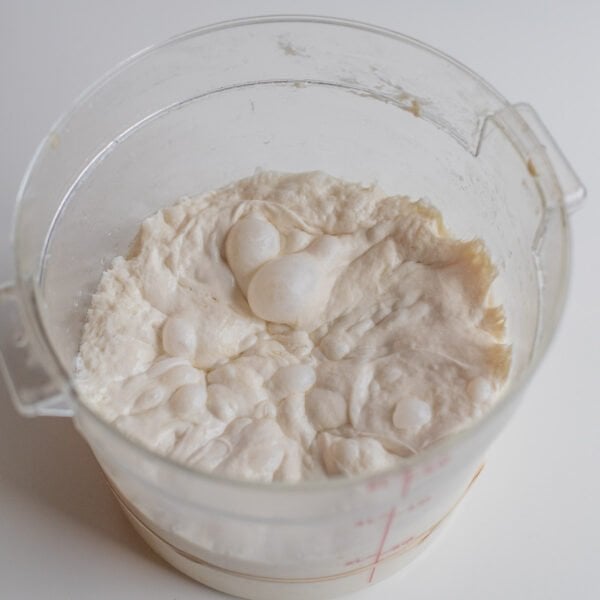
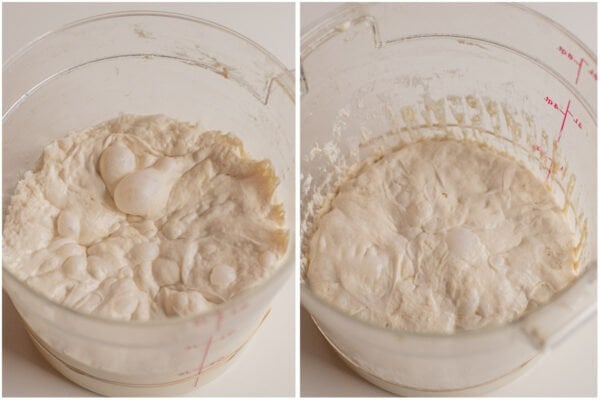
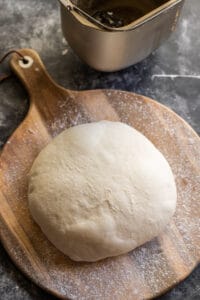
The dough starts out thick and chunky. After the first resting period it might even look loose and almost runny. But, after each stretching/folding and resting period the dough will look smoother and smoother as the gluten is strengthened. It will also hold a rounder shape immediately after folding with each round.
Compare first and last pictures below to see the smoothness of the dough.
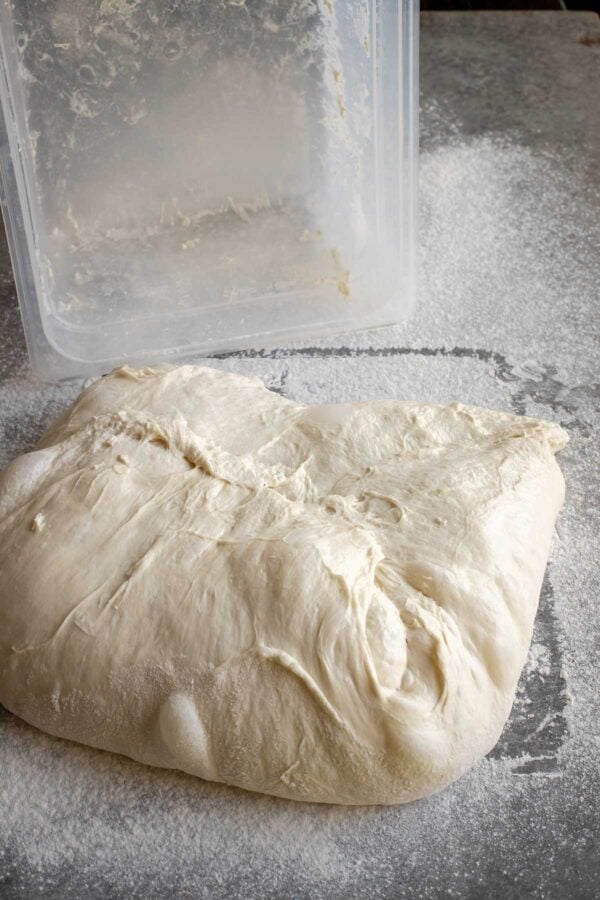
How to invert the dough out of the container
Dust surface of the working surface liberally with flour. This will preserve as many of the air bubbles as possible when you turn the dough onto the working surface.
Then, with wet fingers go around the perimeter of the bowl and loosen the dough from the edges.
Invert the bowl or container with the dough over the floured surface and allow the dough to slowly fall out of the bowl.
Use the dough as directed in the recipe.
Scroll to the bottom for the recipe card for the exact recipe and for ways to use and bake this dough.
FAQs
How many days can this dough be kept in the fridge?
The dough can be kept in the fridge for up to 5 days. The optimal time for using the dough is between 3-5 days.
If you can not use it within 5 days, punch down the dough and you can keep the dough in the fridge for up to 2 more days. After that, the flavor and texture profile will deteriorate.
Can I make this recipe on the same day?
You can make it and use it the same day by sacrificing the flavor and texture. While it will still make good bread, pizza, and such, the depth of flavor will be lacking compared to the original artisan bread dough recipe.
To make and use the dough the same day increase the yeast amount to 2 teaspoons. This will speed up the proofing time which will leave no time for stretches.
To make up for it, the dough can be kneaded for about 15 minutes by hand or mixer after brining all of the ingredients together, or until the dough is tacky to touch and forms a dough ball around the kneading hook.
After kneading, the dough will need to be proofed until double in size, then used immediately after.
Other Bread Recipes
Artisan Bread Dough Recipe
Ingredients
- 1/2 Tsp active dry yeast
- 2 Cups Water room temperature
- 4 Cups bread flour or all-purpose flour
- 1 Tbsp kosher salt
Instructions
-
Mix the dough:
In a cup combine room temperature water and yeast, stir to combine. Set aside.
In a large bowl combine flour and salt, then stir to combine. Add the yeast and water mixture and using a firm spatula stir until a shaggy dough forms.
Use your hands to knead to mix the dough together for 2-3 minutes, to ensure that yeast and salt are evenly distributed.
-
1st rest & fold:
Cover the dough with a tea towel and allow to rest for 30-60 minutes at room temperature.
Now, wet your hands and grab the edge of the dough and pull it up until it stretches but before it starts to tear, then fold it over. Continue going around the dough stretching and folding it until the dough no longer allows you to stretch or pull at it easily like it did when you started.
Quickly turn the dough over, folded side down. The dough should be smoother than when you started, but still have some roughness to it.
Visual: The folded dough will pool back into the rest of the dough easily.
-
2nd rest and fold:
Cover the dough again and rest for 30-60 minutes.
Repeat the stretch and fold method described in step 2 with wet hands, then turn the dough folds side down.
Visual: The dough will be even smoother then after the first fold.
-
3rd rest and fold:
Cover and rest the dough one final time for 30-60 minutes, followed by stretching and folding once again. Turn the dough folds side down.
Visual: The dough should have a smooth surface and each fold should have visible ridges, without pooling back into the rest of the dough quickly.
-
Proof:
Cover the dough with a tea towel and allow to proof at room temperature for about 12-18 hours or until it's almost doubled in size.
-
Cold fermentation: transfer the risen dough into the refrigerator and leave it in the fridge for 12 hours or up to a week. Peak flavor, aroma, and texture will be during a 3-5 day period.
-
Invert onto the working surface: Remove from the fridge. Dust working surface with flour liberally. With wet hands go around the edges of the bowl with dough and loosen the dough from the bowl.
Inver the bowl with dough onto a floured surface.
-
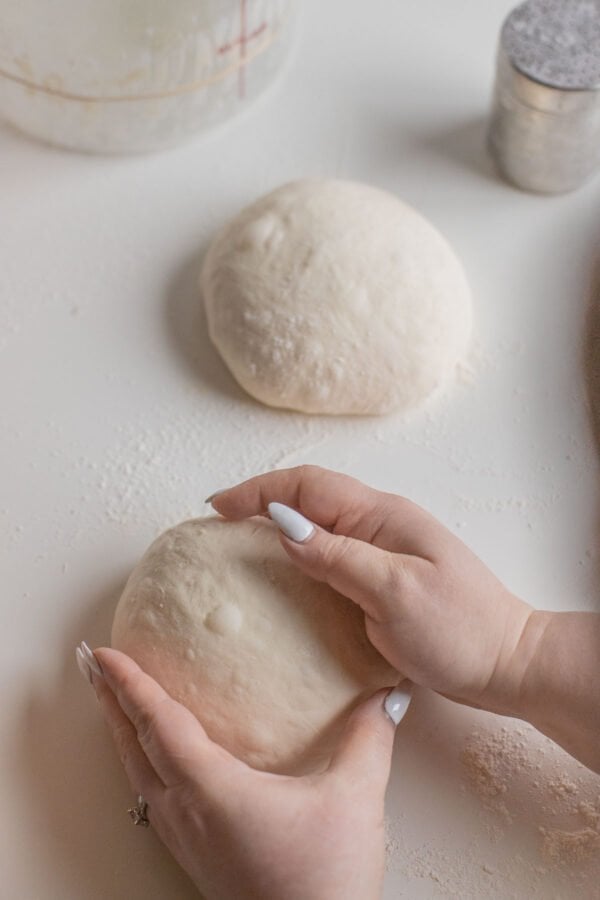
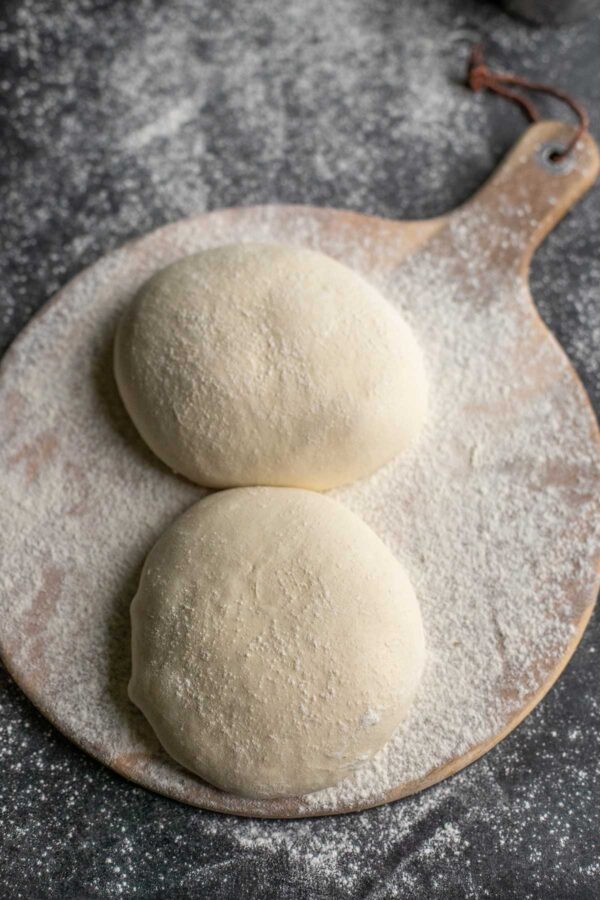
Divide the dough: Using a bench scraper or knife divide the dough if needed. Flour hands and surface as needed to prevent sticking.
-
Pre-shape: Flatten the dough slightly. Fold the right side towards the middle, then the left side towards the middle (envelope style). Now roll the long "envelope" tightly forming a roll. Leave to rest for at least an hour on floured surface or parchment paper until ready to bake or use.
-
Use as directed in the recipe.
Recipe Notes
To Bake Artisan Bread:
- Place the pre-shaped bread (from the last step in the recipe) on a piece of parchment and allow it to rest.
- Meanwhile, preheat a dutch oven in a 500F oven for at least 30 minutes to 1 hour.
- Right before adding the bread to the dutch oven slash the top of the bread across the top at a 45 degree angle about 3/4 of an inch deep. Transfer the dough to the dutch oven by the corners of the parchment and cover with the lid.
- Bake: turn the oven down to 450F and bake for 30 minutes. Then, remove the lid and bake for another 20-25 minutes or until a deep golden brown color.
- Remove from the dutch oven and allow to cool before cutting
To Make Artisan Pizza: (makes 4 thin 10″ pizzas or 2 large 16″ pizzas)
- In a step 9 above on a well floured surface divide the dough into 4 or 2 and pre-shape into taught balls setting them seam side down.
- Allow to rest covered in a container with plenty of space for expansion for a couple hours before preheating the oven and moving to the next steps. This time will allow the gluten to relax and make it easier to stretch into a pizza.
- Work with 1 dough ball at a time. Liberally dust work surface with flour. Use a bench scraper to quickly lift the dough ball from the container and set it on the floured surface. Stretch the pizza to desired size.
- Four pizzas – stretch to 9-10 inches.
- Two large pizzas – stretch to 16 inches.
- Transfer the stretched pizza to a parchment paper. Add toppings, sprinkle with cheese.
- Bake in a preheated to 500F oven for 1 hour with a baking stone or baking steel in the center of the oven for about 10 minutes or until the edges are well puffed up and golden in color.
To make Artisan Dough Flatbread:
- On a well floured surface divide the dough into 6 pieces and shape into taught balls. Pat down to flatten. Let rest for about 1 hour for easier stretching or rolling.
- Roll into freestyle 8 -10 inch circles.
- Cook on a preheated to medium heat dry cast iron skillet for about 4 minutes per side.
- Transfer to towel lined plate and cover with another towel on top.
To make Artisan Bread Dough English Muffins:
- On a well floured surface divide the dough into 12 -16 equal pieces and shape into taught balls. Pat down to flatten slightly.
- Let rest covered on a well floured surface (or surface dusted with cornmeal) for about 1 hour – 3 hours.
- Preheat a cast iron skillet over low-medium heat. Using a bench scraper transfer the prepared dough balls into a bowl with cornmeal and dip both sides.
- Cook in a dry cast iron skillet for about 6-7 minutes per side or until each side is lightly golden in color and the middle is cooked through.
To make Elephant Ear style Donuts:
- Transfer the dough onto well floured surface and with well floured hands pat it down to about 3/4 inches thick, try not to break the air pockets as much as possible.
- Now with a knife or a bench scraper cut the dough into about 18 pieces. Transfer to a well floured baking sheet. Cover and let rest as you heat the oil.
- In a deep fryer or a dutch oven heat at least 2″ of oil to 350F.
- Fry in the hot oil in batches trying not to overcrowd on both sides or until golden in color. The dough does not have sugar so the donuts do not need to be dark in color to be cooked through. Transfer to a cooling rack or a paper towel lined baking sheet.
- Make cinnamon sugar by combining 1 cup of granulated sugar and 1 tbsp of cinnamon.
- Dredge the donuts in sugar several minutes after removing them from the oil.
- Eat while fresh.
To make an Artisan Focaccia:
- Transfer the dough into a well oiled 9″x12″ baking pan. Pat it down with oiled hands stretching it to cover the surface of the pan.
- Now oil both hands and poke the dough all over with your fingers about every 1 inch.
- Drizzle with about 1/4 cup of good quality olive oil. Top with desired toppings (cherry tomatoes, calamata olives, pressed garlic, sprinkling of flaky sea salt, etc).
- Bake in a preheated oven to 450F for about 45-50 minutes or until golden in color.

Thank you for following me on Instagram, Facebook & Pinterest!
Hashtag your photos #LetTheBakingBeginBlog so I can see your creations and for a chance to be featured!
Marina | Let the Baking Begin


I will be splitting the bread and making it into two loaves. How long would you recommend to bake?
I haven’t even made it yet, and I’m giving it 5 stars, because your instructions and explanations are so clear and helpful.
I have just, no lie, read through 8 people’s recipes for this same 4-ingredient bread, and yours is the one I’m following. The instructions vary, esp. around proofing and fermentation time, but the main difference I’m finding is quantity of yeast, and I am flat out bewildered: the recipes all called for something between 3 and 4 cups of flour. But the quantity of yeast varied from 1/2 tsp dry active yeast to 1 tablespoon.
Can you shed some light on this? I tried following one that called for 2.25 (one 7g packet) and my bread simply refused to bake all the way through. It’s waiting on the counter for me to experiment with whether toasting it will help. I’m going to try 1/2 tsp this time but I’m so confused!
I’m wondering if the dough can be frozen for future use? If so, at what point should it be frozen. When using after it’s been frozen, how long should it rest at room temperature before using, especially with pizza in mind. Thank you.
Hello again, may I ask have you ever added raisins and nuts or even diced cheese to your cold fermented bread recipe, I’m thinking of experimenting -just curious if you’ve attempted something like that yet
I’m trying this today for the first time, I’m curious if the entire amount of dough will go into my large cast iron dutch oven? It’s 10 1/4 “ diameter (Normally I use the no knead recipe from Jim Leahy which calls for 3 cups flour, 1.5 cups water…)
Thanks
Yes, it will fit.
I’m not on social media so I’ll not be able to post a picture but for my first attempt at this method I am very happy with the results- I baked it on the end of the 3rd day of refrigeration but next time will try 4 days, then 5 to see what that sweet spot is for flavor.
The crust is beautiful and it did a decent split even though i forgot to score it. The inside has nice open air pickets but not ridiculous amounts so butter won’t fall through ; very chewy inside. Family is pleased as well.
Looking forward to trying more of your recipes
Hello 🙂 I am making this bread now and while I was on step 5 allowing my dough to rise double in size, I noticed it was rising pretty high and then it sunk in. I’ve made other recipes before and everytime I saw that happen the bread usually came out weird.
I put it in the fridge and it’s just sitting in there now
Do you know why this happens and how I can fix it?
Hi Elizabeth,
It sounds like the dough was allowed to proof past its maximum capacity, at which point it collapses. When it collapses, it means that the yeast is past its ability to work properly. Overproofed dough can still be baked and you will get a bread, but it will no longer be what it could’ve been.
If you’d like to try this again, make sure you don’t let the dough proof past double the original size. That is very important for this recipe as the dough will continue to rise once in the fridge until the dough has cool down enough for almost all yeast activity to stop working. That is also the time when enzymes and good bacteria get to work and give us that extra delicious bread flavor.
Hope this help
Wow okay now I know!! Thank you so much for your feedback and help! One day I hope to be pro like you
Can you provide the flour and water amounts in grams? I used 480g of flour and 454g of water which is almost 95% hydration and it’s complete goop – nothing like the photo you shown right after mixing.
My cup of bread flour is 150 grams, so 600 grams of flour is needed for this recipe.
Thanks! Do you have an idea of how long the bake time should be if I split the dough into two artisan loaves and bake one at a time?
What an unbelievable recipe. This is my third making this beautiful bread and we just love it.
Super easy and the instructions were amazing and very straightforward.
This recipe has given me the confidence to try and tackle sourdough bread baking.
Thank you so much for your time and this recipe.
It must have taken you days to put together this informative and concise bread recipe.
Thank you so much.
Kind regards
Julie Parkes
Do you need to cover or oil the top of the dough before refrigerating? Or should it be refrigerated in an open container?
Hi Megan,
No need to oil it, just cover the container with a lid or plastic and refrigerate.
Hey Marina, in the process of making this. I am wondering if I am meant to punch down the dough/knead before starting the process of the cold ferment in the fridge.
Nope, no need to punch it down.
Made this yesterday. Have been making Artisan bread for years…this was the BEST I have ever made.
Have you made this with Wheat flour and White bread flour combined? If so how did you change the recipe?
thanks so much! Sue
Wow! Makes my day hearing that! Thank you for sharing your feedback.
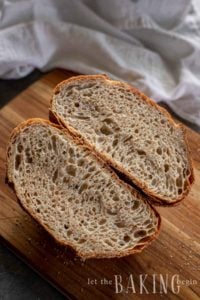
I have added up to 3/4 cups of whole wheat flour in place of all-purpose flour or bread flour and it was fine. My perfect amount is 1/2 a cup though. Everything else stays the same in the recipe.
what temperature would you bake the bread at with this dough? Thank you for the recipe it looks amazing.
Thank you Lanka!
Here’s how I’d bake it:
Shape the bread and transfer to parchment paper. Allow to sit at room temperature as the oven preheats.
Preheat a dutch oven at 500F for at least 30 minutes (to 1 hour).
Slash the top of the bread and quickly transfer it to the preheated dutch oven.Cover with lid.Turn the heat down to 450F.
Bake for 30 minutes with the lid on, then remove the lid and bake for another 20 minutes.
I love bread and I can’t wait to try this recipe. I’ll post a review when I’ve baked it!
How many pizzas will this dough make? Thanks!
2 thin 16 inch pizzas, or 2 thick 14 inch pizzas.
Or 4 smaller 11-inch pizzas.
It would be so nice to visit your site (which I absolutely love), without having your Cranberry Bliss Coffee cake video covering and following as as I scroll down you’d page. I’ve watched it a kazillion times. Time to change the content and make less invasive.