Bread Machine Bread – Easiest Bread Ever
This Bread Machine Bread Recipe is a simple yet delicious homemade loaf that you can easily make in a bread maker. 5 minutes of your time and the bread machine does the rest. Also, you’ll learn all the dos and don’ts of bread making in the bread machine.
If you, like me, enjoy a good bread recipe, you’ll also like this Hoagie Roll Recipe, this Basic Sweet Yeast Dough, and our family’s favorite Bread Maker Pizza Dough recipe!

Bread Machine Bread Recipe
A bread machine is a super useful kitchen appliance for those of us that enjoy a fresh, crusty loaf of bread, but don’t have the time to make it the traditional way by kneading and forming by hand.
With a bread maker, you just throw all the ingredients into the bread pan and pull out a perfect baked white loaf a couple of hours later. It doesn’t get better than this.
Growing up, this was one of our family’s most loved pieces of equipment in the kitchen, so naturally, the bread machine was the first thing I added to my wedding registry. If you have a bread-loving family, you’ll appreciate everything this machine has to offer, along with this recipe.
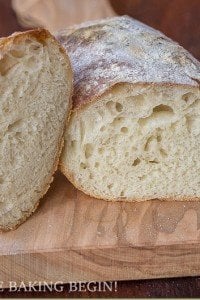
My bread machine bread recipe makes a beautiful 2-pound loaf of white bread. If you want a smaller loaf, simply cut the ingredients in half and choose the appropriate setting on your bread machine. Or, bake a 2 lb loaf, then freeze half of it until you need it, later.

Tips for Learning How to Make Bread in a Bread Machine
Here’s how to make bread with minimal effort and maximum results. Use these tips to ensure a perfect recipe every time:
- Use high-quality flour. One of the best tips I can give you as you learn how to make bread is to use the best flour possible. I prefer Canadian flour or any other kind of high gluten flour like King Arthur or Bob’s Red Mill bread flour for their high gluten content, which translates to better bread.
- Make sure your yeast is still active. If you have an older packet of yeast, you may want to make sure that the yeast is still active.
There is a simple way to check – add the yeast that the recipe calls for and 1/2 cup of water from the overall amount along with a pinch of sugar. Stir and let sit for 5-10 minutes. If the mixture has not formed a foam cap your yeast is old and you need to buy a fresh one. - Tip on utilizing older yeast: another thing to keep in mind is that if your yeast is on its last leg, there’s still a way to use it. When the yeast is close to its expiration date, it becomes less active or potent. To work around this you can increase the amount you use in a recipe by up to 25%, if you need to increase it by more than that, then the bread might have too strong of a yeasty odor.
- Sift the flour: putting the flour through a sieve aerates the flour and creates a fluffier, softer loaf.
- Use the french bread or white bread setting for this recipe.
How to Enjoy this Bread Recipe
You can enjoy homemade bread with pretty much anything. I’m betting the first time you make it, you’ll just want to rip it and eat it as soon as it comes out of the pan. We always have freshly baked bread in the house and consider ourselves expert bread eaters, so we’re talking from experience here, ha!
But, if you’d rather have a list, soups (like this Instant Pot Chicken Noodle Soup, or my family’s favorite Ukrainian Beet Soup or this classic tomato soup are all good choices), sandwiches (egg sandwich, or a tuna sandwich, anyone?) or canapés are all the best ways to go here.
Here’s a list of some good savory topping –
- Mushroom Pate
- Multi-Cooker Farmer Cheese and a sprinkling of salt
- Homemade Salmon Caviar and a slather of butter
Eggplant Spread recipe - or the most favorite way to eat it – to dip it into the creamy mushroom sauce.
A fresh slice of bread with some jam will do the trick too! 🙂
I recommend this Raspberry Refrigerator Jam – it’s easy to make and tastes amazing. Combine it with a slather of butter and jam or honey and you’ve got a poor man’s cake 😀 I know, genius idea!
However you make it, I hope you enjoy this recipe and let me know about it in the comment section below!
Bread Machine Bread at a glance:
- Add all of the ingredients to the bread machine bread pan in the following order: water, yeast, flour, sugar, salt, oil.
- Add the filled bread pan to the bread machine and twist the container into place. Close the lid of the bread machine.
- Choose the appropriate setting on your bread machine for a 2 lb white bread loaf, also making sure to baking preference (light, medium, dark).

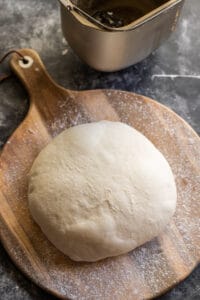
- The dough will be kneaded slowly at first to bring all the ingredients together without the flour going everywhere.
- Then, the dough will switch to a faster kneading speed and continue this way until the proofing cycle.
- Once the dough goes through proofing, punch down, then another proof it will go through a baking cycle.
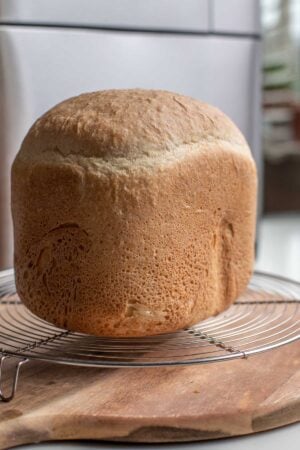
- When the bread machine beeps, it is safe to open the lid and remove the basket with the bread using kitchen mittens.
- Shake the bread out of the bread pan and allow it to cool completely.
- Lastly, remove the kneading paddle from the bottom of the loaf and enjoy!

FAQ
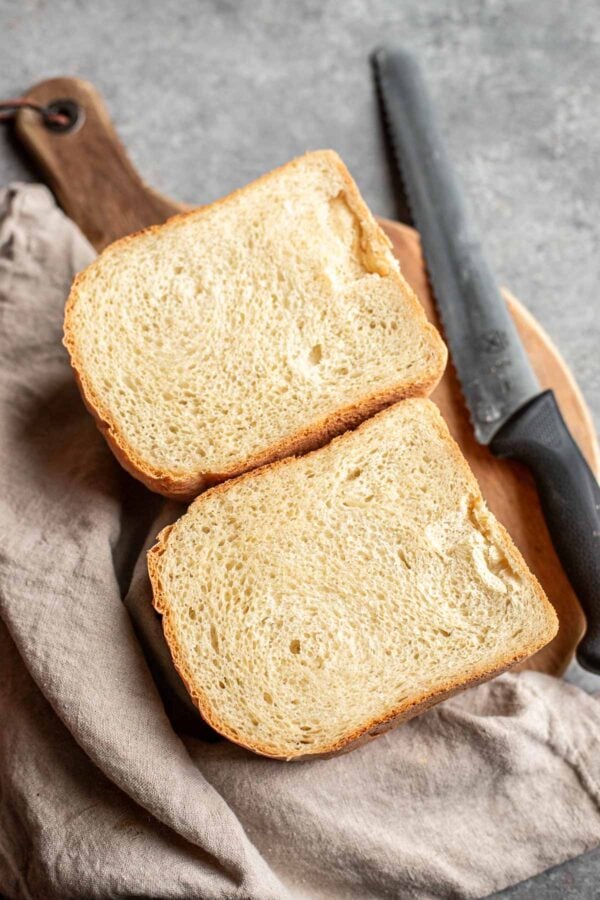
What is the best way to cut bread?
Cutting fresh bread can be quiet a feat, but here are my tricks to getting perfect slices without ruining your beautiful freshly baked loaf.
- Make sure the bread is completely cooled before cutting, otherwise the steam from the hot loaf can make cutting it a lot harder, by dragging the knife as it slices.
- Use a good long and sturdy serrated knife. Bonus points if it’s specifically formulated for bread cutting, like this bread knife (I purchased it after a chef’s recommendation and now it’s the only knife I use for cutting bread).
How to store Bread Machine Bread?
Store bread in a bread keeper at room temperature or in the refrigerator, covered, for up 2-3 days.
Otherwise, allow to cool completely, then place in a ziplock and freeze for up to 1 month.
To thaw, remove from the freezer and leave at room temperature or microwave until thawed.
My bread is dense, what to do?
If your bread comes out dense there are several ways to fix it.
- 1 – Use less flour: next time you make it, use 1/4 cup less flour than you did this time.
- Use more water: if the dough is very dense while being mixed, add a tablespoon of water at a time while the dough is being mixed until the dough ball is very soft.
- Use more water: if the dough is very dense while being mixed, add a tablespoon of water at a time while the dough is being mixed until the dough ball is very soft.
My bread machine bread rose, but then collapsed in the middle –
- Recheck the amount of ingredients you have used and make sure you add the correct amount.
- Adjust the flour or water if needed by checking on the dough while it is being kneaded.
- If the dough is not too soft and proper consistency, add a little bit less yeast next time.
- Make sure you have not opened the lid after the kneading cycle or the cold air can cause the bread to collapse in the middle.
- Do not remove the bread before the full cycle is complete.
My bread rose too high and overflowed or is touching the lid –
This could be caused by using too much yeast. Use less yeast next time.
Also, verify that you’re using an appropriate size loaf for your bread machine. If you make a 2 lb loaf in a bread machine that only fits 1 lb, the dough will overflow.
More Bread Recipes to Try:
- Artisan No-Knead Bread– Can’t get any better than this no-knead bread loaf!
- Rustic Farmer’s Bread – Simple and delicious white bread recipe.
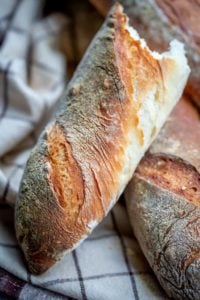
- Rustic Baguette Recipe – Long, crispy baguettes.
- The best Bread Maker Pizza Dough – So easy! You’ll want to make every night a pizza night.
Bread Machine Bread Recipe
This Bread Machine Bread Recipe makes the best white bread loaf that is perfectly fluffy, with a nice crust, and all with only 5 minutes of hands-on work.
Ingredients
- 1.5 cups water room temperature
- 2 teaspoons instant yeast
- 3.5 cups all-purpose flour or bread flour
- 2 teaspoon kosher salt
- 1 tablespoon granulated sugar
- 2 tablespoons oil
Instructions
-
Makes one 2 lb white bread loaf.
Add ingredients to the bread pan in the following order water, yeast, flour, salt, sugar, and oil (in this particular order).
-
Choose the appropriate setting for "White Bread" on your bread machine.
Next chose the preferred darkness of the loaf (light, medium, dark). I recommend choosing a "dark" setting to help the bread to bake through fully.
Lastly chose a 2 lb loaf for the size of the loaf.
-
Adjust as necessary:
As the dough starts kneading keep an eye on the process for the first 5-10 minutes making sure that the dough has formed into a soft, round ball. If for some reason the dough looks very loose after all flour has been incorporated add a little bit more flour, 2 tablespoons at a time until it forms into a ball.
Note the amount of flour used to form the ball this time and add this adjusted amount the next time you make this bread machine bread recipe.
Once the kneading cycle has ended do not open the lid, otherwise, this will allow the heat to escape.
See notes for best practice when baking Bread Machine bread.
-
Remove and cool: Once the cycle is complete and the alarm goes off, use mittens to remove the bread pan out of the bread machine. Allow to sit for 5 minutes, then shake the bread out onto a cooling rack to cool for at least 40 minutes before slicing. If the kneading peddle tends to come off and stay inside the bread after baking, remove it before slicing.

Thank you for following me on Instagram, Facebook & Pinterest!
Hashtag your photos #LetTheBakingBeginBlog so I can see your creations and for a chance to be featured!
Marina | Let the Baking Begin


I’ve tried every bread machine recipe and this one is the best! I’ve stopped searching here
Just found this recipe and love it. I have tried the ones that came with my bread machine but they are not great. The only thing extra is that I put in bread improver. Definitely going to keep making this, and it’s so simple.
Thank you so much for this recipe!! I’m still new to the bread machine world.
I struggle to keep things like milk in the house and this was simple and I had everything on hand. Followed it step by step, didn’t need to change or add anything. The bread came out perfect!
That’s awesome! Thank you for your comment, Christine!
I a Smartlife Kambrook bread maker Christmas WITHOUT any intructions or recipes where can i get them please???
I have not used mine as I need a recipe books and hoe to operate the machine.
It came with nothing, please firrst time I had a page
i tried it is awesome love it
You give nutritional information but no detail on determining what a serving is.
My first attempt at this recipe did not go well. The dough was wet so I added more flour but not enough. The top caved in. I altered the recipe and it came out much better the 2nd time. The bread tasted good and was soft and light.
I used 4 cups of flour and only 1 tsp of yeast.
The picture of my bread came out the same as yours. I am not used to having crusty top bread. the inside is a moist texture soft.
I was happy with result
Thought it would be a little higher a bit on small size. JenniferBaker779@gmail.com If I put a little bit of an increase in the ingredients it might com up a bit higher. Will try that a let u know.
when I put my ingredients in and it mixes, it looks like it has blended well. when i put the loaf out there are large clumps of unblended flour in the loaf. any ideas on how to get ingredients blended through the loaf?
Just check on the dough halfway through mixing and if needed gently move the dough with a spoon to encourage it to pick up the dry bits of flour. Some mixers are better at mixing then others and this might help it.
This recipe was a hit, the whole family commented on how how delicious the loaf was. It slices really well and holds its shape. So will be great for lunches etc. Very tasty and super easy. Makes a good sized loaf for a standard sized bread maker.
Hi Marina,
Thanks for the recipe. I found a great old Sunbeam electric knife at the thrift store, you can still buy them new, to perfectly and quickly slice my bread loaf 10 minutes out of the machine. The action of each of the two parellel blades moving in the opposite direction at the same time, slices without disturbing the structure of the bread!
Directions for my Oster bread machine says to never let yeast touch liquids so is it alright to add to water
With my machine, you put water/oil in first, followed by sugar/salt. Then, you put the flour in and the yeast on top of the flour, keeping it separate from the water until kneading. But you should follow the instructions for your machine to make sure you add the ingredients in the right order as not every machine works in exactly the same way. in other words, use recipes just for the ingredients and ignore the instructions they contain.
Hi Marina
Brilliant product, the recipe worked like a treat.. thank you.
Made this Bread today for the first time and it came out awesome!! Easy, fast and so delicious! Will be making this a lot this winter!! Thanks for sharing!
Toooooo stiff! Nearly broke the machine motor adding water didn’t help. Had to unplug and start OVER! I found There’s a video on yt that’s vintage that has the perfect measurements no issues.
Using ingredients and amounts specified in thus recipe makes a very soft dough. I wonder if you didn’t measure correctly (spoon flour into a 236 ml cup, level off the top by scraping excess with a knife) if your dough came out too stiff.
Not tried this yet. I am in the UK and wanted to know what size is a cup? Also can I use normal table salt for this recipe. Thank you!
I normally make bread in the oven but decided to try the bread maker. This recipe was so simple that my 1 and 3 year old helped me make it. It turned out perfectly, I’m so pleased!
What is with the lack of ingredients measurements on recipe boards. This unfortunately useless to me.
The recipe with measurements and ingredients are at the bottom of the post, like on any recipe website.
You can either click “jump to recipe” at the TOP of the page, or just keep scrolling until you get to it.
Hi Marina! I made the bread today. Came out perfect and baked beautifuly.
We ate half of the bread before it could
Cool off!!!
Thank you for sharing your gift of cooking and baking!
Love it! So happy you enjoyed it!
I haven’t made a loaf of bread in quite sometime. I had a recipe book of easy bread machine recipes that would come out great. I wanted to make a loaf of bread for my neighbor but could not find that bread machine recipe book. I started googling quick and easy bread machine recipes and came across yours. I used your exact measurements and followed your recipe except for the order in which you add your ingredients. I’ve read to place wet ingredients on the bottom of your bread pan, then the flour and dry ingredients. You then make a well in the dry ingredients and that’s where you place your yeast. I usually set it on medium for my crust but chose dark as you suggested. My bread came out looking wonderful! The crust was a little hard and chewy but other than that it was pretty good. In the past I would consistently buy the boxed bread machine kits from the grocery store. I would always keep a few stocked in my pantry to make for neighbors and friends. They would always turn out great and were so easy and convenient. Oh how I miss them! You can’t find them anywhere now. Your recipe was quick, easy and I liked that you could use regular flour and didn’t have to use dry milk. I have saved your recipe to my iBooks and it will be my go to for a quick, easy white bread. Thank you
I don’t have “white bread” settings ….I have “basic” or “sandwich” plus others like French etc.
Which do I choose?
I haven’t tried this recipe yet, but why do you have the water at room temperature when usually recipes recommended warm water?
Because the bread maker has a heater that heats everything as it kneads, so heating the water is redundant.
Then why do MOST bread machine recipes say “warm water” to help activate the yeast.
Tried this 2x and both times I got a batter, not a dough.
Sounds you didn’t follow the directions in step 3.
“Adjust as necessary:
As the dough starts kneading keep an eye on the process for the first 5-10 minutes making sure that the dough has formed into a soft, round ball. If for some reason the dough looks very loose after all flour has been incorporated add a little bit more flour, 2 tablespoons at a time until it forms into a ball.
Note the amount of flour used to form the ball this time and add this adjusted amount the next time you make this bread machine bread recipe.”
Different flours will absorb different amounts of water, so the first time you make a recipe you have to keep an eye on the dough and adjust as necessary.
I’m not reading a novel to find a recipe.
Rude. It takes 2 seconds to scroll down. And you’re missing out on a great FREE recipe.
Click on “jump to recipe “ on the top
This bread turned out fantastic! Thank you for the tip of watching the kneading of the bread. It was a bit wet, but 3 tablespoons of flour fixed that quickly. Bread had a super flaky crust and soft center. It was delicious!
This is exactly the recipe I was looking for! Thank you for making everything so clear! When I was a little kid, my mom used to make a bread machine box mix that she got from the store, and it made the house smell so wonderful! When she gave me the bread machine a couple years ago, I couldn’t find those mixes anymore, and this is by far the best recipe I found! Thank you!!
So happy to hear of your success! Thanks for sharing your feedback!
This did not turn out. It was a hard lump of dough with hard ends. Salty, wet and just awful.
Looks like you either forgot to put yeast, or your yeast was inactive. Try it with good/unexpired/active yeast and it should work.
No, I purchased the yeast fresh. I know that every other recipe required separation in the order of ingredients so that the water did NOT touch the yeast. (It was added on top of the flour) for the bread maker.
I will not be following your recipe again. I have a Toastmaster bread maker and the instructions do not agree with your recipe.
The yeast touching the water does not destroy the yeast’s properties unless the water was hotter than 110F. Bread is something I do on a regular and I dissolve instant yeast in the water to help it distribute more evenly (although it is not a required step, more of a preference). If you have more luck with yeast being on top of the flour, it’s ok to add it after the flour, but make sure to add salt and sugar to the water then. Salt can also hinder yeast’s activity.
I’m sorry the bread didn’t turn out how you liked. Bread can be tricky! Takes a few mess ups to figure it out and than once you figure it out the weather changes and you have to try something new. But now you know this one doesn’t work for you… but it worked for others. It can be frustrating. It’s because of people like the one who posted this recipe that we are all able to learn. So take a minute and sit with your frustration, be frustrated it’s ok it’s annoying we’ve all been there. But remember who’s hand was putting in the ingredients.. Placing blame won’t bake the bread right?
Better luck next time and Happy bread baking!!
Just got a bread machine so this is all new to me can you make any bread machin bread recipe in any bread machine someone told me you can only make the bread recipes that came in the book with your bread machine. And mine calls for powdered milk which I would rather use real milk any tips would be awesome
Unless you have some type of special brad maker, you can use any recipes for bread makers. Just make sure to check on the weight of the loaf that the recipe will produce. Meaning, if you have a 1 lb bread maker than make sure the recipe isn’t for a 2 lb loaf, or it will overflow.
And yes, you can use this recipe for your bread maker 🙂
It was my first time using my brand new machine and this recipe was perfect for mine. I used activated dry yeast so I let it sit in warm water for a few minutes but everything else was the same and turned out perfectly. Thank you!
Love hearing this! Thanks for sharing your feedback Angie!
What can I say I have not baked A Bread yet.
I cannot thank you enough for this magnificent recipe! It eliminated two things I was worried about…correct placement of the yeast (on top of the flour or in the water) and paddle placement (LOL)! I followed your recipe to the letter with the exception of putting the crust on dark and it turned out beautifully. I was worried because before the proofing the dough seemed sticky but decided to just wait for the end results. It rose like a champ and baked up a beautiful golden brown…so delicious! I couldn’t believe it looked like a loaf that I got from a bakery. I have one of those high end Zojirushi bread machines and this recipe is much better than the one supplied with the machine. Can’t wait to try substituting half bread flour and half whole wheat! Let me know if you think this will work and again…THANK YOU!!!
I am glad I found the recipe. Why has the bread mix not been sold at grocery stores in like 6 years or more? My husband loves the bread and I have tried all the mixes. It is so very easy to make from the boxes. thanks, Pamelia
Hi Pamelia,
I’m not sure I’ve ever even seen mixes for breads in the store, so I didn’t know they existed 🙂 This recipe is simple enough though that that shouldn’t be a problem though, if you only have flour and yeast, since other things you probably already have at home.
Hello I just got a bread machine and got online and found your bread, I do have a question all others say to make a well last and put yeast in well?
For bread machine, you do not need to make a well or premix anything. Just add everything in the order listed and you’ll be good to go. Congrats on your new purchase! Hope you love this recipe.
Do not let the yeast touch the water if it’s active or instant dry yeast…it will start the process to early, when you haven’t added the flour yet. Put flour last THEN make a small well in the flour then add the yeast to the well.
I really like your post, Thanks for sharing great post.
Hi! Hoping you can help! Every time I have bread so far, it sinks in the middle during baking. I followed the above recipe to a t and not sure what to do!
Thank you!
Step 1 – try increasing the amount of flour. Depending on how big of a sink it it in the middle, I’d probably try increasing it by 1/2 a cup.
Step 2 – decrease the amount of yeast if increasing the amount of flour doesn’t work.
Help please.
I want to know if I should open and knead the dough after it finished mixing or wait for it to continue ?
For how long should I wait or should I press start again?
I kneaded and put back but it was just quiet
Hi Jeany,
If you have a bread maker then you just load the ingredients into the bread maker and set it for the white dough cycle. Now you just wait until the cycle is complete – at that point it should’ve kneaded, risen, then baked the bread. No need to take it out and do anything with it. Unless, you want to bake it in an oven, then you would set it for a dough cycle and allow it to knead and rise, then you would take it out shape and place it into your own baking pan and bake it in the oven.
Does this make sense?
For a crisper crust, I choose light crust on the machine, and when done, straight into the oven, preheated to 200c with a bowl of water in the bottom. I set auto to 7 minutes, and when done, I open the door and leave to cool inside the oven.
Hi Marina,
This is the exact bread making recipe I was looking for…..quick and effortless. You made it easy. So, thanks a lot for making things nice and simple.
Surely, I am going to try this.
I have always been a fan of bread. It is difficult to go wrong with the recipe because it’s so easy and if you’re using whole wheat flour, then your loaf will come out light, fluffy, and even! Thanks Marina for sharing this recipe.
That’s good to know, thank you for sharing!
You say to use the french bread setting but this setting on my bread maker is three hours fifty minutes is this ok?
Hi George,
I have tried it on both the shorter (2 hours) setting and the longer (3 hours 20 minutes) setting and both work. Let me know how you like the bread once you make it.
Good luck!
Thanks I will try both, by the way can I use butter instead of oil and if so what ratio.
Hi George, you can use butter just make sure to melt it and cool it to room temperature before adding it to the batter. Use the same amount as oil in the recipe.
The recipe is easy but I have a 1.5 lb bread machine
Hello Marina I was looking for a good recipe for my bread maker. Finally have found your post. Very nicely explained. I am going to try this in a few days.
Great recipe. I used whole wheat flour and the loaf still had a light, even, and fluffy texture. The only problem was waiting the 3+ hours for the bread maker because it smelled so enticing!
Can I take the dough out of the machine before the final rise? I would put it in my bread pan, cover and let
It do final rise.then bake at 400 for 35 min. I have never done this.
Also what setting on your machine for this bread? White or basic or French?
Thanks so much.
Hi Lynda,
This recipe can be used on all 3 settings you mentioned. They will give you different texture for each (French being the fluffiest) but still will be all good loaves of bread. Try each one and see the ones you love the best.
If you have a bread maker you probably have a dough cycle on there, so the dough would be mixed and proofed and then you can take the dough out and use it as you wish. But, in theory if you wanted to use a regular bread cycle, you can like you said, mix it and allow it to rise the first time, then remove it from the pan, shape it, allow it to proof and bake it in the oven.
This is the second time to use this receipe. Once again, after waiting patiently for my bread to be done, to my disappointment, the bread rose and fell. The dough fell out of the container. What went wrong?
Hi Dee Dee,
It sounds like the bread is removed before it has a chance to completely cook through. Here’s what I would do:
1. check and make sure you’re using a 2 lb bread setting. If you’re using a 1 lb bread setting and baking a 2 lb loaf it might not have enough time to complete baking.
2. make sure that your bread maker bread container is capable of fitting a 2 lb loaf and is not instead a 1 lb loaf capacity.
3. Check and make sure you’re using 2 teaspoons of yeast as opposed to 2 tablespoons of yeast which will expand the dough unnecessarily large, and it will deflate after being removed since there’s not enough gluten structure to support that much expansion.
4. while the bread is being kneaded (in the first 10 minutes) make sure that the dough forms a soft, round ball. If it does not and instead looks very loose, add a little bit more flour at a time until it has formed into a dough ball.
Hope these tips will help you to bake a nice loaf of bread next time!
Going to try to today.
Awesome recipes.
Live them.
I’m a little confused. I always thought you were not supposed to mix the yeast near the salt, as salt kills the yeast. Are we to put the ingredients in this order, or in the order recommended by the bread maker manufacturer?
You can do either/or, but you will not see much of a difference since the yeast is dry and it doesn’t get activated until it gets wet by the water.
I don’t have a bread machine but have KitchenAid mixer and I followed your recipe portions. Bread came out fantastic! Thanks so much! I let yeast rest for a few minutes in the warm water (Actually added a splash of milk too) and then slowly added it to the half of the flour and then mixed in the rest. Kneaded for a few minutes, rested for an hour (until doubled in size), punched a bit and formed the loaf, let it rest for another hour in the loaf dish. Baked 15 minutes at 400F and then 30 minutes at 350F. Cooled down completely! Very very good sandwich bread!
Just made it. I used 2 tbs. Of coconut oil and 2 tbs. Of fresh ground flax seed instead of oil. Turned out perfect.
Thanks for your feedback!
Wow! Thank you! I’ve followed this recipe 3 times with excellent results! I don’t know how many recipes I’ve been through just to get a decent loaf of bread. This one is so flavorful, moist, and perfect for our sandwiches or bread as a side for our dinner. Thank you for posting this recipe!
That’s great Rose! Our family has been using this recipe for the last 14 years and we love it just as much! Thanks for your feedback!
Hello. Do I need to add warm water for the yeast or just room temp?
Hi Amy, either one is fine.
Do you use bread flour or all-purpose flour?
I only use all purpose flour 🙂
i tried it is very good recipe
Hi,
Is this recipe for 1.5 or 2 pound loaf? Also what setting should I choose on my machine – French bread or basic?
Thanks! Yours looks so fluffy mine is always dense, I do sift the flour but nothing helps no matter what. I want to try your recipe…
Hi Lena,
If your bread always comes out dense it is most likely not the recipe, but your flour or yeast. To find out if your yeast is still active, add the yeast that the recipe calls for and 1/2 cup of water from the overall amount and the sugar. Stir and let sit for 5 minutes. If it has not doubled or tripled in size, your yeast is old and you need to buy fresh ones. There have been instances where I bought old yeast, so make sure to check your freshly-bought yeast as well. Another thing that could cause a dense loaf is not very good quality flour. I’ve had trouble with this one as well. There was a year when all the Canadian flour (which is deemed the best) was producing very heavy and dense breads. Since the same recipe was producing good loaves before, I knew that it was caused by the flour and not the recipe.
The given recipe is for a 2 lb loaf. I use the french bread setting.
Hope this helps 🙂