Easy Cheese Danish (Video)
Cheese Danish is a pillowy soft breakfast pastry that’s perfect for eating any time of day. A rich cream cheese filling topped with an easy streusel recipe made this one of my most shared Instagram posts of all time! It’s fantastic.
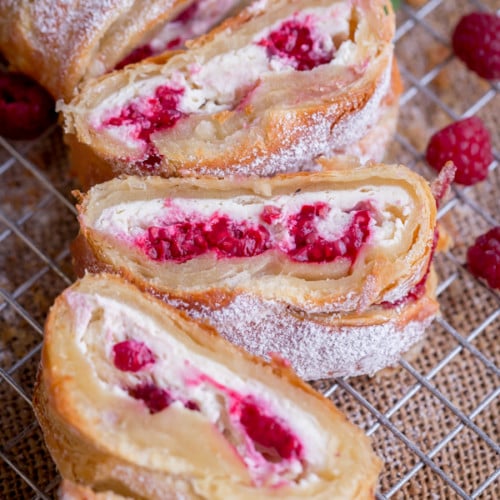
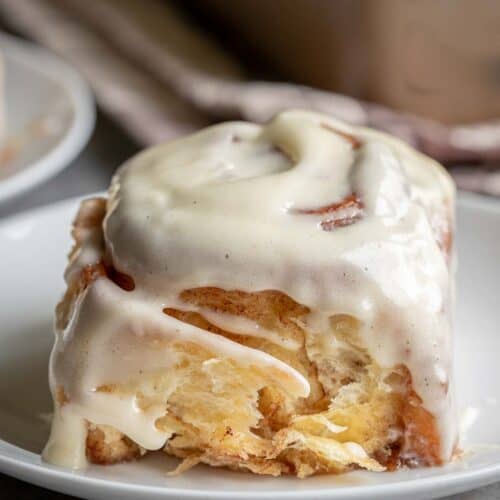
If you love cheese Danish, you’ve also got to try my Hot Cross Buns, Easter Bread Recipe, and these amazing Homemade Cinnamon Rolls. Yum!

Breakfast Pastries
I’ll admit it – it isn’t very often that I enjoy breakfast pastries. Mornings are quite too often a hectic rush at our home. I’m much more likely to eat a bowl of oatmeal or a chunk of farmer’s cheese and toast.
However, isn’t the point of the weekends to slow down and do all the fun things we don’t get to do during the week? Why not set aside one morning to make a batch of fresh breakfast pastries? I guarantee these will drive your family straight to the breakfast table once they get a whiff!
Make creating breakfast pastries a part of your Saturday morning routine. You won’t regret it! I’ve found this is a great activity to do with my girls and teach them one of my favorite things in the world…baking. It makes for a fun (and delicious) way to pass the morning. 🙂

They’re so, so soft and fluffy!
Cream Cheese Danish
One of my favorite recipes to bake is this cream cheese Danish. I sometimes call these cheesecake buns, but they are so similar to a Danish that my family uses the term interchangeably.
The cream cheese Danish is known for it’s characteristic sweet and slightly tart cheesecake-like filling. This recipe is no exception!
In fact, the filling is what makes this treat so good. It’s easy to make and contains just three ingredients: cream cheese, sugar, and vanilla. Whip them together until smooth and you’ll be amazed at how delicious the simple combination becomes!

Pastry Dough
On the other hand, I’m not giving this recipe justice if I don’t stop to talk about the pastry dough. I often see people use pre-made dough for recipes like this. That’s fine in a pinch, but I highly encourage you to make your own, delicious, highly enriched pastry dough if you have the time!
It’s not hard to make (mixer does all the work for you), and the end result is so worth it. This dough makes pillow-like, perfectly airy pastries that your teeth can sink into.
Another reason I really like this pastry dough recipe is that this dough is also super versatile. You can use it to make any kind of pastries, rolls or sweet breads. I’ve made poppy seed rolls, apple-filled piroshky and even Challah type bread with this pastry dough.

Tips for Making the Cheese Danish Pastry
- Make sure the butter is softened. If your butter is too firm, it will crumble and disperse unevenly. Melted butter will not give you the correct consistency. Let your butter sit out for a few hours before baking with it to get it softened..
- Use good flour: high protein all-purpose flour like Canadian Flour or King Arthur’s flour is your best friend when making pastries. Otherwise, use any other regular all-purpose flour.
- Use Red Star platinum yeast is possible: it’s highly forgiving, so if you’re not much of a baker with this yeast your chances of extraordinary perfection are very high.
- Use a scale: Use it not just for weighing your ingredients (to get consistent good results), but to divide the dough into equal pieces which will help with even baking of the cheese danishes .
- Brush your dough with egg yolk before baking. This adds shine and will enhance the golden color of the cheese Danish pastry.
- Choose your toppings. The basic recipe below for the cheese Danish pastry doesn’t include this, but if you like you can add a few frozen cherries to the hallowed center along with the cheesecake filling before baking. You can also top it with slivered almonds.

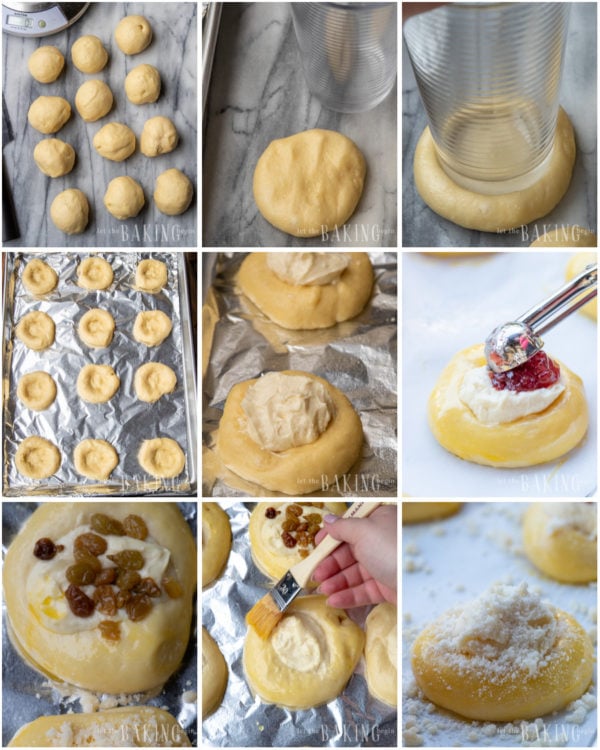
How to make the Easy Danish Recipe
For detailed recipe instructions see the recipe card bottom of the post.
1. Before starting, ensure that your yeast is active by combining yeast, milk, sugar and then allowing it to proof.
2. The kneading process of the dough can be done either in a bowl of a stand mixer or by hand. Your choice. Either way, you’ll want to knead all the ingredients except for the butter until the dough is fairly smooth. Lastly, you’ll add the butter and continue kneading until it’s tacky to touch and stretchy without tearing.
3. Next is the proofing process. I preheat my oven for 3 minutes at 250F, then turn it off and set my bowl with the dough in there.
4. While the dough is proofing, you’ll make the cream cheese filling, egg wash, and the streusel topping.
5. Once doubled, punch down the dough and divide it into 16 equal pieces. Shape into balls and make an indentation with a bottom of the glass in the middle.
6. Fill each indentation with cream cheese filling. You can also add a teaspoon of jam to the middle of cream cheese filling or sprinkle with plumped up raisins if you wish. Now allow the danishes to proof until doubled in size.
7. Brush the tops with egg wash, sprinkle with the prepared streusel and bake at 350F for about 20 minutes.

Easy Cheese Danish

This simple Cheese Danish recipe is the perfect breakfast pastry to make for the entire family. The pillowy soft dough is filled with a cheesecake-like topping, then topped with a sugar streusel before baking - yum!
Ingredients
Pastry Dough:
- 1 cup warm milk
- 2 tsp active dried yeast (Platinum Superiror Baking Yeast is the best)
- 4 egg yolks
- 2 Tbsp sour cream
- 1/3 cup granulated sugar
- 3 cups all-purpose flour (high protein flour like the Canadian Flour or King Arthur Bread Flour is best)
- 1/4 tsp kosher salt
- 3 oz unsalted butter , room temperature
Cream Cheese Filling:
- 1 1/3 cup of cream cheese
- 1/2 cup of sugar
- 1 tsp of vanilla
- 1/2 cup jam of choice (*Note 1) (optional); strawberry, peach and apricot are our favorite
Streusel Topping:
- 1/3 cup of flour
- 1/3 cup of sugar
- 3 tbsp of melted butter
Egg wash:
- 2 egg yolks
- 1 Tbsp water
Instructions
-
Check the yeast: If you're unsure if your yeast is fresh and active, combine the yeast with 2-3 tablespoons of the milk from the overall amount and 1 tsp of sugar from the overall amount. Stir to dissolve the sugar and yeast. Allow to proof for about 10-15 minutes. The mixture should rise and look frothy. If it does not, discard the yeast and do not start until you have good, active yeast.
-
Make the Pastry Dough: In a bowl of a stand mixer mix the remainder of the 1 cup of warm milk, 1/4 tsp kosher salt, 4 egg yolks, 2 tbsp of sour cream, remainder of 1/3 cup of sugar, 2 tsp of dried active yeast (or the frothy yeast mixture if you had to do step 1), and 3 cups flour together on the 3rd speed of a mixer for about ten minutes.
-
Add butter & knead: Add 3/4 stick of softened butter to the dough mixture in quarters and knead for about 8 minutes or until the dough pulls away from the sides of the wall, and feels tacky to touch. If you stretch the dough, you should be able to form a thin film without it tearing.
-
Let rise until doubled: Transfer the dough to a well-oiled bowl, then cover the outside of the dough with some oil as well. This will keep it from cracking and drying as it rises. Cover the bowl with a tea towel. It is best to set the dough in a warm place (between 80°F-90°F). I turn the oven to 250°F for 3 minutes, then turn it off and set my bowl with dough inside the oven with the oven light on. Top of the refrigerator or any other warm, draft-free place will work as well.
-
Meanwhile, make the cream cheese filling: Whip together 1⅓ cup of cream cheese, 1/2 cup of sugar and 1 tsp of vanilla until smooth. Cover and set aside.
-
Make the streusel topping: Combine 1/3 cup of flour, 1/3 cup of sugar, and 3 tbsp of melted butter with a fork or hands until crumbly. Refrigerate until later.
-
Make the egg wash: Whisk together with a fork 2 egg yolks and 1 tbsp of water. Cover and set aside.
-
Divide & shape the pastry dough. Once the dough is doubled, punch it down. Next, divide the pastry dough into 15-16 equal pieces. The most accurate way to do that is to weigh your dough, then divide the total by 16.
-
Shape each piece of dough into a ball by tucking the ends underneath itself until you get a smooth surface on top. Set the rolled danish buns on a 12"x18" foil or parchment-lined baking sheet, evenly spacing each piece of dough. If you would rather have the buns not touch, divide the danish pastries between two 12"x18" baking sheets. Let rest for 10 minutes, then dip the bottom of a glass or a cup into flour and press with it in the middle of each bun to form an indentation.
-
Fill with cream cheese filling: Use a medium ice cream scoop to fill each indentation with 1 scoop of cheesecake filling. Otherwise, just spoon the cream cheese filling with a regular spoon. If you would like to add some jam to the middle as well, use a teaspoon to spoon 1 tsp of jam or preserves in the middle of the cheesecake mixture.
-
Let rise until doubled: Put the baking pan with the filled danishes back into the oven (with the heat off, oven light on) or top of the fridge. The danishes should double in size in about 30 minutes to 1 hour.
-
Brush with egg wash & top with streusel: Once the dough has doubled, brush the outside of the danishes with the egg wash, then sprinkle generously with streusel pressing gently to adhere it if needed.
-
Bake: In a preheated to 350°F degrees oven for about 20 minutes, or until the outside is golden in color. Then, remove from the oven and transfer to a cooling rack to cool slightly before enjoying.
Recipe Notes
Note 1:
Pick any type of jam or pie filling of your choice.
You can also sprinkle the cheesecake filling with dried raisins, cranberries, blueberries before adding the streusel toping to the top.
How to Store the Cheese Danishes
On the counter: If this batch is too much for you to eat in one day after the cheese pastries cool down you can store them on a counter covered with a dome. This will keep them soft longer then if they were to stay open.
In the freezer: You can also freeze them for longer-term storage. Just keep them in a sealed container and freeze for up to a month.
To thaw, just microwave for about 30 seconds a piece and then pop in the air fryer for about 2 minutes at 370F to make them look and taste as though they just came out of the oven.
OR, pop them in the oven straight from the freezer for about 5 minutes at 350F.

Thank you for following me on Instagram, Facebook & Pinterest!
Hashtag your photos #LetTheBakingBeginBlog so I can see your creations and for a chance to be featured!
Marina | Let the Baking Begin


I have made these several times, they are so good !
They are a crowd pleaser also, everyone always asks for some when I make them.
I have made a decent amount of bread, a few of them enriched, and I have little confidence I will be able to use this. Are the 3 cups of flour supposed to be spooned and leveled or scooped/packed into the measuring cup? I am waiting on first rise but the structure currently reminds me of a foccacia. I haven’t made an enriched dough in a while so trying to trust the process!
In all my recipes, I usually fluff up the flour and then gently scoop and level.
Dough comes out way too tacky.
Once the dough is left to rise, the dough will stay soft but should stop sticking to hands. If it’s too tacky even after the rise, ensure that the dough has not been over-proofed, at which point the gluten bonds break down making the the dough sticky.
These were delicious. The dough in particular is outstanding, I’m thrilled to finally find one that is so good, I’ll be using it in lots of different buns. Thanks.
I have made these but when I used the bottom of the glass to make indentation, the indentation bounced back for the most part. Any idea why?
If you leave them to rest for a bit before pushing the center in, the dough will be more relaxed and won’t bounce back
I baked the cheese danish, using raspberry jam and slivered almonds on most, apple butter on some, and left 2 plain- just the sweet cheese filling and strudel topping. This recipe went together very easily, and the dough was easy to shape, and very soft to work with. They were a perfect dessert with coffee, and I wrapped and froze some for another time. I will definitely make again.
I bake very often and was so excited to try these. They looked beautiful with some nectarine jam I made, and the cream cheese was on point but the bread part was so dry. Completely frustrating and not sure what I did wrong. Followed the recipe exactly. Want to try again but am afraid.
Hi Elizabeth,
Im sorry to hear about your frustrating experience 🙁
I would go over the ingredient types/amounts and the rising/baking time one more time to ensure that the recipe was followed. If anything, the dough comes out softer than typical, so if it was not like that, there must’ve been either a step or ingredient missed or something of this sort.
I’ve been making these for years with great success. They are so delicious and loved by everyone. Although recently I’ve run into problem. For some reason the danish’s fall once they come out of the oven. They rise very well and get nice and poofy but the past few times I’ve made them, they would fall almost flat after baking. Any idea why?
Hi Zory!
I would allow less rising time before placing in the oven. Over-proofing the buns before placing in the oven weakens the structure within the bun, so once its hit with the oven heat they expand beyond their capacity to keep the structure and collapse once out of the oven.
These came out amazing. I have tried other recipes for years with no success. However this was so easy my toddler helped me add the ingredients to the mixer. Next time I’ll spread the filling more out. My kids loved these.
Can we make it without pre prep for yeast? Some of of already know! Love it so much and make it numerous time a year.
Thank you so much
Very soft. . Very delicious. . Amazing recipe
My first time making cheese danish, it was a hit! I made 15 at 2.7 ounces each which fit my pan perfectly. I used cherry, blackberry, raspberry and apricot & ginger preserves. I only had 6 ounces of cream cheese which was more than enough as I left 5 with just preserves as my son prefers those. I would reduce the sugar in the cream mixture to 1 tbsp instead of 1/4 cup to 6 ounces next time. Mine baked for 30 minutes. I would put the topping in the freezer next time as it melted a bit but it was hot and humid today which would have affected it too.
These are amazing! I’ve made them multiple times and each time they come out nice and soft and DELICIOUS! I did just notice that the recipe says 3oz of butter but in the instructions it says 3/4 of a stick which is 6oz usually unless you’re talking about the tiny packets. Can you please clarify. Thank you!
Nevermind I just realized what I did! I haven’t been putting enough butter.
Glad you figured it out 😀
Hi Marina,
I gave 5 stars but it turn out 1 star. I don’t why. Also the sentences ….
Sorry. So sorry
Hi Marina,
Last evening I made these delicious Danishes n they turn out
soft n airy. Also the instructions were easy to follow. Can I use
this dough to make savoury buns OR mixed pumpkin seeds
with sunflower seeds buns?If so, how many grams of seeds
should I use?
Thank you n looking forward to your reply.
Thank you very much for the recipe! They turned out delicious.
These are amazing! They turned out so beautiful and delicious.
I love this recipe so much, thank you!
The only thing I have a problem with is that the bottom of the Danish always get burnt within 5-10 mins. On my 2nd batch I had to lower the heat to 250 degrees. I don’t know if it’s because I have a gas oven or if I’m doing something wrong. But with both foil and parchment paper I sadly had the bottom burnt.
Any advice is much appreciated!
Still use the parchment paper, but you could also try putting a second baking pan under the first one.
The second pan might add some extra insulation.
Can I use this dough to do poppyseed rolls or buns?
Yes
Hi I was wondering if I could use this dough for poppyseeds rolls or buns? I love how light and airy it is and not so dense as other poppy breads.
Can this dough be considered a brioche dough? Also can I fry it as a donut?
This is a very enriched dough that if you add even more butter to it (in place if milk) will become brioche. Yes, this can be fried and will make lively donuts. You might not need to add as much sugar to it though since donuts typically are barely sweet on the inside.
Would these still be soft and impressive if baked the night before, and then eaten in the morning/afternoon? I make treats for my husbands co-workers every Friday, but don’t have time to make this early in the morning so I’m wondering if I could do it the night before. I still want them to be soft and fresh though, so i’m not sure!
Hi Ang,
It would still be wonderful in the morning. You can pop them in the oven for about 3-4 minutes at 350F right before serving and they’ll be good as fresh.
Absolutely wonderful recipe, has quickly become a staple at my house. I now get asked to make these all the time! Thanks sm for sharing this! Going to make another batch over the weekend!
Thank you, Mae for your feedback!
This recipe is amazing!! Just made these today and they are sooo good!
Thank you, Veronica! Love that you enjoyed this recipe!
This recipe, do i have eggless version? If so, is it possible for u to share?
Interested in making these…just wondering if they are more like kolaches or danish? Usually I think of Danish as layers of flaky pastry, which can be achieved in pockets with pea size shaped butter. But this appears more like a soft bread, like a kolache.
They are great, but I think it’s more dense, vs very flaky, like a Kolache dough. I filled with cheese, some with Jam, some with both. Froze the extra and just let them thaw. Great recipe.
Hi Jay!
The true Danish is made by layering a basic yeast dough with a thin block of butter until there’re layers of butter between each layer of dough (this is called lamination). The end result doesn’t produce flakiness like a croissant dough would but it’s a bit different texture than a regular dough.
This recipe is called an “easy danish” because the flavor is like a danish (with all that butter in the dough), but without the laborious lamination process. A kolache recipe typically doesn’t call for the amount of butter this recipe does and therefor has a “simpler” flavor than this one. They probably look similar to kolaches, but this recipe produces fluffier and richer pastry than a kolache.
These are delicious!! Already made them twice, once with cream cheese filling and than tried just cherry pie filling. Both time came out great. Didn’t last a day at this house with 2 kids and hubby. Definitely going to be making these again. Absolutely love the soft dough. Thank you for the great recipe!
Hi Marina,
I was wondering if this dough could be refrigerated? Like mixed, kneaded, proofed, then in the fridge overnight, and then the following morning shaped, filled, 2nd proofed and baked?
Hi Nelli,
If I was to use refrigeration I would work all the way through shaping, then allow them to rise halfway and place in the fridge. They would continue rising slowly, then in the morning once they’re at least double their size you would just bake them.
Make sure to keep them covered while they’re in the fridge so they don’t form a crust on the outside.
Wow! these were great. The family really enjoyed them.
Thanks
These are AMAZING. I did blueberry pie filling along with the cheese filling, and it was so unbelievably good. I will definitely be making these again. The pastry puffed up more than I thought it would, so next time I will be sure to stretch my dough balls out a little thinner and use a bit more filling. But, that’s all user error 🙂
I have made these danish many times ,each time they turn out fantastic!Easy recipe with beautiful results, bakery worthy.
Hi tried this recipe today looks amazing, but I haven’t tried them yet as they are still hot just out of the stove! I was disappointed however to see all the filling had slid off…… I did press down the center with a glass as the directions stated. Not sure how to change this? Definitely want to try again as they look and smell divine just need to figure out how to keep the filling from sliding, any tips/advice are welcome!
Hi Traci,
When you pressed the center with the glass did that part stay indented or did it just spring right back up? If it stayed indented then the filling should’ve stayed put. If anything, you can press with the glass after the little dough balls proof, and then put the filling. That will keep the filling inside for sure.
Do you cover the cheese filled pastries when you let it rise? I put it in warm oven without covering it. Am I supposed to cover it? And what’s the best way to cover it without disturbing the filling? Thanks
Fantastic! Easy to make, great dough, measurements are right on! I made 16 of them and they are all gone. Thank you for the recipe!
These are Phenomenal!!! Always the best recipes, thank you Marina. ❤️ I wanted to ask how could I reheat these if I made them the night before? They’re just soo good when they’re warm.
Hi Inna,
thank you for such wonderful feedback! To reheat, I would either microwave them for about 20 seconds or place in a preheated to 350F oven for several minutes.
These are dangerously delicious! Pillow soft, and not too sweet. I got 16 large rolls from this recipe.
I had to add a few tablespoons more flour, but my egg yolks might have been extra large making the dough too wet.
I used one block of cream cheese, and had enough filling to fill 8 rolls with a heaping tablespoon. The other 8 rolls got a half tablespoon of cheese filling with a spoonful of jam.
Hi Leslie, what a pleasure to read your feedback! Thank you so much for sharing!
These came out wonderful! I made the dough, let it go through the first rise to double in size, covered the bowl with plastic wrap and stuck it in the fridge overnight . The next morning I took the bowl out and let it warm up to room temp for about an hour and then proceeded with the rest of the directions.
Great thinking! Happy to hear that it all worked out well!
Do you think there’s any way this dough could be refrigerated overnight to be assembled and baked in the morning? If so, at which point on the process would be best to do so? Thank you!
why is my dough too soft
It’s supposed to be soft, just make sure to keep kneading it until it stops sticking to the bowl.
So, I love the idea of these, and the dough seems amazing – I definitely want to make them. However, my family are not too keen on anything cheesecake – so what I want to ask is, do you have any suggestions for a filling that wouldn’t involve cream cheese? Thank you so much!
You can use jam or pie filling (cherry, blueberry).
This recipe made really delicious Danish and was easy to follow. The next time I would devide the dough into 20 pieces to make smaller servings and would also increase the amount of crumb topping. Reheating these rolls from frozen in a 300 degree oven for 5 minutes works out great. Am amazed how well they stand up to being frozen and reheated.
A lot of putzing, lots of dishes, I usually stay away from those types of recipes. BUT these were worth it! They are AMAZING! Did half peach jam and have strawberry. Partial to the peach.
So glad to hear that you loved it! peach and strawberry jam sounds amazing!
i have a freind named ruth
Marina this is an amazing recipe! Easy to follow with all the tips given and the result is superb!!! Thank you so much. We will definitely make these over and over again!!
Thank you, Nico! I love hearing your feedback!
When you say pastry dough, do you mean pastry dough or dough for the pastry? Because the recipe doesn’t look like pastry dough, looks like regular yeasted dough.
Hi Anshel,
It’s pastry dough in the context of the recipe, meaning that it’s the dough for the pastry, but it is not puff pastry dough if that is what you thought it means.
Thank you
How long does it take approximately to double? Want to know plane a rough timeline so I can try these wonderful pastries.
It could take from 1-2 hours. Depends on the temp of the place where it’s proofing
If I wanted to do an overnight rise, would that happen after shaping and filling?
I haven’t tried that to tell you for sure, but if I tried it I would do it after shaping it.
Amazingly delicious! I made them a little larger by accident, need to make them smaller next time but so yummy!
I made these they were soooooooo goood…. even my dad enjoyed it and he is a very picky eater.
Super great recipe! Really enjoyable and very tasty. My whole family loved it!!
This thing are so amazing . Dough is super soft . And easy to make . We couldn’t stop eating them .
This seems to be a common problem with this recipe 😀 Thank you for sharing your feedback!
WOW these are amazing!!!!! I kneaded the dough by hand and initially thought it wasnt coming together but after adding the butter the dough became soft. These are seriously delicious and a must try!!!!!!
So happy to hear that! Thank you so much for sharing your feedback!
I want to make apple-filled piroshky, can you please share how do you do it? Thanks
What I typically do for Apple filling is shred the apples (may be 4-5?) and set them over a colander to remove excess liquid. Then add sugar (may be 1/3 – 1/2 cup?)and may be 1 tbsp of either corn starch or semolina (it will absorb any moisture once baking) and stir.
Divide the dough, make balls, then flatten each ball into a circle. Place the filling in the middle and pinch the opposite ends together. If the filling gets into the edges, it will not seal, so keep the filling away from the edges.
Set the filled piroshki seam side down and proof until doubled. Then bake:)
It’s doesn’t say. But in the stand mixer, should I use the hook attachment?
Yep!
These are perfection. They turned out perfectly
Just made these and they were a big hit in my family !! Turned out amazing!! Thank you so much for this delicious recipe!
Thank you Tina for sharing your feedback!! Glad you enjoyed them ❤️
This is a PHENOMENAL recipe! Thank you!!
Hi i want to make this but i dont undertand step 3. I have to hand knead it for 8 minutes or can i put it in my machine? And so i put in 1/4 chunk of soft butter , let it mix, then add a other 1/4 chunk? Is that right ? Sry not good at baking.
Hi Kelli,
You knead the dough in either a mixer or by hand. It would take longer to knead it by hand though, I think.
And yes, you add the butter in chunks.
Good luck!
How long do these last on the counter if they are covered?
Hi Hanna,
I wouldn’t leave them for more than 1 day. If you plan to keep them longer, I’d refrigerate them since cream cheese is a perishable ingredient.
Wow!! This recipe is AMAZING! It is so easy, almost foolproof and the dough is so soft. Thank you, Marina! This is my first comment ever, but the recipe is so deserving! Making danishes was a first for me, I was nervous, but your instructions led me right through. Loved how you included mixer setting and mixing times.
Among the Russian food blogs, this one is by far my first choice and favorite! Your recipes, both sweet and savory, are the tastiest. Blessings to you!
Thank you so much Luda! So happy you loved this recipe and my site! I treasure readers like you ❤️
your tips say to weigh ingredients, which I always do, especially for butter which I find I never cut straight. but your recipe does not include weights?
I don’t usually leave reviews as often as I should. These came out really good. Dough is perfect! I did have to add little more flour during mixing the dough process but they are so soft and so good! Great recipe!
Thank you for your feedback and star rating! Means so much to me!
This dough was supet easy to put together. As a former yeast killer I absolutely love Red Star Yeast! I have not had a failed rise since I started using this yeast.
The dough is beautiful and buttery, you don’t have to roll it out which is a bonus.
Now to move on to the cream cheese filling after I filled my danishes I won’t lie I licked the bowl lol that’s how good it is.
The streusel topping doesn’t disappoint either.
I’ll definitely be making these again on;y next time I’m going to add jam.
Thanks for the great recipe !
What a wonderful review, thank you so much for your feedback! Glad you enjoyed this recipe~
Hi can Substitute the sour cream with other ingredient?
Just replace it with more milk