Dill Pickle Recipe
This dill pickle recipe makes the most delicious fermented pickles! If you haven’t tried making your own pickles before, you’ll be surprised at just how simple (and tasty) it is.
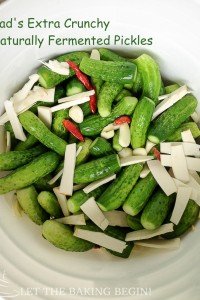
If you love pickles, you will also enjoy this pickled mini bell pepper recipe as well as my dad’s extra crunchy pickle recipe.

Two Ways to Make a Pickle Recipe
There are two types of a pickle recipe: cucumbers pickled by vinegar-based brine (1), and naturally acidified brine (2). The natural acidified brine is a brine that is made with only water and salt, but the naturally present on the cucumber’s surface bacteria make the brine acidic.
Why try a fermented pickle recipe?
This delicious pickle recipe contains no vinegar, yet they taste tangy and sour as a pickle should. So how do they get their tang? The same way the sourdough is leavened with naturally occurring yeast, the cucumbers have naturally occurring lactobacillus bacteria, which in proper environment will cause fermentation and give us all the benefits of the probiotics for our gut.
By submerging the cucumbers in the salty brine in this pickle recipe, the growth of the bad bacteria is inhibited, all the while giving the good bacteria the perfect environment for converting sugars in the cucumber into lactic acid. Lactic acid is what lowers the pH of the brine, giving the cucumbers the acidity they need to preserve and pickle them.
So, why go through this process instead of just using vinegar in the first place? Because the flavor that this natural Lacto-fermentation process produces is unbeatable, and as an added bonus you get the benefit of the probiotics which are amazing for our digestive tract health.

Slowing Fermentation in this Pickle Recipe
As long as the cucumbers are in the brine, the bacteria will continue converting the sugars into lactic acid.
Refrigerating this pickle recipe will slow the fermentation, but only slightly. So plan to eat the pickles within a week or two after you’ve made them or they will get too sour, even when refrigerated.
Long term storage of fermented pickles:
If you want to preserve them for longer, drain the brine and bring it to a boil. Then pour it back over the cucumbers leaving 1-inch headspace. Cover with a lid finger-tight. Place on a baking sheet in the lower third of the oven preheated to 350F for 10 minutes (for 1-quart jars). Then, remove from the oven, tighten the lid once more and cover the jars with a blanket or towel until they’re completely cool. Then, put away into storage. This method will keep the pickles for over a year.
At this point, most of the bacteria will no longer be active and the fermentation will slow down almost fully. Thus, you’ll get all the flavor, plus the added benefit of being able to keep them for a while.

Pickle Brine Recipe
A good basic pickle brine recipe is 2 tablespoons of kosher or pickling salt dissolved in 1 quart of water. Then, you can add different herbs like dill and aromatics to give the brine an added layer of flavor.

Pro Tips for Making the crunchiest Quick Pickles:
- Use pickling or Kirby cucumbers: these cucumbers usually have very bumpy skins and firm flesh which makes them perfect for crunchy pickles. They retain their crunch and don’t become mushy and soft after pickling.
- Choose perfect cucumbers: when picking cucumbers look for firm, medium to small cucumbers that are without blemishes or mushy spots. Using blemished cucumbers can contribute the wrong bacteria to the brine and make it compete with the proper bacteria.
- Soak in iced water: For the crunchiest pickles, make sure your cucumbers are as fresh and crunchy as possible before you start. If they’re softer or not fresh, just trim both ends and give the cucumbers a soak in icy water for 30 minutes to 2 hours before you start.
- Cut cucumbers for quicker results: I love to use smaller whole cucumbers when preparing these dill pickles, but if you’re in a hurry cutting the cucumbers into spears or rounds will speed up the fermentation process.

- Add horseradish: Horseradish contains tannins that help the cucumbers stay crunchy. Grape leaves or a pinch of black tea will do the same.
- Use kosher or pickling salt: other salts have additives to keep the salt from clumping or other chemicals that will interfere with the fermentation bacteria which will either give you an odd flavor or texture.
- Use dill flowers or seeds: while fresh dill will add wonderful flavor, the dill seeds that are in the dill flower or the dried kind in a jar are what give the pickles that signature pickled cucumber flavor. Use either one and don’t skip it.
- Leave in a warm, dark place: for the proper fermentation and quick result find the warmest, dark spot in your house (garage?) and leave your jars there. The fermenting bacteria will have a field day in a warm environment, and you will have quick pickles, quick 😀
How to Make the Dill Pickle Recipe
*For detailed recipe instructions see the recipe card bottom of the post.
Ready to learn how to make this simple dill pickle recipe? You’ll never go back to the store-bought version again!
Ingredients for the Dill Pickle Recipe:
- Kirby or Pickling Cucumbers
- Kosher salt
- Dill
- Bay leaf
- Peppercorns
- Coriander
- Horseradish root or leaves
- Garlic
- Optional – chili pod and/or red pepper flakes (for spiciness)

How to make this Dill Pickle Recipe:
- Wash the cucumbers in cold water, trim both ends. Soak in icy water if needed.
- Make the Pickle Brine: Bring water, spices, and salt to a boil.
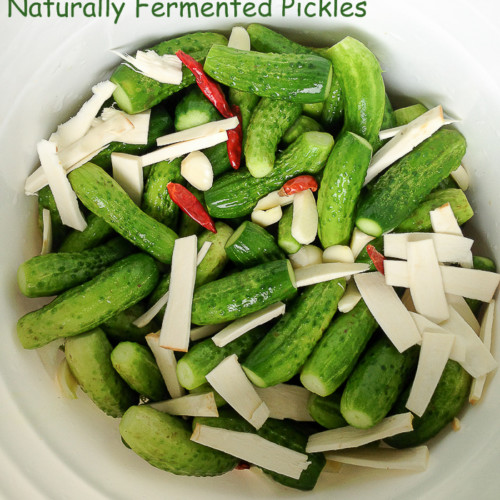
- Meanwhile, add dill, garlic, horseradish, and bay leaf to the bottom of jars or a pickling crock. Top with cucumbers leaving at least 2 inches of headspace.
- Pour the hot brine over the cucumbers, keeping the brine level well above the cucumbers.
- Place a weight on top of the cucumbers to keep everything submerged in the brine. Leaving the cucumbers or any herbs exposed to air will cause them to spoil.

- In a couple of days, the cucumbers will turn more yellow and the brine will turn cloudy, all a sign of the proper fermentation. There should not be any foul smell or mold on top. Taste the cucumbers and decide if you’d like to leave them to ferment longer or if the sourness is to your liking. Once pickled, cover the jar with a lid and refrigerate until ready to eat. Nothing better than a cold, crunchy pickle!

Scroll to the bottom for the full recipe with precise ingredient amounts.
More Canning Recipes to Try:
- Raspberry Refrigerator Jam
- Spicy Roasted Pepper Dip
- Tart Cherries Canned in Their Own Juice
- Aromatic Cured Salmon Recipe
Dill Pickles Recipe
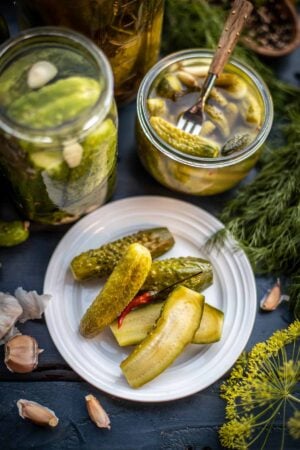
This dill pickle recipe is so easy to make! These fermented quick pickles will quickly become a favorite snack—they are crunchy and perfectly sour.
Ingredients
- 6 Kirby cucumbers (about 4 inches long) 6 cucumbers ~ 1 lb
Pickle Brine Ingredients
- 2 cups water
- 1 tbsp kosher salt
- 1 bay leaf
- 4-5 black peppercorns
- 1/2 tsp coriander
- 1 chili pod (unbroken) (omit if you don't like spiciness)
- 1/4 tsp red pepper flakes (omit if you don't like spiciness)
Add to the bottom of the jar
- 1 dill flower pod
- 1 horseradish leaf or shavings of horseradish root
- 3 garlic cloves, crushed
- 2 fresh dill sprigs
Instructions
-
Wash the cucumber and trim both ends. If the cucumbers aren't crunchy, soak the cucumbers in icy water for 30-60 minutes before starting.
-
Make the pickle brine: To a small saucepot add 2 cups water, 1 tbsp kosher or pickling salt, 1 bay leaf, 4-5 black peppercorns, 1 chili pod (if using), 1/4 tsp red pepper flakes, 1/2 tsp coriander and bring to a boil.
-
Fill the jars: In the meantime, fill a clean 1 qt jar or a crock with 1 dill flower, 2 dill sprigs, 3 crushed garlic cloves, 1 horseradish leaf or a couple shavings of the horseradish root. Then, top with the cucumbers (for quick pickles cut the cucumbers into rounds or spears to speed up fermentation) fitting them snuggly and leaving about 1 inch headspace.
-
Cover with brine: Place the filled jar in a bowl, then pour the boiling hot brine over the cucumbers all the way to the brim. The bowl is to catch any overflow as the cucumbers ferment. Add something heavy to the top to keep the cucumbers submerged in the brine.
-
Keep in a warm place: Transfer the bowl with the jar to a warm place (like a garage, or top of the fridge) for about 48 hours, tapping the jar or lifting the weight off the top to "burp" the jar and allow trapped gasses to escape. Once the pickles have changed their color to a more yellow color, and the brine has turned cloudy trim off a piece of a cucumber with clean hands and knife and taste it to see if they're pickled to your liking. If you'd like them more fermented leave them in a warm place for a little longer. Otherwise, move to the next step.
-
Refrigerate: Remove the weight and cover the jar with a lid. Refrigerate until ready to eat. Will keep for at least 2 weeks in the fridge.

Thank you for following me on Instagram, Facebook & Pinterest!
Hashtag your photos #LetTheBakingBeginBlog so I can see your creations and for a chance to be featured!
Marina | Let the Baking Begin


Do you know by any chance where to find horseradish root or leaves in FL 🙂
For the canning jars, do I need to let the pickles sit out for 1-2 weeks to ferment first and then bring the brine back to a boil (twice) and seal or do you seal them the same day you put them in the brine?
For canning, you let the cucumbers ferment until about about 75% fermented, this can take from 4 days to 1-2 weeks. It depends on how warm your house is.At 69F, my pickles took 7 days for the smaller ones and 9 days for the larger ones.
Then, drain the brine and boil it for 5 minutes. In the meantime put the pickles into sterilized jars. Pour the hot brine over the pickles, place the lid on top and tighten it “finer-tight”. Place on a baking sheet, spacing them about the width of one jar apart. Leave in the preheated to 350F oven for about 10 minutes.Then, allow to cool and store.
Exactly how I made/make mine, except….I cool my brine. Also, for a perfect 3.5% brine, I use the ratio of 1cup pickling salt to 28 cups of water. (3.5% is nature’s salinity in the oceans!). For 2 large jars this means 1/2 cup salt to 14 cups water.
After puring in the boiled brine into the bottled cucumbers. Instead of doubling up again with the 2 nd boiled brine. Could I not put the lid on after the first time of boiled brine and emerse the bottled cucumbers in boiling water for 5 minutes. This to vacum ? Would this kill all the good stuf ??
Hi Erwin,
You know, it might work just as well, but I haven’t tried that so can’t tell you for sure.
I just know that pouring the hot brine over the cucs once works sometimes, but sometimes it doesn’t. I’ve found that doing it twice just as described in the recipe has served me well and I don’t have any jars go bad this way and the cucumbers stay crunchy.
I loved the Dill Pickle Recipe and my Granddaughters could not get enough of them. My question to you is: Can these Pickles be kept longer than two (2) weeks if not placed in the refrigerator? I’m used to canning pickles and sending or gifting them for the holidays. Can these be Canned or Stored like canning?
Thank you so much for sharing your feedback!
Yes, they can be kept over the winter.
What you will need to do is, drain the brine from the pickles and bring it to a boil. Meanwhile, pack your sterilized jars with the cucumbers tightly, leaving 1 inch of headspace. Then use the hot boiling brine to cover the pickles with. Leave it with the hot brine for 20 minutes, then drain it back again, bring to a boil and pour it over the pickles one last time. Screw on the sterilized lids and close to seal. Once the jars have cooled down and the seal has formed on the lid, wipe down the jars and store away.
Let the baking begin? This is pickling!
You’re right, thanks for noticing 😉
I ferment at home, but have never heard of pouring boiling hot brine into the jars. Surely this will kill the lacto bacillus responsible for creating the lactic acid which pickles the vegetables?
And yet, this is how we’ve always done it and my dad (who taught me how to make these) swears that by using the hot, not cold brine you get the crunchiest pickles.
When the brine hits the cold cucumbers it cools down, so it doesn’t kill all lacto bacillus, allowing the fermentation to still happen.
Sounds simple. Gonna give it a try.
Hope it worked well for you!