Easy Sourdough Bread Recipe
If you’re new to sourdough bread and want to make homemade bread without yeast, the easiest way possible, this Easy Sourdough Bread recipe is for you.
Learn how to make delicious sourdough bread with these easy-to-follow step-by-step instructions and pictures for beginners. Simple ingredients (water, flour, sourdough starter) and basic kitchen tools are all you need.

I have been making sourdough bread at home for many years. I enjoy the process and take my time to make the best sourdough bread every time.
But, sometimes, you don’t have the time to do all the tedious steps and want the quickest way to get the job done. This is when this easy sourdough bread recipe comes in. It uses simple steps, no stretch-and-folds every 30 minutes, and the process is mostly hands-off.
This recipe won’t give you the wild crumb and sophisticated flavor that you would get from the other, more tedious version of sourdough, but it will give you homemade bread that’s fluffy, crispy, and delicious.
I am including step-by-step pictures and a video to help you along. I hope this easy tutorial will help you experience the joy of making your own sourdough bread.

To learn more about sourdough, check out my thorough Sourdough Bread guide. Otherwise, let’s get this EASY version of sourdough going, starting by understanding what sourdough bread is.
What is Sourdough Bread?
Sourdough bread is made with flour, water, and sourdough starter instead of commercial yeast. It is the oldest way of making bread. The starter gives the bread fluffiness and a slight signature tang many love. The tanginess is also a result of fermentation, which breaks down the gluten and makes this bread easier to digest.
What is a sourdough starter?
Sourdough starter (get some from a friend or order it on Amazon) is a fermented culture used to make fluffy bread. When water and flour mix in warmth, bacteria and wild yeast grow, releasing gas that creates air pockets in bread.
If properly cared for, the starter will become strong and concentrated. When mixed with more flour and water, it will make a fluffy loaf of bread.
What does it mean to “feed” the starter?
Like any living thing, the starter needs regular feedings (flour and water) to keep the bacteria and yeast strong, vigorous, and healthy.
Feeding a starter means taking a bit of the deflated, hungry starter and mixing it with equal parts flour and water.
Keep in mind that allowing the starter to go unfed and hungry for long periods of time will weaken it over time and produce dense and flat bread. However, a sourdough starter is resilient, so feeding it several times will bring it back to health.
Maintaining a regular feeding schedule and feeding the starter when it hits the highest rise (a.k.a peak) will produce the best bread.

Feeding frequency
Sourdough starter feeding frequency will depend on how often you’d like to bake bread.
If you bake about once a week, feed the starter weekly and keep it in the fridge to slow down the rise.
If you bake several times a week, store the starter at room temperature and feed it once daily.
While either choice is fine, I have found that the bread always comes out better from a starter that is kept at room temperature and fed once a day.
Weekly Feed (1:1:1 ratio feeding)
- Mix: In a thoroughly cleaned 8 oz jar, mix the following ingredients vigorously for 30 seconds.
1 tablespoon (15 grams) sourdough starter,
1 tablespoon (15 grams) room-temperature water
2 tablespoons (15 grams) all-purpose flour (or bread flour). - Mark: Clean up the sides, cover with a lid, and mark the current level.
- Let rise: Rest at room temp for 2 hours to start the fermentation (you want to see about 50% rise), then transfer to the fridge.
- Feed the starter once a week, keeping only 1 tablespoon of the old starter for the next feed and discarding the rest.
Daily Starter Feed – (1:12:12 ratio)
- Mix: In a thoroughly cleaned 16 oz jar, combine the following ingredients and mix vigorously for 30 seconds
1 teaspoon (5 grams) sourdough starter
4 tablespoons (60 grams) cold water
8 tablespoons (60 grams) all-purpose or bread flour - Mark: Clean up the sides, cover with a lid, and mark the current level.
- Let rise: Leave at room temperature. Repeat this feeding once every 24 hours or when the starter reaches peak rise.

When is the sourdough starter ready to use?
The starter is ready when it has reached peak rise or at least doubled in size and is bubbly. To make sure it’s ready, do a float test. Take a small amount of the starter and carefully drop it in water to check. If the starter floats, it’s good to use.
A vigorous and healthy starter will rise to triple the size and pass the float test.
If your starter doesn’t triple, you can repeat the feed directions
Other signs that your starter is peaked and ready to use –
- Doubled or tripled in size
- Have lots of bubbles on the surface
- The top surface looks thin
Use whatever you need for the recipe, then save at least a tablespoon to feed. Discard the rest or refrigerate the discard to use in sourdough discard recipes.

Tips for success:
Starter: Start with a strong and healthy sourdough starter. If it takes much longer to rise than described above, feed it a couple more times and then use it to make bread. A starter that is sluggish and takes too long to reach peak can make your bread sour and dense instead of fluffy.
Flour: Ensure your all-purpose flour is unbleached. The bleach in bleached flour will have a negative impact on the bacteria in the starter. If you’d like to level up your sourdough game, use unbleached bread flour with a higher percentage of gluten than all-purpose.
Water: You can use warm tap water for this recipe (good) or leave the tap water on the counter for several hours before using it to allow the chlorine to dissipate (better). But warm filtered water will give you the best results. The chlorine kills not only the bad bacteria in the water but also the good bacteria in the starter.
Kitchen Scale: For consistent results, you’ll want a kitchen scale. It’s a small investment serving you well for all baked goods.
Preheat the oven: Preheating the oven for almost an hour might seem unnecessary. But, the oven needs to maintain its temperature even as you open it several times to load the bread into the Dutch oven. Reducing the preheating time can make your bread dense and the crust hard, as the oven takes time to return to temperature, prolonging the baking time.

Overview of Easy Sourdough Recipe
Find a detailed recipe with ingredient amounts at the bottom of the post in the recipe card.
Tools and Ingredients:
- Flour: unbleached all-purpose flour is the flour of choice. To make a healthier version, replace 25% (1 cup) of all-purpose flour with whole wheat flour and keep the rest of the recipe steps the same.
- Water: use warm but not hot (95F) water. Once you add the flour, the dough will be the perfect temperature for rising 75F – 78F.
- Salt: Use kosher salt in this recipe. If you use table salt (ensure it’s not iodized), decrease the amount to 2 teaspoons instead of 1 tablespoon.
- Starter: use an active starter that doubles in about 4 hours or less when fed equal parts starter, flour, and water (1:1:1 ratio). If your starter is sluggish and takes longer to double, the bread will also be impacted. To remedy this, feed your starter equal parts flour/water several more times until it’s so active that it at least doubles in 4 hours.

Prepare the starter (the night before 8 p.m.)
- Mix warm water, starter, and flour to make an off-shoot of the starter (a.k.a. levian). Let it rise overnight at room temperature (68F – 70F) or in the oven with the light on. Use the starter when it hits peak rise.


Mix the dough (in the morning)
- To a large mixing bowl add warm water, a peaked sourdough starter (levian) from the night before, flour, and salt.
- Mix with a fork, then knead to combine all ingredients into a sticky dough. You can use a stand mixer with a hook or paddle attachment to knead the dough into a sticky mass for about 1 minute. Clean up the sides of the bowl with a firm spatula and add everything back to the dough.
- Form a rough ball with wet hands.
- Cover the dough with plastic wrap or a damp tea towel.

1st warm rise – Bulk Fermentation
- Rest at room temperature (70F) for 8-10 hours or in the oven with the light on (75F – 90F) for about 6-7. Wait until it almost doubles in size and becomes puffy. It will take less time if your kitchen is warm and more time if it is cold.
Stretch and Shape
- When the dough has puffed up and somewhat flattened out, as shown below, dust it with flour and turn it over onto the counter.
- Laminate the dough (a.k.a. stretch and fold until you have a taught ball).
- With floured hands, stretch the dough into a large rectangle. Fold it into thirds like an envelope.
- Now, fold both sides towards the middle, forming a square.
- Stretch the square again and fold towards the middle to create a long rectangle.
- Stretch and roll it into a tight roll.
- Tuck all ends underneath to shape a tight ball, then liberally dust with flour.

- Line a large bowl with a cotton tea towel and dust it liberally with all-purpose flour or rice flour. Add the dough ball top side down to the towel-lined bowl or a proofing basket called banneton dusted with all-purpose flour or rice flour.


Cold fermentation or 2nd rise (overnight)
- Put the dough in a plastic bag and let it rise for 2-3 hours at room temperature until it puffs up.
- Then, transfer to the fridge and leave overnight for cold fermentation.

Bake the easy sourdough (in the morning)
- Preheat the oven with the Dutch oven and the lid to 450F for 30-60 minutes.
- Remove the dough from the fridge. Turn it over onto a piece of parchment paper.
- Score the dough using a serrated knife or a razor blade with a 5-inch cross. This slash creates a weak point for the steam to escape as the easy sourdough bakes.
- Transfer the dough to a preheated Dutch oven. Throw 1-2 ice cubes between the Dutch oven and the parchment paper. Use tall oven mittens when handling the Dutch oven so you do not burn your hands.
Tip: Dutch oven is the best vessel for baking bread. It preheats to and maintains a high temperature even when removed from the oven to place the dough in. If you do not have a Dutch oven, place the parchment with the dough on a flat baking sheet and cover it with a large metal bowl. - Cover with a lid and bake for 20 minutes. Remove the lid and bake for another 20 – 25 minutes or until golden brown.
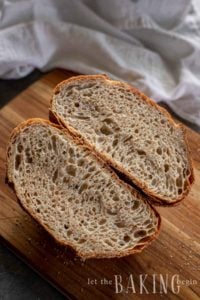
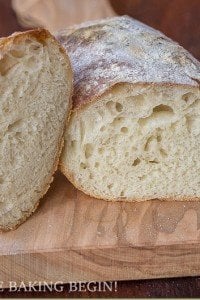
- Remove the bread from the oven and transfer it to a cooling rack to cool for at least 2-3 hours.


Love baked goods? Try these other super popular and well-loved recipes!
Easy Sourdough Bread Recipe

Easy Sourdough with a no-knead method, no fancy ingredients or equipment. The easiest version of sourdough bread.
Ingredients
Sourdough Starter
- 1 tbsp active sourdough starter
- 1/4 cup warm water (95F)
- 1/2 cup unbleached all-purpose flour
Sourdough Bread Dough
- 1 3/4 cups warm water (90F – 95°F)
- 1/3 cups sourdough starter from the step above
- 1 tbsp kosher salt
- 4 cups unbleached all-purpose flour
Instructions
Feed the Sourdough Starter (8 pm, day 1)
-
Mix: In a small jar, mix 1/4 cup warm water (95F), 1 tbsp active sourdough starter, and whisk until milky. Then, add the 1/2 cup unbleached all-purpose flour and mix well for 1-2 minutes to incorporate the starter well.
-
Leave at room temperature (70℉) for 10+ hours or until the top of the starter looks bubbly and the volume at least doubles. If the starter doesn't bubble on top and double in size within 10-12 hours, it could mean the starter is weak.
In that case, feed the starter as described in step 1 a time or two or until the starter ripens in under 10-12 hours.
Mix the dough ( 8 a.m., day 2)
-
Mix the ingredients:
To a large bowl, add 1 3/4 cups warm water (90F – 95°F). Stir in 1/3 cups sourdough starter from the step above from the night before. Mix well until the water is milky.
Add 1 tbsp kosher salt and 4 cups unbleached all-purpose flour and stir with a wooden spoon to moisten the flour.
-
Mix the dough:
Then, use your hands to mix everything until a wet dough forms. Clean off the sides of the bowl with a firm rubber spatula. Clean your hands with the dull side of the butter knife and add it to the dough.
-
Shape into a rough taught ball:
Wet your hands, shape the dough into a rough ball (this is easily done by folding the dough in half until it's to tight to fold again).
Rest the dough (1st rise – bulk ferment):
-
Cover the bowl with plastic wrap or a wet kitchen towel. Leave it at room temperature or in a warm place until the dough almost doubles in size, about 6-10 hours.
The dough needs to be in a relatively warm area, otherwise it might take a lot longer to rise. The oven with just the light on is a good place to leave the dough in.
Shape the dough:
-
Once the dough almost doubles dust the top of the dough lightly with flour. Turn the bowl over on the table, and with lightly floured hands, help the dough out of the bowl.
-
Next, keep stretching and folding the dough with floured hands to build tension. Here's how:
Stretch the dough into as large a rectangle as it stretches without tearing. Fold the dough into thirds, envelope style. Fold both sides towards the middle, forming a square/rectangle.
Stretch it out again. Fold it into thirds (envelope style), and roll it into a tight roll.
Pinch the sides of the roll for even ends and roll the dough against an unfloured counter, pushing and moving the dough towards yourself as you rotate it to form a smooth ball. If you handle the dough with lightly floured hands the dough should not feel too sticky. Dust the ball with flour.
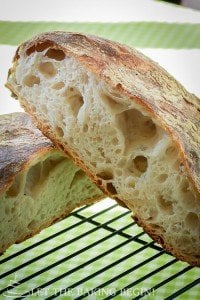
All this stretching and folding builds strength, redistributes air pockets, and aligns gluten strands in the dough for an even crumb in the bread.
Dough that rises under tension (tension is created with strong gluten formation) will have a more open crumb.
Proof in the lined basket:
-
Line a bowl with a clean cotton kitchen towel (preferably cotton). Liberally dust with flour. Add the dough ball seam side up. Pinch the seam together once more to create a taught ball. Dust with flour if you wish.
-
Cover with a towel and leave at room temperature (70F) or in the oven with the light on for 2-3 hours or until the dough increases by about 30% and becomes puffy. This dough will continue rising in the fridge overnight.
-
If planning to bake the same day – proof until about 50% increase.
Do not over-proof or the dough will become runny, stick to the towel and bake into a flat loaf. Once the dough overproofs there's no going back, you'll just have to bake it and hope for the best.
How to check if the dough has proofed
-
Finger poke test:
Ready: If you press into the dough with a finger about 1 inch deep, the dough will slowly spring back and still leave a slight indent.
Leave to rise a little longer: If the indentation bounces back fast.
Overproofed: If it doesn't bounce back at all, it's over-proofed.
-
At this point, you can either bake the bread or place it in the fridge for cold fermentation.
Cold fermentation will improve texture and flavor, and the oven will spring.
Cold ferment (overnight)
-
Place the bowl into a plastic bag or cover with a disposable shower cap to prevent drying out.
Refrigerate overnight.
Morning of Day 3
-
Preheat the oven:
Adjust the oven rack to one just below the middle.
Place the Dutch oven with the lid on top.
Preheat the oven to 450F for 30 minutes to 1 hour.
-
Score the bread:
5 Minutes before the oven is preheated, remove the dough from the fridge.
Remove the dough from the plastic bag.
Turn the dough out of the bowl on to a piece of parchment paper.
With a sharp serrated knife make a 5-inch cross on top of the dough going about 1/2 inch deep.
Bake the Easy Sourdough
-
Transfer the dough into the preheated Dutch oven by pulling on the parchment paper.
-
Add ice:
To keep the crust thin add 1-2 cubes of ice behind the parchment paper. The steam will keep the crust from hardening for longer, allowing the bread to open up better.
-
Quickly, cover with a lid to trap in steam.
-
Bake for 20 minutes with the lid on.
Then, remove the lid and bake for another 20-25 minutes or until golden color. The internal temperature of the bread should read 205℉ – 210℉.
Cool
-
Remove from the Dutch oven and allow to cool on a cooling rack for several hours before cutting.

Thank you for following me on Instagram, Facebook & Pinterest!
Hashtag your photos #LetTheBakingBeginBlog so I can see your creations and for a chance to be featured!
Marina | Let the Baking Begin


damn Tried it. It’s a nice recipe I personally love it.