How To Make Sourdough Bread: A thorough Step By Step Guide
Everything you need to know to make homemade Sourdough Bread at home successfully. Made with just flour, water, salt, and sourdough starter, this sourdough bread recipe makes the best-tasting homemade bread.
Enjoy this thorough, step-by-step guide to crispy, chewy, slightly tangy bread that you won’t get enough of! If you know nothing about sourdough bread, get ready to learn lots.
From all the recipes on this site, no other recipe ever has gotten as much dedication, practice, research, and attention before it was brought before your eyes as this sourdough bread recipe.
I have done the research, read the books, baked, then read again, then did research again, then baked and baked, all in an attempt to not just bake a good sourdough loaf but understand it. Below, you’ll find a comprehensive guide so that you can repeat my success and create the most fantastic bread in your kitchen.
Many recipes give you a recipe without explaining the “why, ” making it hard to understand what went wrong when you get a puck instead of fluffy bread. I hope that this sourdough guide will equip you with the knowledge and tools necessary to create your own delicious homemade sourdough bread and be able to adjust the recipe for your needs.
So, now I have a “go-to” sourdough recipe I’ve perfected. It’s based on my artisan yeast bread recipe, but I use sourdough starter instead of commercial yeast.
There are various methods of making sourdough bread. After trying different approaches, I have found a combination of techniques that produces excellent bread while also incorporating time-saving tips that do not compromise the quality or taste.
My sourdough is mixed all at once, as opposed to a multi-step process you’ll see in other recipes, and left to rise in a simple makeshift proofing box to speed up the rising time. The high hydration of the dough keeps the bread moist and fresh for many days.
I hope you give it a try! And if you don’t succeed at first, don’t give up! Making sourdough is the type of knowledge that is worth the practice.
So, what is Sourdough Bread?
Sourdough bread is the oldest way of making leavened bread. It is as simple as it is genius. Sourdough bread is made with flour, water, salt, and a fermented wild yeast culture made with flour and water, also known as a sourdough starter.
Sourdough starter is a natural alternative to commercial yeast. It not only makes the bread rise as the yeast does but also makes it easier to digest and improves the bread’s texture, flavor, and keeping ability due to the sourdough’s bacteria and enzymes that commercial yeast does not have.
Depending on your preference and how it was cared for, the starter can impart a lot or a minimal sourness to the bread. So don’t be warded off thinking that you don’t like sourdough because it’s sour.
What is a sourdough starter?
In the simplest of terms, a sourdough starter is a live fermented culture made with only flour and water.
Through fermentation, the starter captures and replicates the wild yeast and bacteria naturally present in the flour and the environment.
Gluten breaks down when the bacteria eat the flour, creating air bubbles (CO2), acids, and alcohol as a byproduct. This process makes the starter rise and become light and fluffy.
To keep the sourdough starter alive and thriving, as any living thing, it needs regular feedings. Flour and water are the starter’s food of choice. Feedings help the good bacteria and yeast in the starter grow and become stronger and more resilient over time.

Where do I get a starter?
If you don’t want to create a starter from scratch, I suggest buying a ready-made one or asking for a mature starter from someone you know. This can save you time and effort.
A mature starter is much more stable and less fussy than a young, temperamental one. If this is your first time making sourdough, having a mature starter gives you one less variable to worry about as you sail on this bread-making journey.
If you would like to get sourdough starters online, here are several options:
- King Arthur Sourdough Starter
- San Francisco Style Sourdough Starter
- Send a prepaid envelope, and they’ll send you the Oregon Trail Sourdough Starter from 1847 for FREE.
Feeding a sourdough starter?
Let’s start with some simple concepts and understanding the effects of feeding on the starter.
Feedings are needed to keep the starter alive and thriving. The sourdough starter feeds are typically done in ratios. As such, a 1:1:1 feed means that 1 part starter, 1 part flour, and 1 part water by weight are added. A healthy starter fed a 1:1:1 ratio and kept at 70 F should take about 4 hours to at least double in size.
The starter will rise as the yeast and bacteria go through the flour. At peak rise, the concentration of natural yeast in the starter is at its highest, which makes it the best time to use it for making bread.
A consistent feeding schedule will ensure the starter stays strong, healthy, and vigorous.
Discard
Each time the starter is fed, only a tiny amount is used, and the rest should be discarded. If the starter is fed less than a 1:1:1 ratio, you risk having a weak, unhealthy starter that carries over too much acidity from feed to feed and into your loaf.
You can store this discarded starter in the fridge for recipes that call for discard specifically.
If you do not discard most of your starter each time you feed it but continue topping it off with more and more flour, you’ll end up with too much weak and probably very acidic starter.
_________________________________
Weekly feedings:
Keep the starter refrigerated if you only bake once every week or two. Feed it once a week to maintain health. When ready to bake, do at least two consecutive refresher feeds to activate the yeast or at least one refresher feed with a larger ratio (ex: 1:10:10).
Weekly maintenance feed:
- Add 10 grams of the sourdough starter (discard the rest), 10 grams of filtered water, and 10 grams of unbleached bread flour (1:1:1 ratio) to a clean 8 oz jar.
- Stir vigorously to combine.
- Clean up the sides of the jar and mark the current level outside of the jar with a rubberband or marker.
- Cover with a lid. Leave at room temperature for 1 hour, then refrigerate.
_________________________________
Daily feeding: (recommended*)
Store the starter at room temperature (around 70°F) if you bake several times weekly.
Feed it at least once every 24 hours or when it reaches its peak rise, adjusting the ingredient ratio to hit the peak at the 24-hour mark.
Daily maintenance feed:
- Feed a 1:10:10 or 1:20:20 ratio to maintain between 68F – 70F.
- For a 1:10:10 ratio, mix 5 grams of peaked starter, 50g of water, and 50g of unbleached strong flour in a clean 8 oz jar. Vigorously stir for 1 min. Mark the current level. Close with a lid closely. Leave at room temp until the next day.
Feed again or use at peak to leaven bread dough.
When is the starter ready to use?
If the starter (fed a 1:1:1 ratio) at least doubles in size in under 4-6 hours at 70F, it’s OK to use. But, starting the dough with a peaked starter will result in a higher concentration of yeast and bacteria, leading to a quicker rise.
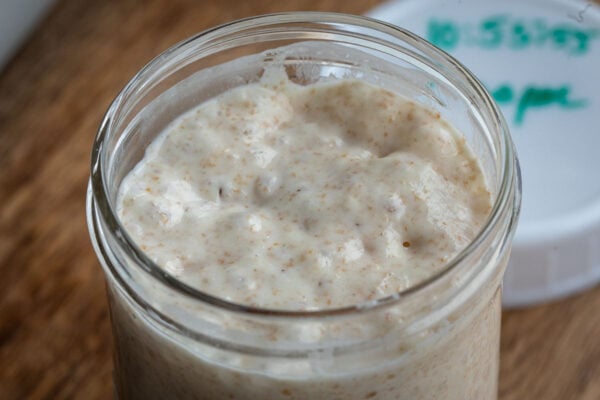
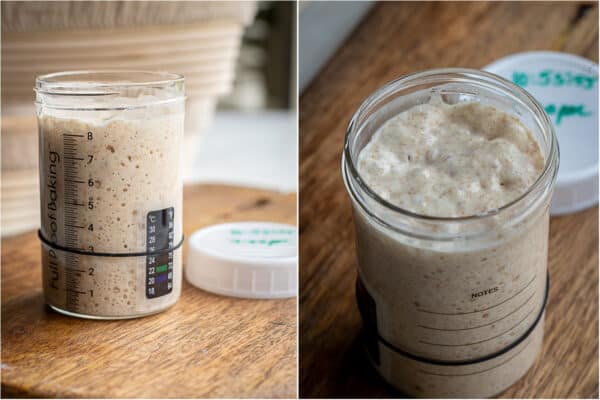
What does a peaked or ripe starter look like?
- Concave surface: As the starter rises, it will have a domed top. Once yeast runs out of food, its activity will halt, and the air pockets created earlier will start to deflate. At this point, the starter’s top surface will become concave, which will be most noticeable around the edges of the jar.
- Popping bubbles: You will also be able to observe some of those bubbles popping/winking as you watch the surface of the starter.
- Variation of bubbles: The sides of the jar should have lots of large and small bubbles.
- Peaks and valleys: The top surface will have peaks and valleys.
- Float test: If you drop a spoonful of starter into the water, the starter will float.

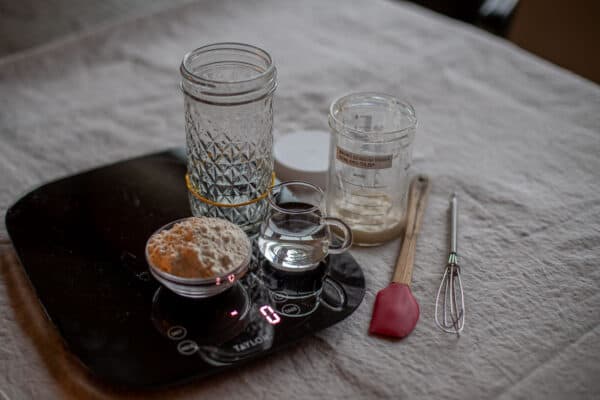
Tools for making sourdough bread
I linked to the tools that I use. You’re welcome to replace them with alternatives.
- 1 qt wide mouth jar – preferably with straight sides for easier mixing of the levian
- Digital scale – to measure the ingredients for more consistent results
- Small, sturdy rubber spatula – to mix the starter when feeding
- Plastic container & lid or a large/wide bowl – for mixing and stretching the dough
- Banneton Basket (12″ oval or 10″ round) – to hold the shaped dough and wick moisture off the exterior of the dough while refrigerated.
- Lame or a sharp serrated knife for scoring the bread before baking
- Dutch oven (7 qt oval or 5 qt round) to help retain steam and help the bread open up as it bakes
- Perforated Plastic Bags – the perforations on the bag allow the steam to escape while keeping the bread from drying out. It’s also perfect for giving away bread 🙂
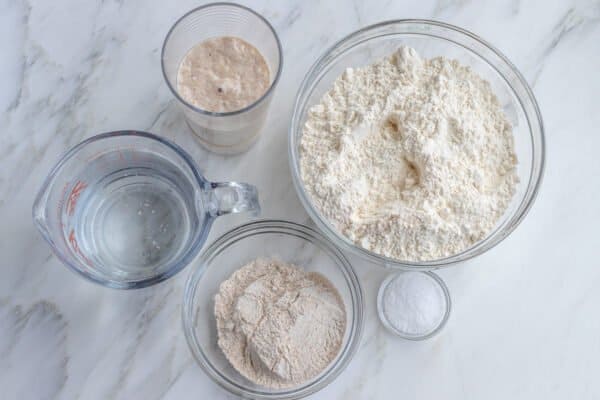
Ingredients for sourdough:
White bread flour, whole wheat flour, water, starter, and salt. Now, let’s talk about them in depth.
- Unbleached Bread flour or unbleached high-gluten flour – I use Central Milling High Mountain Flour. You can use any unbleached flour, but high gluten or strong bread flour will allow you to use a higher water-to-flour ratio, giving you a more moist crumb and creating a more open bread structure.
- Whole Wheat Flour – any whole wheat flour will work, but Bob’s Red Mill whole wheat flour doesn’t impart as much sourness to the dough as other brands. You can replace whole wheat with regular white bread flour. But whole wheat flour adds flavor and a variety of bacteria to improve the nutritional value and speed up the fermentation of sourdough bread. It also absorbs more water than white flour, so the dough will be stiffer and easier to handle than if you used all white flour.
- Warm (90 F) filtered water – I use cold filtered water straight from the refrigerator’s water filter, then heat it for 1 minute in the microwave to achieve 85F – 90F. The water filter removes any of the harmful bacteria and chlorine that might compete with or kill the good bacteria in the sourdough starter. Starting with warm water means that the yeast will have a favorable environment for growth from the start.
- Sourdough Starter – for best results, catch it at peak. Peaked starter will have the highest concentration of yeast.
- Salt – use kosher salt or any salt without iodine/additives that can interfere with the sourdough’s bacteria/yeast. Salt not only adds flavor to the bread but also helps tighten the gluten in the dough.
OVERVIEW on How to Make Sourdough Bread
An in-depth recipe will be below this overview.
- Feed the starter the evening before making sourdough bread. Adjust the feeding ratio to make it ready to use in the morning.
- Mix all ingredients in the morning. Knead for 4-5 minutes by hand or 1 minute by mixer until no dry flour remains. Cover and let rest for 30 minutes.
- Stretch & fold to build strength in the dough by performing 4 – 6 sets of stretches 30-60 minutes apart (2-3 hours total).
- Rise: Cover and let the dough rest in a warm place for 1-3 hours or until the dough has risen by about 30% – 50% or looks puffy and no longer dense.
- Shape & refrigerate – preshape the dough and rest for 30 minutes. Then do final shaping, transfer to the banneton seam side up, cover, and refrigerate for 12-18 hours overnight.
- Bake: Remove from the fridge the following day, invert onto parchment paper, slash the top of the bread with a lame & bake in a preheated Dutch oven until golden brown.
Now, let’s do a deep dive down into the step-by-step process.
How to make the Sourdough Bread from scratch
This sourdough recipe is made over 36 hours but three days. If you start before going to bed one day, you’ll prepare the dough on the second day and bake it in the morning of the third day. Keep this in mind as you make this sourdough bread. You can adjust the timeline to fit your schedule.
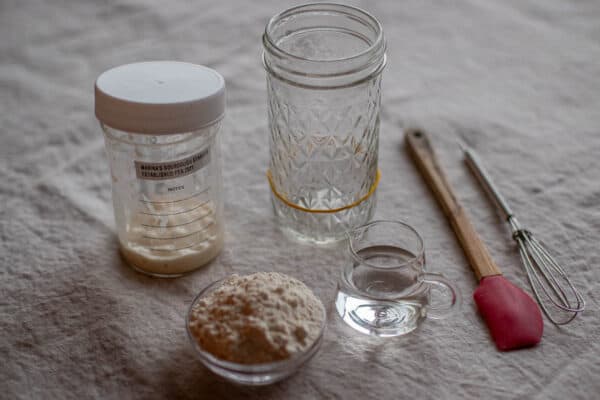
Make the leaven – 8 p.m.
Make an off-shoot of the starter (the leaven or levian) in the evening; it will be ready by morning.
- 8 p.m. – 10 p.m.: create a leaven (1:5:5 ratio) by mixing 10 grams of active sourdough starter and 50 grams of warm water in a clean jar. Then, add 50 grams of bread flour and mix thoroughly.
Clean the sides of the jar. Mark the current level and cover it loosely.
Keep warm (70F), undisturbed for 10-12 hours or until the leaven peaks.
Adjust the ratio based on your room temperature and desired rising time.
See approximate ratios below:
1:2:2 ratio for 66F – 67F room temp 8 hour rise time
1:3:3 ratio for 70F for an 8-hour rise time
1:5:5 ratio for 70F – 10-12 hour rise time
DIY “proofing box” hacks
The best temp for the sourdough to rise is around 75F – 80F. If you do not have a dough proofer to maintain a warm temp, you can easily create your own using one of the methods below.
Warm oven “proofing box”
Preheat the oven to 200F for 5 minutes. Turn the heat off. Turn the light on and keep it on. Do not turn the heat in the oven. Insert a wooden spoon to keep the door ajar while the dough is inside.
Pros: super easy; does not occupy the microwave; does not take extra storage space; free.
Cons: The heat is lost each time the oven door is open when the dough is removed for stretches.
Microwave “proofing box”
Here’s how:
- Wet and fold a kitchen towel to fit underneath a dinner plate. Microwave the wet towel for about 1 minute to heat it through.
- Cover the towel with an upside-down dinner plate to trap the heat underneath.
- Set a cutting board or another folded-up dry kitchen towel on top of the plate to create a barrier between the plate and the cutting board.
- Set the bowl with the dough on the dry towel or the cutting board. Shut the microwave door.
Each time you remove the dough to do a set of stretches and folds, re-microwave the wet towel for a minute to maintain the heat within the microwave. Keep your dough in between stretches on the dry towel.
Pros: Small space is fast and easy to warm up; easy to reheat and maintain the “proofing box” temperature; doesn’t take the extra space that an actual proofing box would.
Cons: This method uses the microwave, so if you need to use it to heat food while the dough is rising, the “heating assembly” will need to be removed and then replaced.
Mix & Warm Bulk Fermentation 8 a.m – 12 p.m., next day:
Bulk Ferment, or first warm proof, starts when the starter is added and ends when the dough is pre-shaped. During this step, the yeast in the dough begins to multiply, making the dough rise while the fermentation breaks down the gluten.
- 8 a.m.: Mix warm filtered water (90F) with the prepared leaven in a large bowl and stir until the water looks milky. Add the flour and salt and stir roughly to bring everything together.
- Knead the mixture for 3-4 minutes by hand or 1 minute with a mixer fitted with a paddle attachment until no dry bits remain.
- This marks the beginning of bulk ferment or the first rise when the dough proofs as a big mass. This is an excellent time to start a timer for 4 hours, which is typically how long the bulk ferment lasts for this particular recipe.
The dough should be chunky and wet but not runny like cake batter. If it looks like cake batter, add enough flour to make it wet and shaggy. Clean up the sides of the bowl with a firm spatula.
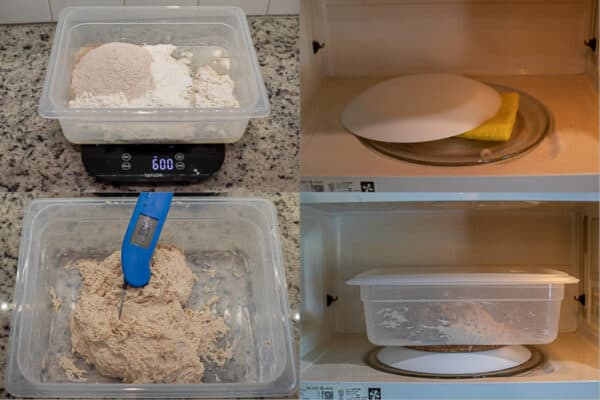
Cover the bowl with a kitchen towel or lid and rest in a warm place for 15 – 30 minutes (set a timer). This will allow the flour to absorb the water, relax the dough, and start the yeast activity.
1st set of Stretch & Folds (S & F)
- 8:30 am: The dough will look shaggy but much more relaxed than when it was first mixed. Wet your hands. Grab a chunk of the dough with your hand, pull it up until it stretches, then fold it over it. Go around the dough and keep pulling up and over until it no longer stretches. Set it seam side down. Cover and return to a warm spot for 30 minutes (the dough should be kept in a warm area between all stretch-and-folds going forward).

2nd set of S&F
- 9 am: the dough will look smoother and should now spread into the container’s bottom. Do another set of S & F with wet hands, turning the bowl 90 degrees as you go around until the dough doesn’t stretch anymore. Set seam side down, cover, and let rest for another 30 minutes.
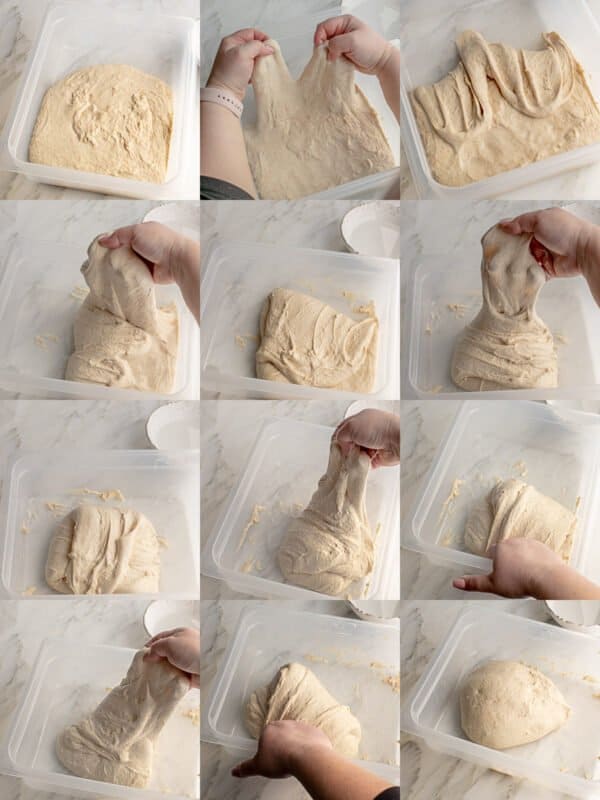
3rd set of S&F
- 9:30 a.m.: Repeat the S & F once again. Adjust the timing between stretches according to your dough’s ability to relax, setting a timer to remind you to check on it in 30 minutes.
By this set, the dough should look slightly puffed up with many tiny blister-like bubbles on its surface. If it doesn’t, don’t worry. It might just need more time in a warm place.
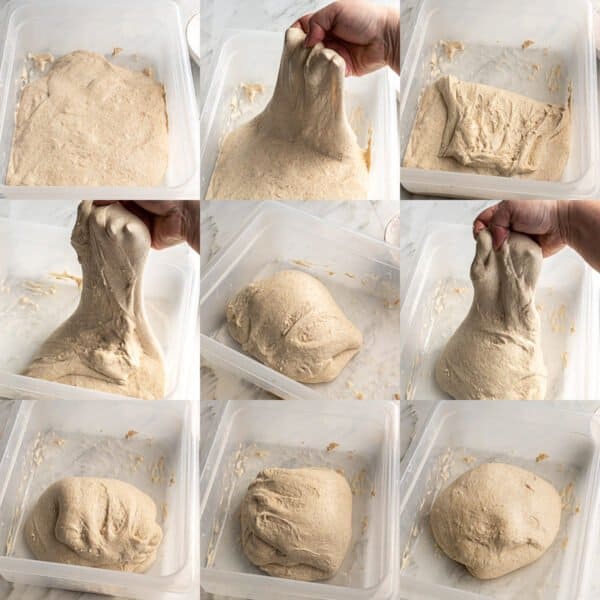
4th Set of Stretch & Folds
- 10 a.m.: If you’ve kept the dough in a warm place (80F) between stretches, the dough will be puffed up (but not by a lot) and feel lighter. After resting for 30 minutes, the dough folds will stay visible and not pool into a single mass easily. If the dough still pools into a single mass, continue strengthening it by stretching and folding it every 30 minutes until about 12 p.m. Otherwise, leave the dough to rest covered in a warm place until 12 p.m. for the dough to continue rising.
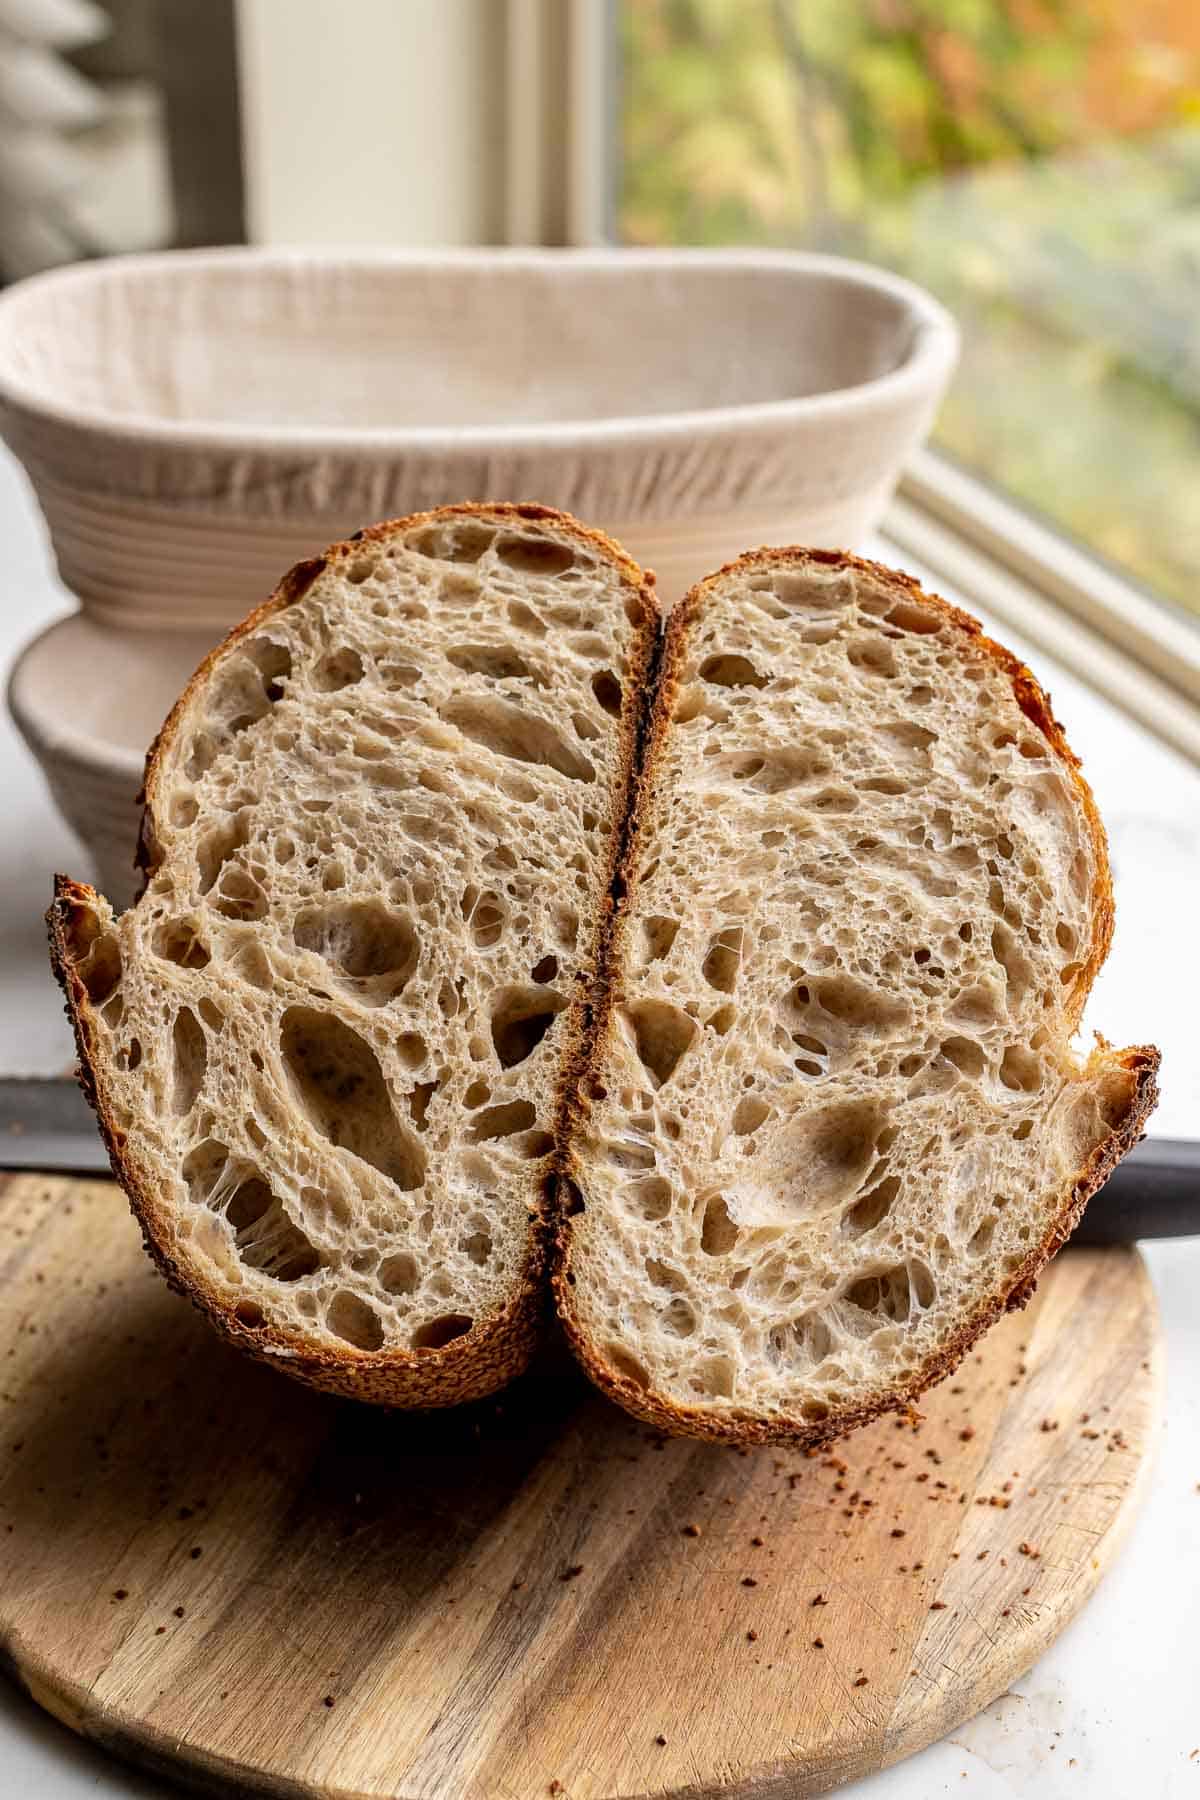
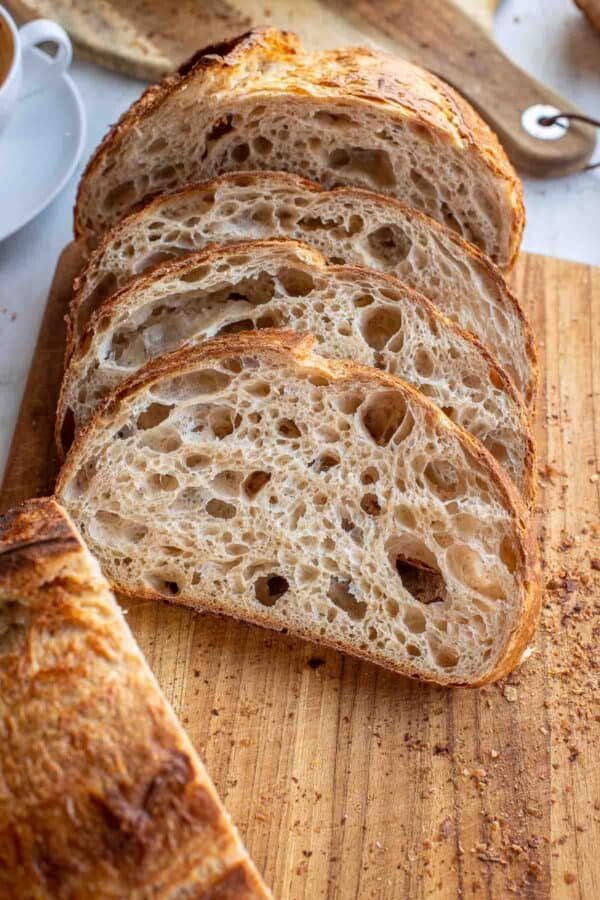
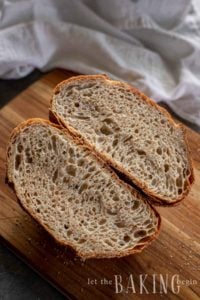
- At 12 pm, the dough should be well puffed up, and have lots of big and small big and small bubbles underneath its surface (see pix below). The surface will be smooth and elastic.
This marks the end of bulk fermentation.
If your dough looks and feels as described above move to the next step. If not, add a couple more folds to strengthen the dough, or leave the dough to rise in a warm place until it feels lighter and increased by 30% – 50% voume-vise. Use your eyes to gague if the dough is ready to move to the next step. My time table is approximate and you might need to adjust it to your own dough.
Sourdough dough behaves differently than a simple yeast dough. You do not need to wait until the sourdough doubles in size. As long as it feels lighter and you see small “blisters” that are just underneath the top surface of the dough, you’re ready to move to the next step.
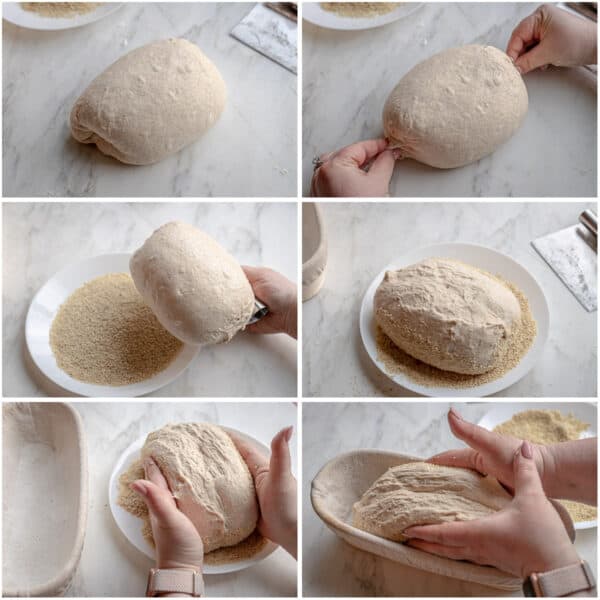
Shape the sourdough 12 p.m. – 12:50 p.m.
Pre-shape
– this step aids in building height, creating surface tension, and establishing the structure for shaping the bread. Dough that rises under tension will have a better oven spring and an open crumb structure when baking.
12 p.m. (or whenever the dough has increased by 30% – 50% and is strong)
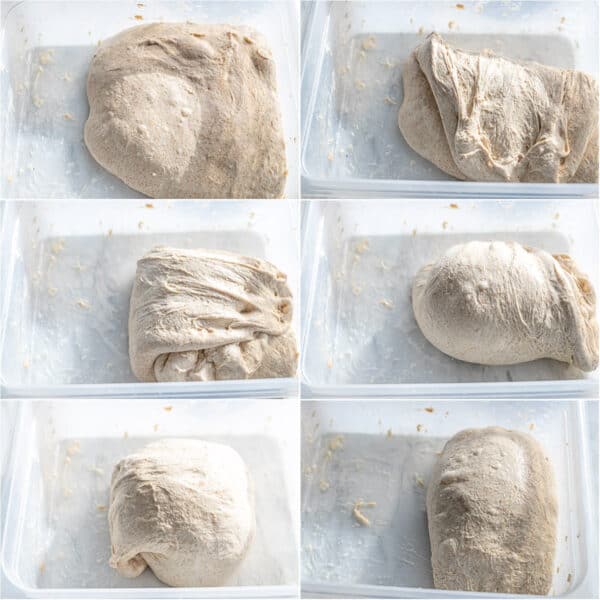
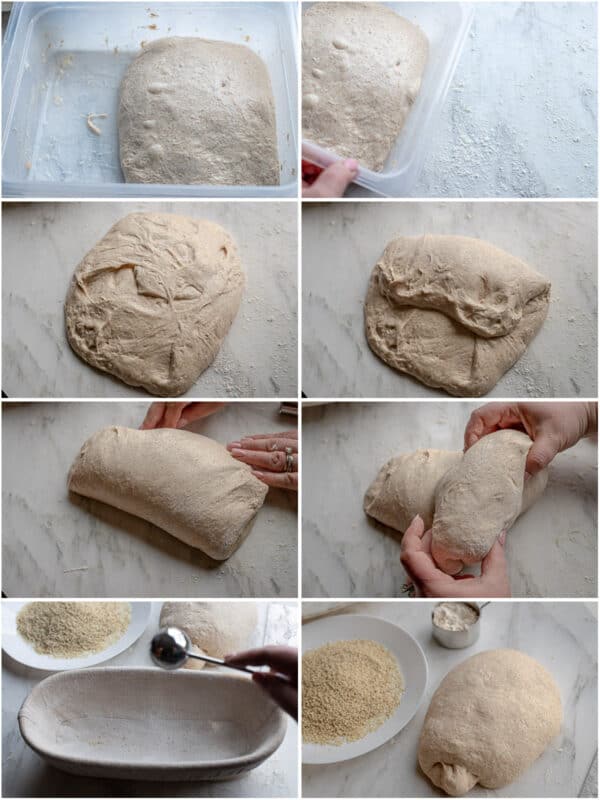
- Dust the top of the dough inside the bin with flour. Turn over the container and allow the dough to fall onto the counter. With floured hands, stretch the dough into a rough square.
- Visually divide the dough into thirds vertically. Fold the left and right over the center third with a bench scraper or floured hands. Now, roll the dough into a roll by tucking/pulling, then rolling to make a tight roll.
- Leave to rest uncovered for 30 minutes to dry out the surface.
- Prepare the bannetone mold (proofing basket) by dusting it with rice flour or heavily dusting it with regular flour, set aside. Alternatively, use a bowl lined with a cotton or linen kitchen towel dusted with flour.
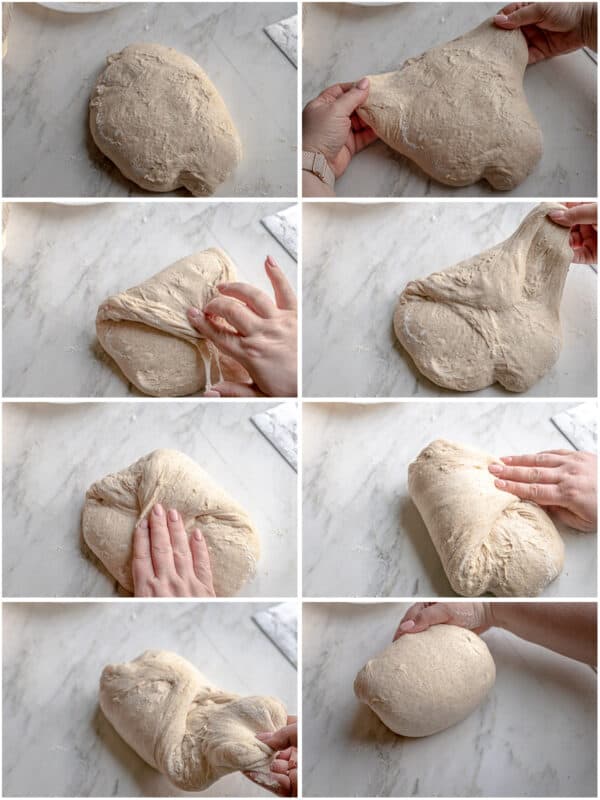
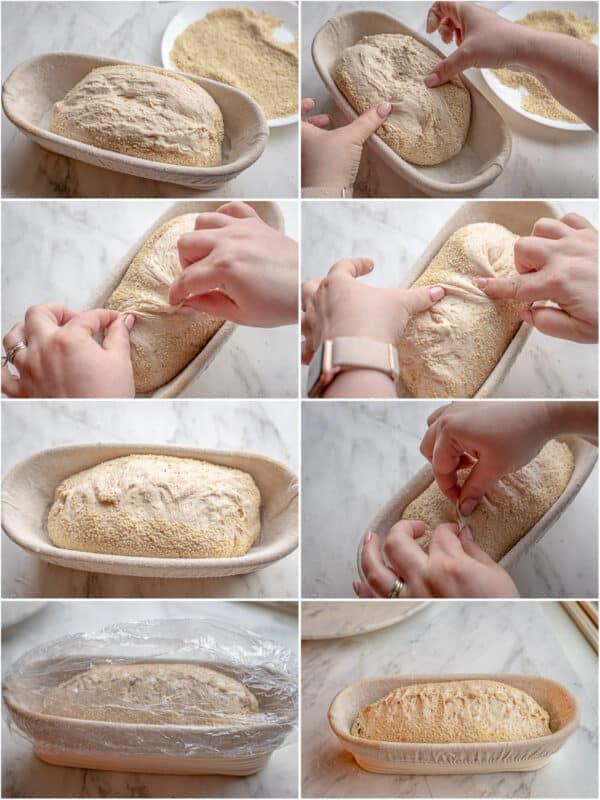
Final shaping – 12:30 pm:
- Using a bench scraper, invert the rested dough bottom side up (do not add flour). Gently stretch the dough out into a circle.
- Grab the top portion of the dough (12 o’clock) and stretch it out and over the top third.
- Next, grab a chunk from the right side and fold it over the center third, followed by the left side over the center.
- Now, fold the edge closest to you over the whole thing, inverting it smooth side up.
- Push the dough towards yourself with the bottom side of your palm or the bench scraper, creating a taught surface.
- Flour the top of the shaped dough
Optional: To cover the dough with seeds or other toppings, spray the top with water, then pick up the dough with a bench scraper and turn it over wet part into the seeds. Roll the dough gently to cover it well.
- Pinch the sides of the dough to create neat ends.
- Using a bench scraper, pick up the shaped dough smooth side down and seem side up into the floured basket.
- Leave to rest for 10 – 20 minutes.
- Pinch both sides of the dough in a zig-zag pattern to create a taught surface.
- Cover the mold with a disposable shower cap or a kitchen towel.
Cold Fermentation – 12:50 p.m. – 8 a.m. (next day)
Refrigerate the dough overnight for cold fermentation (also called cold retard). The yeast’s activity slows drastically during this time, allowing the enzymes to break down gluten further.
In a pinch, you can cold retard (refrigerate) the bread only until the evening (5 p.m. – 8 p.m.), instead of overnight, then bake it. But, I find the texture and flavor is a lot better when baked the next morning, 18-20 hours later .
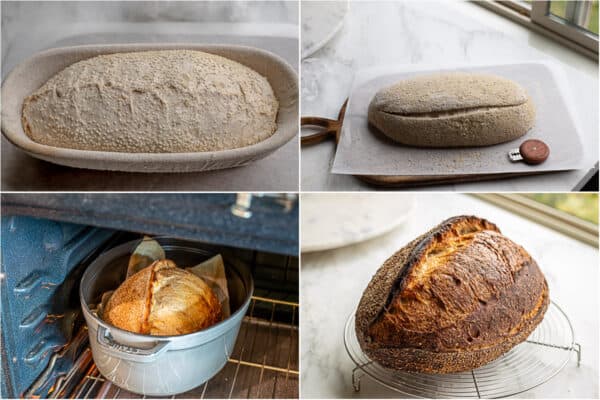
Bake the Sourdough Bread – 8 am – 10 am: Next morning
- Preheat oven: Adjust the oven rack to one below the middle. Place the Dutch oven with the lid inside the oven. Preheat the oven to 475F for at least 30 to 40 minutes or up to 1 hour.
- Remove the dough from the fridge right before the oven is done reheating. Take the cover off. Turn the sourdough over onto the parchment.
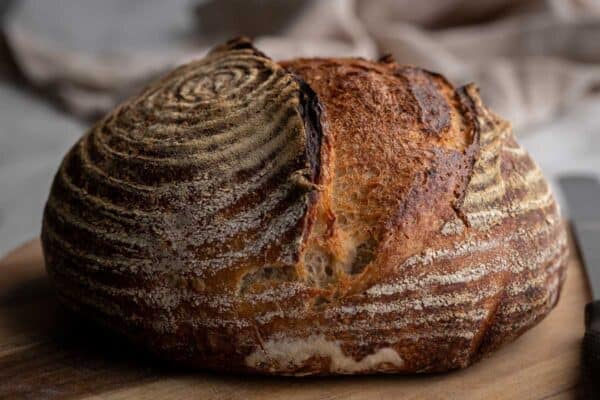
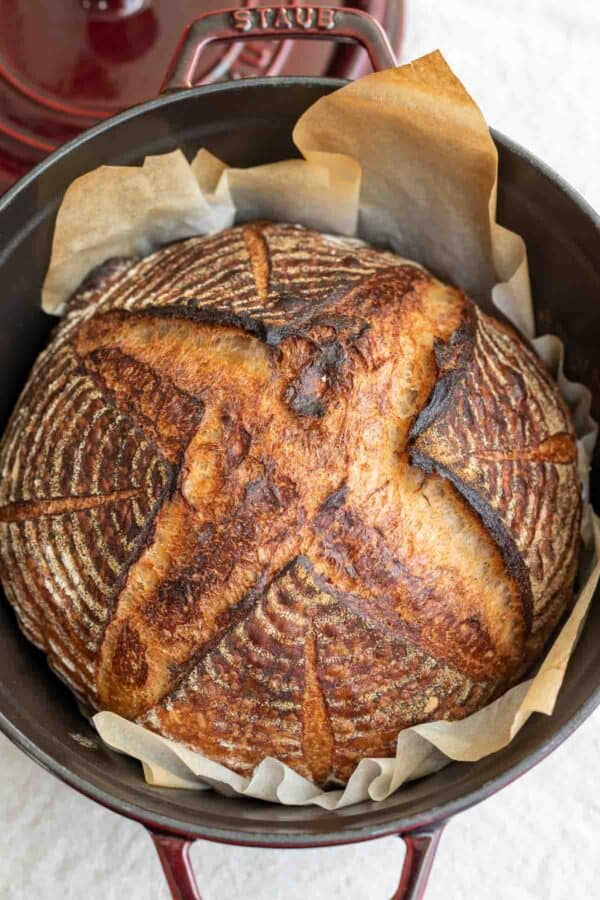
- Score: Using a razor blade (aka lame, – a French word for “blade, pronounced LAHM) or a sharp knife, score the dough off the center lengthwise, about 3/4 inches deep, at a 45-degree angle. This creates a weak spot for expansion as it bakes. Prepare two ice cubes.
- Transfer to the Dutch oven: Remove the hot Dutch oven from the oven. Then, quickly but very carefully, place the parchment paper with the dough inside, keeping your hands away from the hot Dutch oven. Add the ice cubes to the side, and quickly cover the pot with the lid to trap the steam. Steam keeps the crust soft, preventing the crust from hardening before the bread can fully expand.
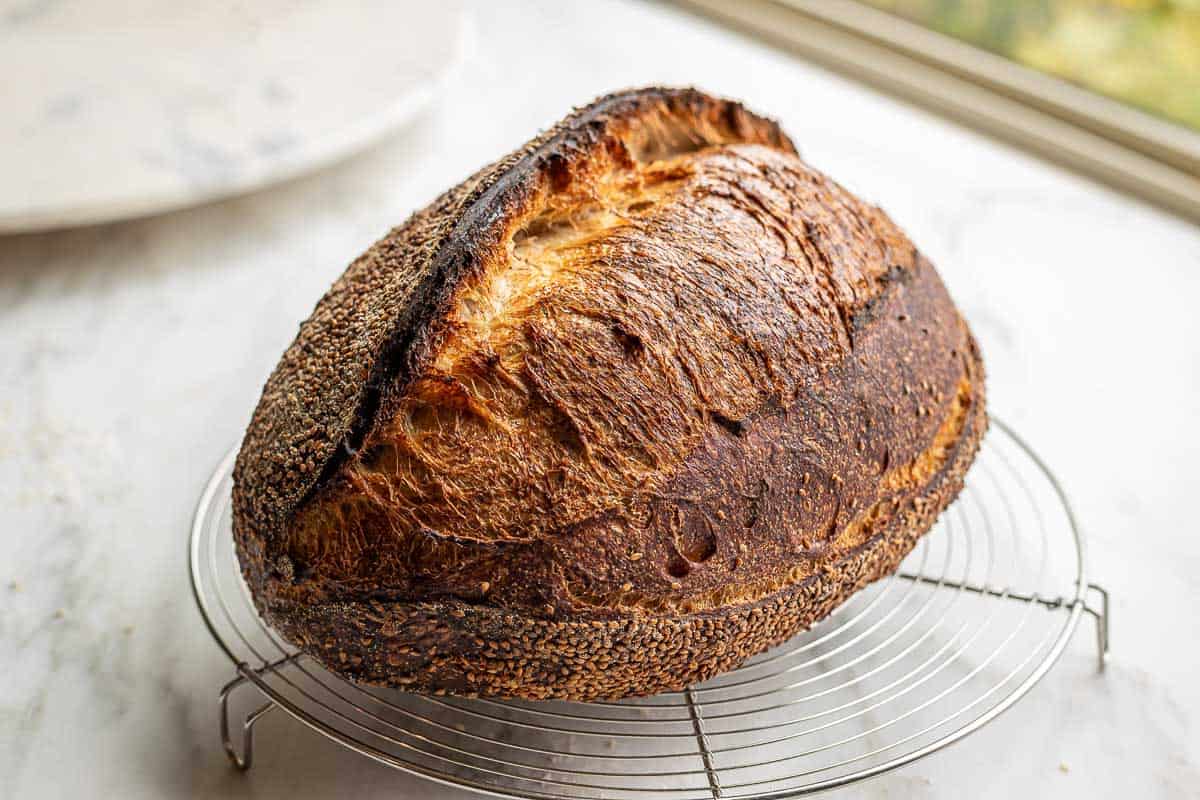
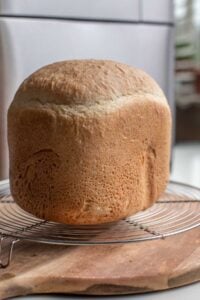
- Bake for 20 minutes with the lid on. Then, remove the lid and bake for another 20-25 minutes or longer, depending on your preference for the darkness of the crust. The darker the crust, the more flavor the bread and crust are imparted with.
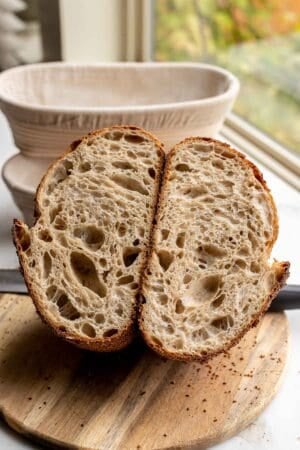
- Remove from the oven and set the bread on a cooling rack to cool completely before cutting, at least 2-4 hours.
How to store sourdough bread?
You can store the sourdough bread cut side down on a wooden board, covered with a dome to prevent drying out if you plan to eat it the same day.
Alternatively, you can slice the bread, place it in a ziplock bag and refrigerate it.
If not eating right away, slice the sourdough bread or keep it whole, place it in a ziplock bag, or wrap it tightly with plastic wrap and freeze. When ready to eat, leave in the fridge overnight to thaw, or microwave for a minute or two until the bread is softened but not hot.

Troubleshooting Sourdough – FAQ’s
I don’t have a kitchen scale. Can I use cups to measure ingredients?
Yes, you can use the approximate cup measurements given in the recipe. Still, I highly recommend using a digital scale and metric (grams) measurements given in the recipe card for the best results. Keep in mind I used a 250-gram measuring cup for this recipe. Use the toggle bar below the ingredient list to switch from cups to grams.
Why is my dough so runny?
If the dough looks like pancake batter instead of thick and shaggy, add more flour. You will need more if using lower protein flour than this recipe calls for.
My dough is not rising or feels very dense.
Temperature: The dough needs warmth to rise and for the yeast to do its job. If your house is cold (65 – 67 or lower), it might take much longer to rise. Use one of the methods in the post to create a warm environment for the dough to grow in.
When gauging how long to extend the bulk ferment/first rise, always go by how the dough looks and feels instead of the time a recipe calls for. Different flours, temperatures, etc., will require different times. My timetable is only a rough guideline for my circumstances and environment; you might need to adjust them for yours.
A weak, sluggish starter will take much longer to raise the bread than a healthy and vigorous one. If your starter is weak, the dough will take much longer to rise (sometimes even 12 hours), and the bread will become much heavier and denser. To fix this, do a couple of refresher feeds for your starter next time before using it in the bread.
If you’re keeping the starter refrigerated, give it one or two refresher feeds before using it in the sourdough bread recipe.
My dough is stuck to the bread basket (banneton)
Unfortunately, now that it’s stuck, there’s no way to get it unstuck easily. Just do your best to remove it from the banneton, but next time, work on building more strength into your dough before shaping.
Also, the dough can get stuck if you do not use enough flour. So, next time, use more flour, or better yet, use rice flour to dust the bannetone. Rice flour doesn’t absorb moisture like regular flour, ensuring easy release from the banneton.
My bread is not browning in the oven.
The first and most obvious reason is to ensure your oven is hot enough. Some ovens run colder than others. Use a thermometer to check that the temperature inside your oven matches what you set it for. Bake the bread until the bread is the desired color.
If the oven temperature is not the reason, it must be because the dough was under or over-fermented. Fermentation is an essential factor in imparting color to your bread. Under or over-fermenting bread can cause your sourdough bread to stay pale and not brown.

Why is my sourdough bread flat?
Bread that rises under tension (created by using proper flour, doing stretch and folds, and using proper shaping techniques) will have a better oven spring and rise instead of pooling out.
- Overproofing: When the dough is over-proofed, the air pockets have extended past their stretching capacity, so the gluten strands tear and collapse. This creates a dense loaf with lots of smaller air bubbles. The bread is still ok to eat, but it’s not what it could have been.
- Weak dough: using a high-hydration sourdough bread recipe with a weaker than the recipe calls for flour will result in a flat loaf. Lower protein content in the flour doesn’t allow it to hold on to as much water, which results in flat loaves.
Another culprit could be that the dough wasn’t stretched enough to build strength. Incorporating additional sets of stretches will fix it in the next loaf.
- Bad shaping technique: pre-shaping and shaping aim to build strength and height in the final bake. If the bread isn’t shaped to have a taught surface, this can result in a flatter loaf.
Why is my sourdough bread gummy?
- Gummy bread is typically caused by over-fermented or overproofed dough. Allowing the proofing/fermentation time to go for too long breaks down the gluten too much, collapsing its structure and making the bread overly moist. Toasting a gummy loaf can help a little.
- Another reason for a gummy sourdough bread is not baking the bread for long enough. Make sure the bread is a deep golden-brown color before you remove it from the oven.
- Finally, please do not cut into the loaf until it is completely cool.
My sourdough bread didn’t open up during baking.
Weak dough structure before baking (using weak flour, not doing enough stretches, bad shaping technique, too short of proofing time) will result in a flat loaf and no oven spring.
My bread is too sour.
The level of sourness is directly related to the acidity level of your starter. Allowing the starter to go hungry for too long will build up a lot of acidity. If you use a very acidic starter, the bread will also have a lot of acidity.
Consistently feeding the starter with a lower ratio feed will carry a lot of acidity from feed to feed.
To fix an acidic starter, feed your starter a larger ratio of starter to flour/water. I would recommend a 1:10:10 ratio.
The bottom of my sourdough is burnt.
Move the baking rack up a little or set a baking sheet on the rack below the cast iron in which the bread is baked. This will prevent the heat from hitting the bottom directly.
If the damage is done, you can either cut off the bottom altogether or use a cheese grater to grate the burnt part off.
How To Make Sourdough Bread: A thorough Step By Step Guide
Everything you need to know to make homemade Sourdough Bread at home successfully. Enjoy this thorough, step-by-step guide to crispy, chewy, slightly tangy bread that you won't get enough of! If you know nothing about sourdough bread, get ready to learn lots.
Ingredients
*Toggle to "metric" below the ingredient list to switch the ingredients to grams*
Sourdough Leaven (Starter off-shoot)
- 1 Tbsp refreshed peaked sourdough starter
- 7 tbsp white unbleached bread flour
- 4 tbsp room temperature filtered water
Sourdough Bread Ingredients (based on a 250 g cup)
- 3 1/2 cups white unbleached bread flour stirred, scooped, leveled
- 1/2 cup whole wheat flour (Bob's Red Mill is the best)
- 2 cups warm filtered water (90F)
- 1/2 cup peaked active sourdough starter from above
- 1 Tbsp kosher salt
Also
- 2-3 tbsp rice flour for dusting the banneton basket
Instructions
Foreword
-
Before starting this recipe, read the post and the FAQ above the recipe card. It has valuable information that will help you understand the process, jargon, and method of baking sourdough bread.
While you can use the cups and tablespoons to measure the ingredients in this recipe, I highly recommend using the metric measurements for a more consistent outcome. You can switch between US and metric measurements by clicking on the "metric" below the ingredients list. The recipe below will include measurements in grams, but you can measure with cups/tablespoons and use those.
In the evening (day 1) – make the leaven: 8 pm
-
8 p.m. – Mix 10 grams of sourdough starter with 50 grams of room-temperature water until milky in a pint or quart-sized jar.
Then, add 50 grams of unbleached flour and stir vigorously for 1-2 minutes or until everything is thoroughly mixed.
-
Clean the sides of the jar and mark the current level.
Cover with a lid loosely.
-
Keep warm at 70F for 10 to 12 hours or until the leaven peaks or at least doubles in size. An oven with just the light on is an excellent place to keep the starter warm overnight.
Adjust the feeding ratio of the leaven to have it hit a peak when you're ready to start mixing the dough.
See approximate ratios below:
1:2:2 ratio at 66F – 67F room temp for an 8-hour rise time
1:3:3 ratio at 70F for an 8-hour rise time
1:5:5 ratio at 70F for a 10-12 hour rise time
Next morning (day 2) – Bulk Ferment/Warm Proof: 8 a.m. – 12 p.m.
-
8 a.m.: – To a large bowl or a plastic container, add 500 grams warm (90F) filtered water and 110 grams of peaked starter from the night before. Mix until the water looks milky.
-
Add the dry ingredients & knead:
Now add 525 grams of unbleached bread flour, 75 grams of whole wheat flour, and 1 tablespoon of salt. Stir quickly to bring everything together.
Mix by hand for 3-4 minutes or until thoroughly mixed and no wet flour remains.
Alternatively, mix everything in a mixer fitted with a paddle attachment for 1 minute on low speed (speed 1-2 out of 8).
The dough should be chunky and wet but not like cake batter. If the dough resembles a cake batter, add enough flour to make it chunky and wet.
Cover and rest in a warm spot.
See the notes for makeshift proofing box options.
This marks the start of bulk ferment or first proof. If the dough is kept at 80°F, bulk ferment should last about 4-6 hours.
Set a timer for 4 hours to help you keep track.
Stretch & Folds – 8:30 am – 12 pm
-
Over the next ~4-6 hours, stretch the dough to build strength by performing 4 – 6 sets of stretches every 30 minutes.
Set a second timer to help you remember.
Approximate times:
8:30 am – stretch and fold
9:00 am – stretch and fold
9:30 am – stretch and fold
10:00 am – stretch and fold
Keep the dough covered in a warm spot (80F) in between the stretch and folds (S & F).
S & F – To stretch the dough, lightly wet your hands, then grab a chunk of the dough and pull it up as far as it will stretch. Now fold it over. Rotate the container a quarter turn and repeat. Go around the bowl continuously until the dough stretches no more. Set the dough folded side down and smooth side up.
Coil Folds – Alternatively, you can do coil folds. Lift the dough in the middle by placing wet fingertips underneath both sides of the dough and your thumbs above the dough. Once one of the sides lifts off the bowl, push the bent part over, creating a fold. Repeat the same motion until the dough does not stretch to allow for one more coil. Then, turn the bowl 90° until the dough is nice and tight. Set it seem side down. Cover it. Return to the warm area.
With each set of stretches, the dough will feel tighter, stick less to your hands and bowl, and require less stretching to get to a tight ball.
Be careful not to stretch it beyond its stretching ability, or the gluten will tear and weaken the dough.
Towards the last sets, the dough shouldn't spread out as much, have defined edges, and dome downwards.
After the stretches, leave the dough undisturbed until the 4-hour timer goes off, then either move on to the next step, or keep an eye on the dough until it is adequately risen and slighly puffy.
When the dough is ready for the next step, the surface of the dough should be covered in tiny bubble "blisters," and feel puffy and jiggly. If the dough does not, leave it in a warm spot for as long as it needs until it has risen by about 30% – 50%.
This marks the end of bulk ferment.
Pre-shape the sourdough 12 p.m.
-
This will help to create surface tension, build height, and establish the structure for the final shaping.
12 pm – Lightly dust the top of the dough inside the bowl/bin with flour.
Turn over the container and allow the dough to fall onto the counter. With floured hands, gently stretch the dough into a rough square.
-
Visually divide the dough vertically into thirds. Now gently fold the right and left sides over the center third. Grab the end closer to yourself and start to roll by pulling and tucking, then rolling and setting the roll seam down.
-
Leave to rest uncovered for 30 minutes. This will help the surface to dry slightly and prevent the need for flour as you do the final shaping.
Final Shaping – 12:30 p.m.
-
12:30 p.m. – Using a bench scraper in one swift motion, turn over the rest of the dough bottom side up (do not add flour).
Gently stretch the dough into a circle.
Grab the top portion (12 o'clock), stretch it out and over the top third. Now grab a chunk from the top right side and fold it over the folded top part. Repeat with the left side. Continue bringing both sides over the center in a zig-zag motion until you reach the end.
Now lift the side closer to yourself and fold it away from yourself, forming a smooth roll.
For an oval banneton – pinch the ends of the roll and tuck them slightly under. Now, with a bench scraper, push the wide side of the dough away from yourself and then towards yourself across the counter to elongate the roll.
For a round banneton, use a bench scraper to swirl the dough in a circular motion, tightening all other sides and creating a smooth ball.
Tip: to cover the bread in seeds of choice, lightly spray the top of the dough with water, then roll the top in seeds.
Set the dough top side down into a rice-floured banneton.
Cold Fermentation – 12:50 p.m. – 8 a.m.
-
Cover the dough with a disposable shower cap or a clean kitchen towel.
Refrigerate for 18 hours or until the following morning.
During cold retard or cold proofing/fermentation, the sourdough enzymes and bacteria will continue the gluten breakdown as the yeast's activity slows due to colder temperatures.
You should still see a 10% – 15 % increase in volume during cold retard as the dough will continue rising until the temperature drops below the yeast's optimal temperature.
If you do not see a rise, next time, extend the bulk fermentation period for a little longer, or make sure your starter is healthy and strong. Check to make sure that the water you add is 90°F and the temperature during proofing is around 80°F.
Score and Bake the Sourdough – 8 a.m. – 10 a.m. – (Next Morning (Day 3)
-
Adjust the oven rack to the center. Place a 5-quart round or a 7-quart oval Dutch oven with the lid on the rack.
Preheat to 475°F for at least 30 to 40 minutes or up to 1 hour.
-
Turn over the dough –
Right before the oven is preheated remove the basket with the dough from the fridge.
Set a piece of parchment larger than the banneton on the counter. Turn over the dough from the basket onto the parchment.
-
Score: Using a sharp knife or a razor blade (lame), score the dough off the center lengthwise at a 45° angle about 3/4 inches deep. This will create a weak spot for expansion as the sourdough bread bakes.
Prepare 2 ice cubes – they will be added into the pot with the dough to help keep the crust from forming before the dough has a chance to fully expand (optional).
-
With oven mittens remove the preheated Dutch oven. Gently drop the scored dough into the pot being careful not to burn your hands. Add 2 ice cubes to the sides of the dough and quickly cover with the lid to trap the stem.
-
Transfer the Dutch oven back into the oven and bake for 20 minutes. Then, remove the lid and bake for another 20-25 minutes depending on your preference for the darkness of the crust.
Cool the sourdough
-
Remove the bread from the oven and set on a cooling rack. Cool completely before cutting, at least 2-4 hours.
Recipe Notes
DIY “proofing box” hacks
The best temp for the sourdough to rise is around 75F – 80F. If you do not have a dough proofer to maintain a warm temp, you can easily create your own using one of the methods below.
Warm oven “proofing box”
Preheat the oven to 200F for 5 minutes. Turn the heat off. Turn the light on and keep it on. Do not turn the heat in the oven. Insert a wooden spoon to keep the door ajar.
Pros: super easy; does not occupy the microwave; does not take extra storage space; free.
Cons: The heat is lost each time the oven door is open when the dough is removed for stretches.
Microwave “proofing box”
Here’s how:
- Wet and fold a kitchen towel to fit underneath a dinner plate. Microwave the wet towel for about 1 minute to heat it through.
- Cover the towel with an upside-down dinner plate to trap the heat underneath.
- Set a cutting board or another folded-up dry kitchen towel on top of the plate to create a barrier between the plate and the cutting board.
- Set the bowl with the dough on the dry towel or the cutting board. Shut the microwave door.
Each time you remove the dough to do a set of stretches and folds, re-microwave the wet towel for a minute to maintain the heat within the microwave. Keep your dough in between stretches on the dry towel.
Pros: Small space is fast and easy to warm up; easy to reheat and maintain the “proofing box” temperature; doesn’t take the extra space that an actual proofing box would.
Cons: This method uses the microwave, so if you need to use it to heat food while the dough is rising, the “heating assembly” will need to be removed and then replaced.

Thank you for following me on Instagram, Facebook & Pinterest!
Hashtag your photos #LetTheBakingBeginBlog so I can see your creations and for a chance to be featured!
Marina | Let the Baking Begin


I followed your direction and measurements and my sourdough seems very runny. What did I do wrong?
Hi Galina,
It should start out very lose and as you do more and more folds it should start to take on more shape as the gluten strengthens. If this does not happen, it means your flour doesn’t have enough protein for this amount of hydration, in which case, just reduce the water by 1/2 a cup next time, or add 1/2 – 3/4 more flour than what it states in the recipe.
I fed my starter yesterday morning and now it seems to have a separation of a clear/yellow fluid about a 1/4 inch from the top of the starter. Is it still good to use?
Love his thorough you are. The photos are so helpful. Can’t wait to try it.
Hello, is the whole wheat flour necessary or can I add 75g more of the bread flour instead? Thank you.
You can replace it with white flour if you don’t have whole wheat, yes.