Quick No-Knead Bread
This No-Knead Bread is the perfect way to learn how to make a homemade artisan loaf without aching arm muscles. In just hours you’ll have a artisan rustic loaf that’s full of flavor to enjoy!
If you like quick baking recipes, you’ll also love these Quick Fried Donuts, my yummy Quick Apple Cake, and this Quick Chebureki Recipe.

Homemade Bread Recipe
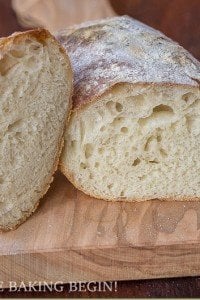
If you haven’t tried a homemade bread recipe before, you’ve got to try this one. This recipe is one of the most simple ways to produce an incredible loaf of bread. The outside is perfectly crisp while the inside of this loaf is soft and airy.
There are so many reasons I often turn to a homemade bread recipe rather than a store-bought one. Firstly, I enjoy the process of making bread, but more importantly, bread made at home is so much better for you than what you get in a supermarket. This loaf is full of natural ingredients that you can pronounce and requires just a few simple ingredients.
Plus, there is no comparison in the taste of this homemade bread recipe to a bagged bread at the store. Trust me, after making this loaf, you may never go back to the bread aisle again!
. Plus, you don't need any special equipment - no bread maker and no mixer! #noknead #breadrecipe #homemeadebread")
Why this No Knead Bread Recipe Works
This recipe is a quicker version of the famous no-knead bread recipe. While that version takes a full day, this recipe only requires about 5 hours from start to finish—and the majority of that time is hands-off.
Aside from this version of the no-knead bread being quicker, it also has a couple other differences from the typical no-knead bread mentioned earlier and here’s why it works:
- This no-knead bread recipe uses less flour, which produces a fluffier crumb (aka inside).
- Part of the flour is replaced with some wheat bran, which increases the water absorption in the dough and has the added health benefit (good source of insoluble fiber).
- Also, this recipe uses hot water (110F – 115F). The higher water temperature speeds up the multiplication of the yeast in the dough so that you do not have to wait overnight for the dough to double in size. You do have to be careful not to go above 115F though so that you don’t kill the yeast completely. Just keep that in mind any time you work with yeast.
- Not only is this no-knead bread recipe very hands-off it requires no special equipment. Yup, no need for a mixer or a bread maker. All you need is basic supplies such as a bowl, spoon and a cast iron pot. Mix the dough with a spoon and that is all. I mean, a bench scraper ( <= this one is my favorite) is useful anytime you work with dough, but you can definitely make do without it.

How to Enjoy This No Knead Artisan Bread
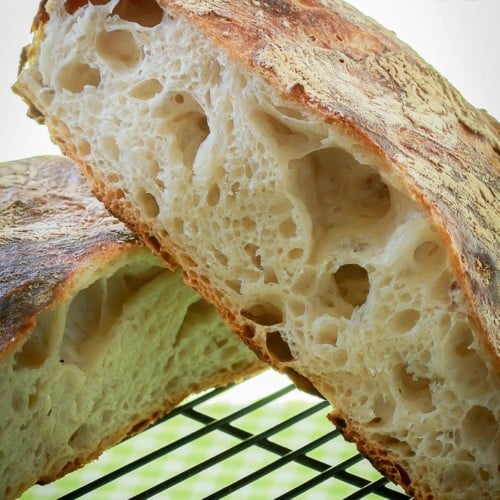
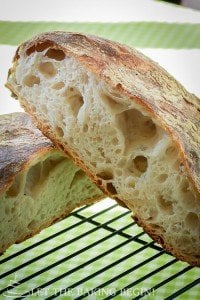
This recipe creates a beautiful no-knead artisan bread loaf that rivals those that sell at fancy french bakeries. The no-knead artisan bread has a thick crunchy crust while the middle is soft, fluffy with beautiful large holes.
I like to serve this bread sliced with some salted butter as part of dinner, or as the base layer in a recipe such as this tomato toast with mozzarella.
It also works well with a dip/spread like the mushroom pate bruschetta or piled with this homemade salmon caviar. Of course, you could simply make it into a sandwich loaf too—there’s no wrong way to eat this no knead artisan bread! 🙂

How to Make No-Knead Bread
- Mix together the no-knead bread ingredients with a spoon.
- Cover and let proof.
- Optional but recommended: leave the bread dough in the fridge overnight for better texture and flavor.
- Shape the no-knead bread dough into a ball by stretching the 4 sides of the dough over itself. Then, turn it over and on a barely floured surface (this will allow the dough to grip to the surface and stretch as it moves) push the dough ball towards your self by cupping the dough ball with the right hand, while supporting it with the left hand on the opposite side. Then rotate the dough 90 degrees and do it from the other side until you get a formed dough ball.
- Pro tip: stretching the dough is what gives this rather loose dough structure and allows the gluten to strengthen, which in turn will trap the air bubbles and give you an airy inside. Do not skip this step.

- Bake in a cast iron dutch oven and allow the bread to cool before cutting.

More Bread Recipes to Try:
No-Knead Bread Recipe
A quick version of the no-knead bread that requires minimum ingredients and effort and makes one delicious homemade bread loaf.
Ingredients
No-Knead Bread Ingredients
- 2 1/4 cups bread flour (I use Canadian flour, which is similar to bread flour in gluten %, or all-purpose flour (Note1))
- 1/2 cup wheat bran (Note 2) (replace with regular flour if unavailable)
- 1 1/2 cups hot water 115F°
- 1/4 tsp active dried yeast or instant yeast
- 2 tbsp granulated sugar
- 1 1/2 tsp fine seasalt or table salt
To sprinkle on top of bread
- 3 tbsp wheat bran (for sprinkling the top of bread)
Instructions
-
Make the dough:
Mix all no-knead bread ingredients with a spoon until a wet dough forms, cover and leave for about 3 hours to proof in a warm, draft-free place. Or preheat the oven to 250F for 2-3 minutes, then turn it off and place the dough in the oven with the oven light on. You do not want the oven temperature to rise above 100F or it will kill the yeast.
Tip: Leave the dough overnight in the fridge (8-12 hours) if the time allows for better development of flavor and texture. Otherwise, move to the next step.
-
Stretch and shape:
Pour the no-knead dough out onto a well-floured (!) surface. The dough will be very lose and sticky, so use flour to flour the bench scraper and your hands as you work with it.
Gently, trying not to deflate the air bubbles that have already formed in the dough stretch the dough by pulling the right side of the dough up until it stretches no more (do not tear it), then fold it over the dough. Do the same with the other 3 sides.
Turn the dough over, folded side down and using cupped hands and barely floured surface (this helps the dough "grip" to the surface and stretch) push the dough ball with one cupped hand towards yourself, while supporting the othere side with the other cupped hand. Rotate the dough 90° and do the same again. You can do this a couple more times until a ball forms.
Transfer the no knead dough ball to a large piece of parchment paper. The parchment paper will allow you to easily transfer the dough to the hot cast iron in the next step. Otherwise you can just leave it on a very well floured surface.
Tip: If the time allows, proof the shaped dough under a bowl or covered with a tea towel for 2-4 hours instead of baking right away. This will give you a fluffier and softer loaf of bread. Otherwise, move to the next step.
-
Bake:
Preheat the oven to 500F° with a cast iron pot and lid inside the oven for about 30-60 minutes. Get oven safe mittens ready for handling the extremly hot cast iron pot.
Once the cast iron is preheated ,remove the lid and transfer the dough to the pot by lifting the corners of the parchment paper with the dough. You can use a cake lifter or a flat cookie sheet to do the same.
If not using the parchment paper, lift the dough with your hands trying to support it with well floured palms of your hands rather than the fingers. This will help to keep all the air bubles from bursting inside the dough, giving you a fluffier no-knead bread.
Be very careful around the extremely hot cast iron so that you do not burn yourself.
Slash the bread down the middle with a razor or a sharp serrate knife at a 45-degree angle and cover with the hot lid immediately. Turn down the heat to 450F immediately and bake the no-knead bread for 20 minutes. Then, remove the lid and bake for another 25 minutes or until the bread is deep golden in color.
-
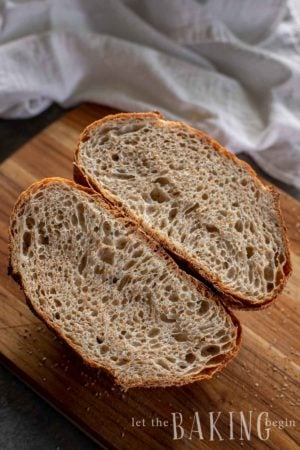
Remove the bread from the cast iron and transfer to a cooling rack for at leat 30 minutes before cutting. Cutting the bread too soon will release all the steam, leaving your with gummy and possibly dry bread.
Recipe Notes
Note 1: Using all-purpose flour in place of bread flour is also fine in this recipe, but once again this will give you a loser dough which will be harder to work with.
Note 2:
Using the wheat bran helps the high hydration dough absorb more water. Replacing the wheat bran with regular flour will give you a loser dough that will be a little harder to work with.

Thank you for following me on Instagram, Facebook & Pinterest!
Hashtag your photos #LetTheBakingBeginBlog so I can see your creations and for a chance to be featured!
Marina | Let the Baking Begin


Absolutely yummy!!! Added some sunflower seeds poppy seeds and caraway seeds to the dough. Just wondering if I could make this in a 9×5 loaf pan? And if so, for the same amount of time in the oven?
Hello Marina, thank you for sharing your recipes! I would like to try this one, after having done the no-knead recipe, but I am a bit confused about the shaping part since I’m not too good at that step! Would it be possible to request some videos of you shaping the dough fo your basic bread recipes? I know it’s alot to ask… but I’m sure it would help alot of people! 🙂 Thanks in advance, Marilou
Hi Marilou,
You can view some of my instagram highlights to see how I make and shape this bread here. Hope this helps!
Can I use the flour instead of wheat bran?
Sorry meant to say rye*** flour
Hi Zory, I haven’t tried it with rye flour so can’t give you much guidance. But if I tried, I’d probably try adding 25% rye flour and 75% bread flour first and then depending on the result increase the ratio of rye flour to bread flour in the next attempt.
These high hydration breads are very forgiving. As I mentioned previously, the trick is to add non-standard flours slowly, and give them time to rise. I recently struck off a loaf of rye that was magnificent. I used two cups of my rye sourdough starter, and added a cup of water and a cup of rye flour. Within 24 hours I had a great sponge. Added two cups King Arthur bread flour and let it cook. Even if you use packaged yeast, the longer they are allowed to develop, the deeper the flavor. You might surprise yourself. Nosdrovie,
If the dough was refrigerated overnight, what should I do if I want to bake it ?
Take it out of the fridge, shape it, let it rest for about 1-2 hours then bake.
Marina, bread looks amazing! Do you think oat bran will work for this recipe?
I haven’t tried it, so can’t tell for sure, but I would think that it works the same way. If you do try it, hope you come back and tell us if it worked.
Where can I get Canadian flour?
We get ours from the local Russia Store or Winco.
I have been baking bread for 45 years or more, and have recently discovered the no-knead method. It makes a fantastic loaf. If you are willing to tolerate a longer rise time, you can substitute both rye flour and cornmeal for some of the bread flour.
My recipe essentially doubles this, so I’m working with five cups of flour. Substituting two cups of dark rye for bread flour, using strong coffee instead of water, and molasses rather than sugar will give you a medium-dark rye loaf that would make most eastern Europeans proud.
Using one cup of rye and one cup of cornmeal and molasses gives the classic Anadama bread from Massachusetts. Adding cornmeal makes a very crisp crust. It’s worthwhile to soak the cornmeal for a few hours in the water, otherwise it can be gritty.
Some try honey rather than molasses. Unfortunately for bread makers, bees are very smart critters. There are enzymes in honey that tend to combat yeast formation. Molasses is cheap, and works well. Always use unsulfured molasses. Sulfur kills yeast, and isn’t a great thing to add to your diet anyway.
The downside of substituting either rye or cornmeal is that you are reducing the gluten, and so have to tolerate a longer rise time. The last loaf I made rose for 16 hours. This isn’t as bad as it seems. Make it after dinner (ten minutes prep) go to sleep, and punch it down in the afternoon. Pop it into a Dutch oven, and let it rise an additional two hours. It will be ready for supper.
The big advantage of a longer, slower rise is in complexity of flavor. I am going to put this recipe in my files, as many times you need bread the same day,
Thanks as always for sharing your knowledge and your art.
Wow, that’s a lot of good info! Thank you so much for sharing your tips and tricks, I’ll have to try it one of these days.