
Rogaliki – Ukrainian Rugelach with Plum Butter (Video)
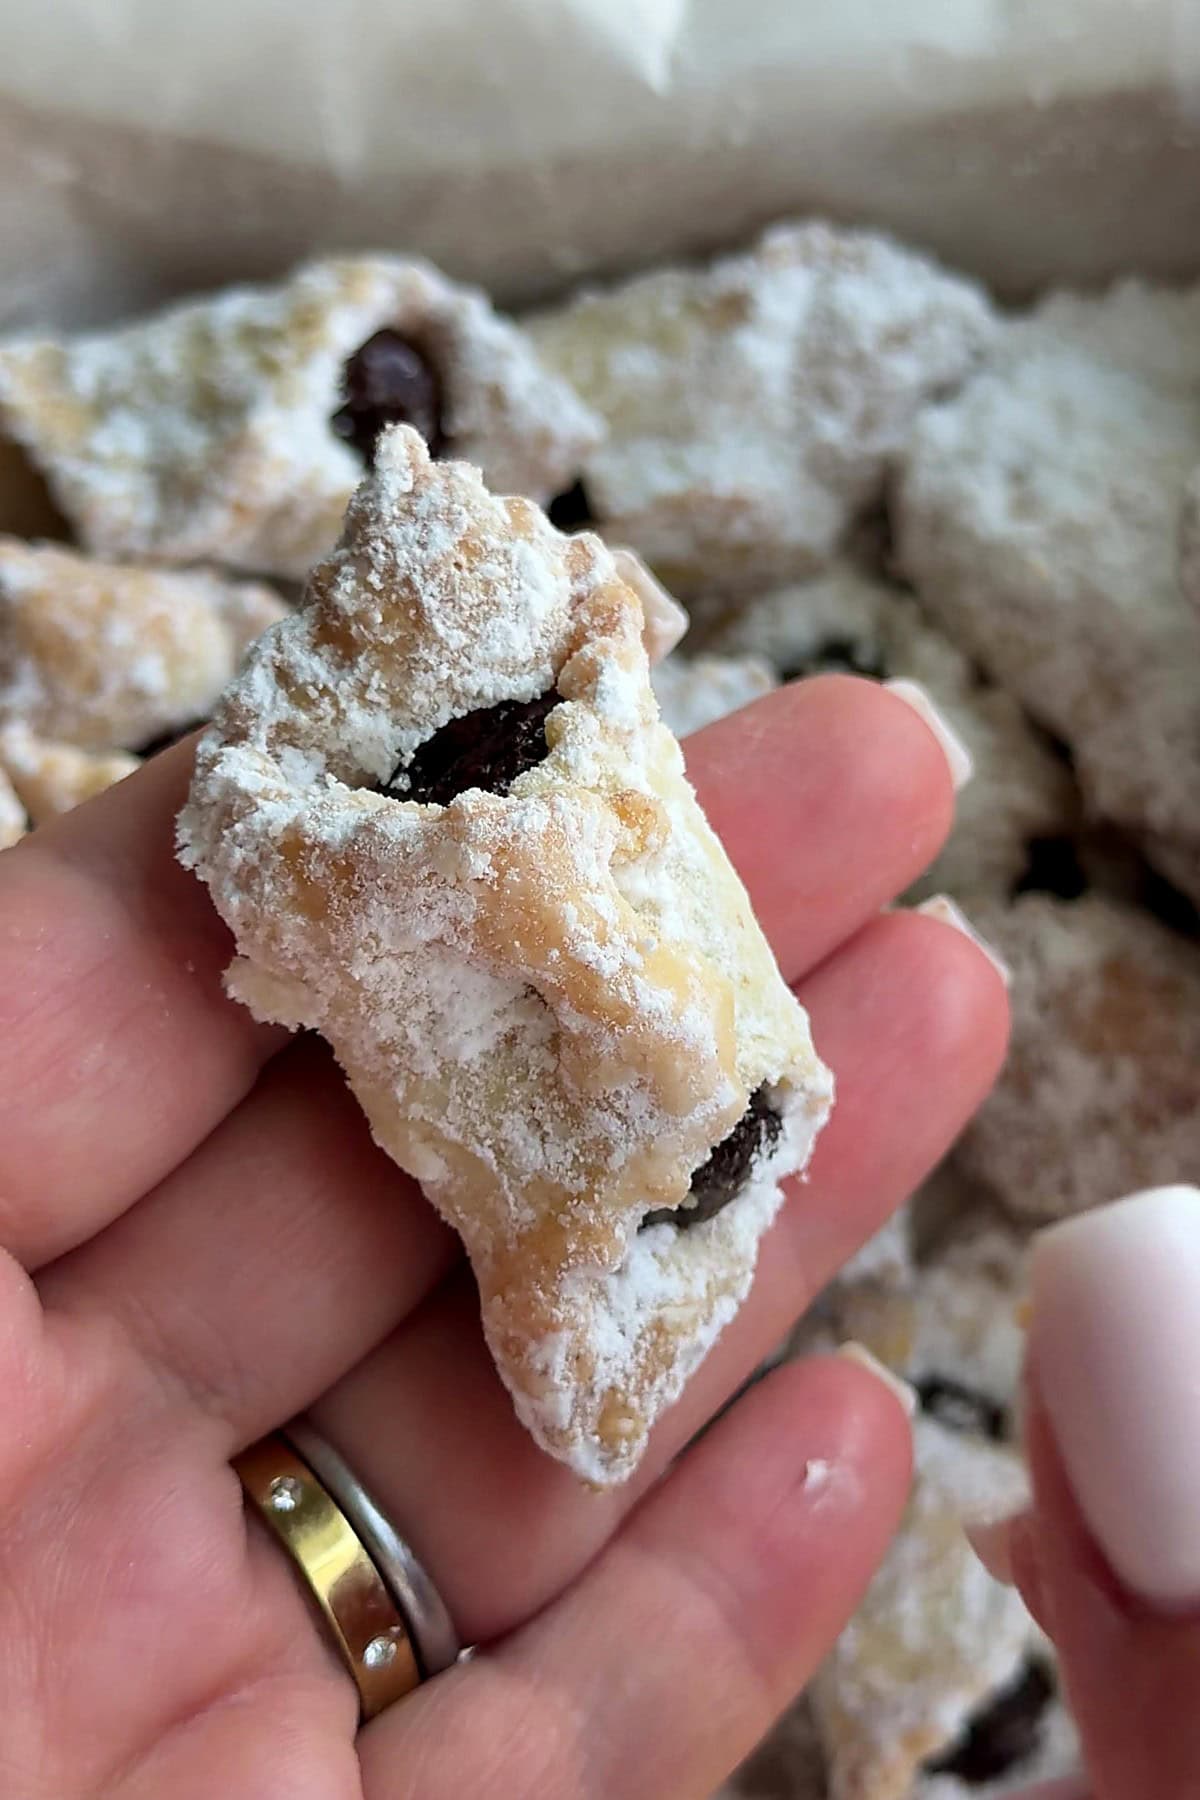
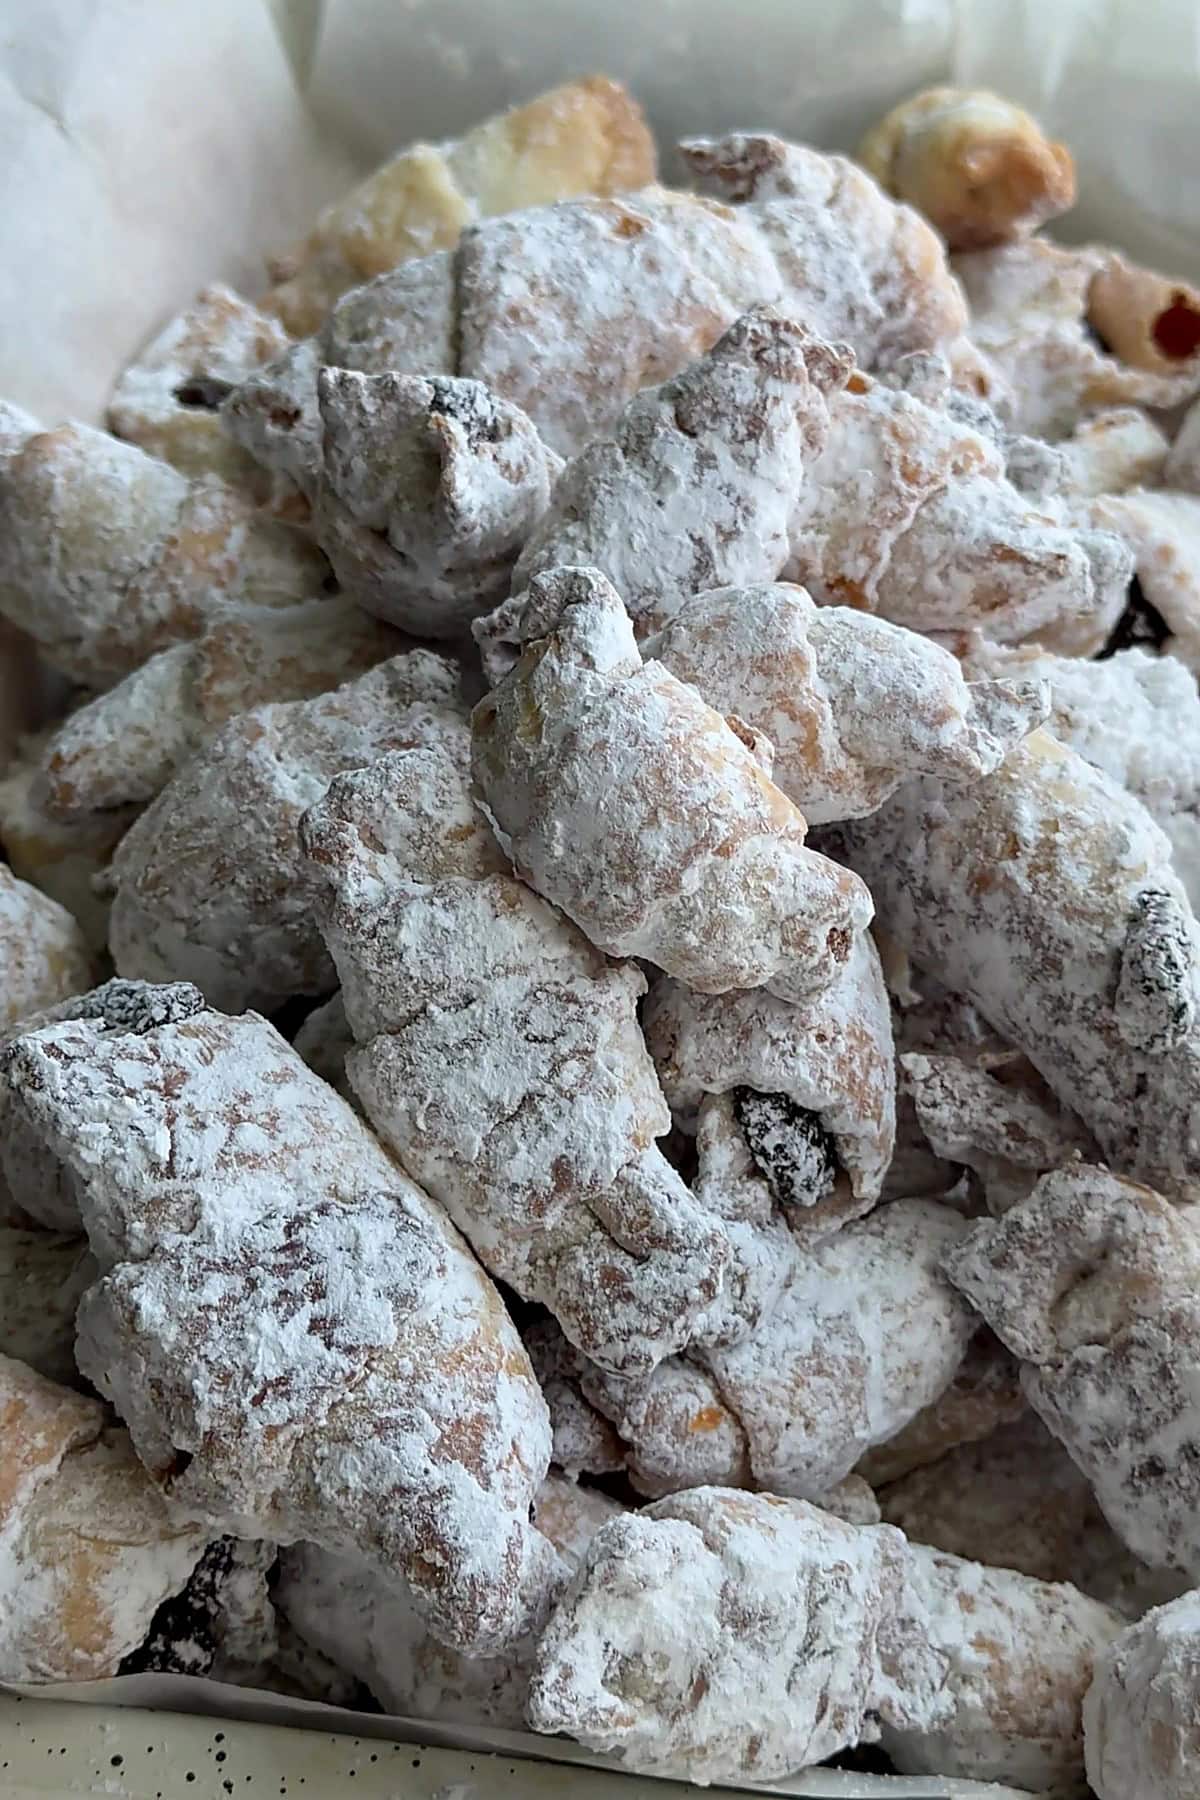
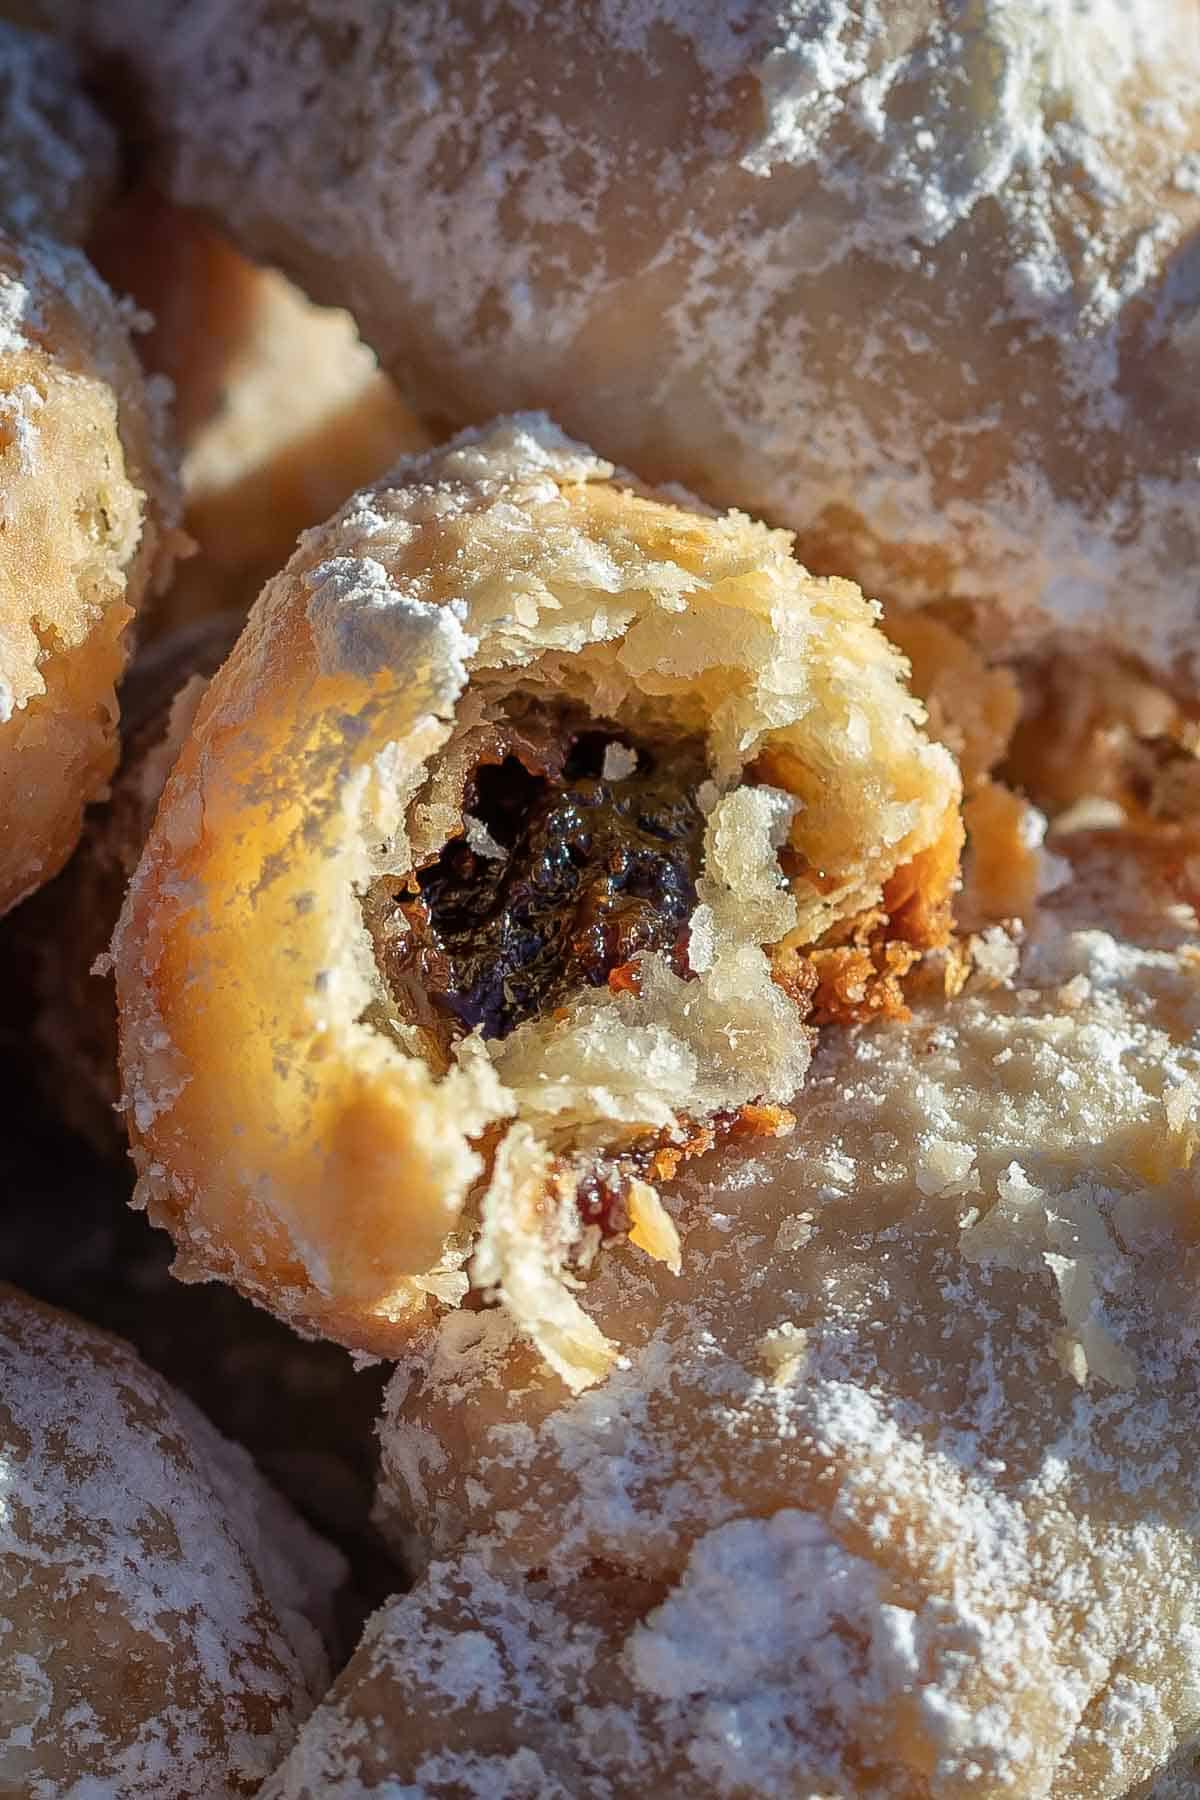
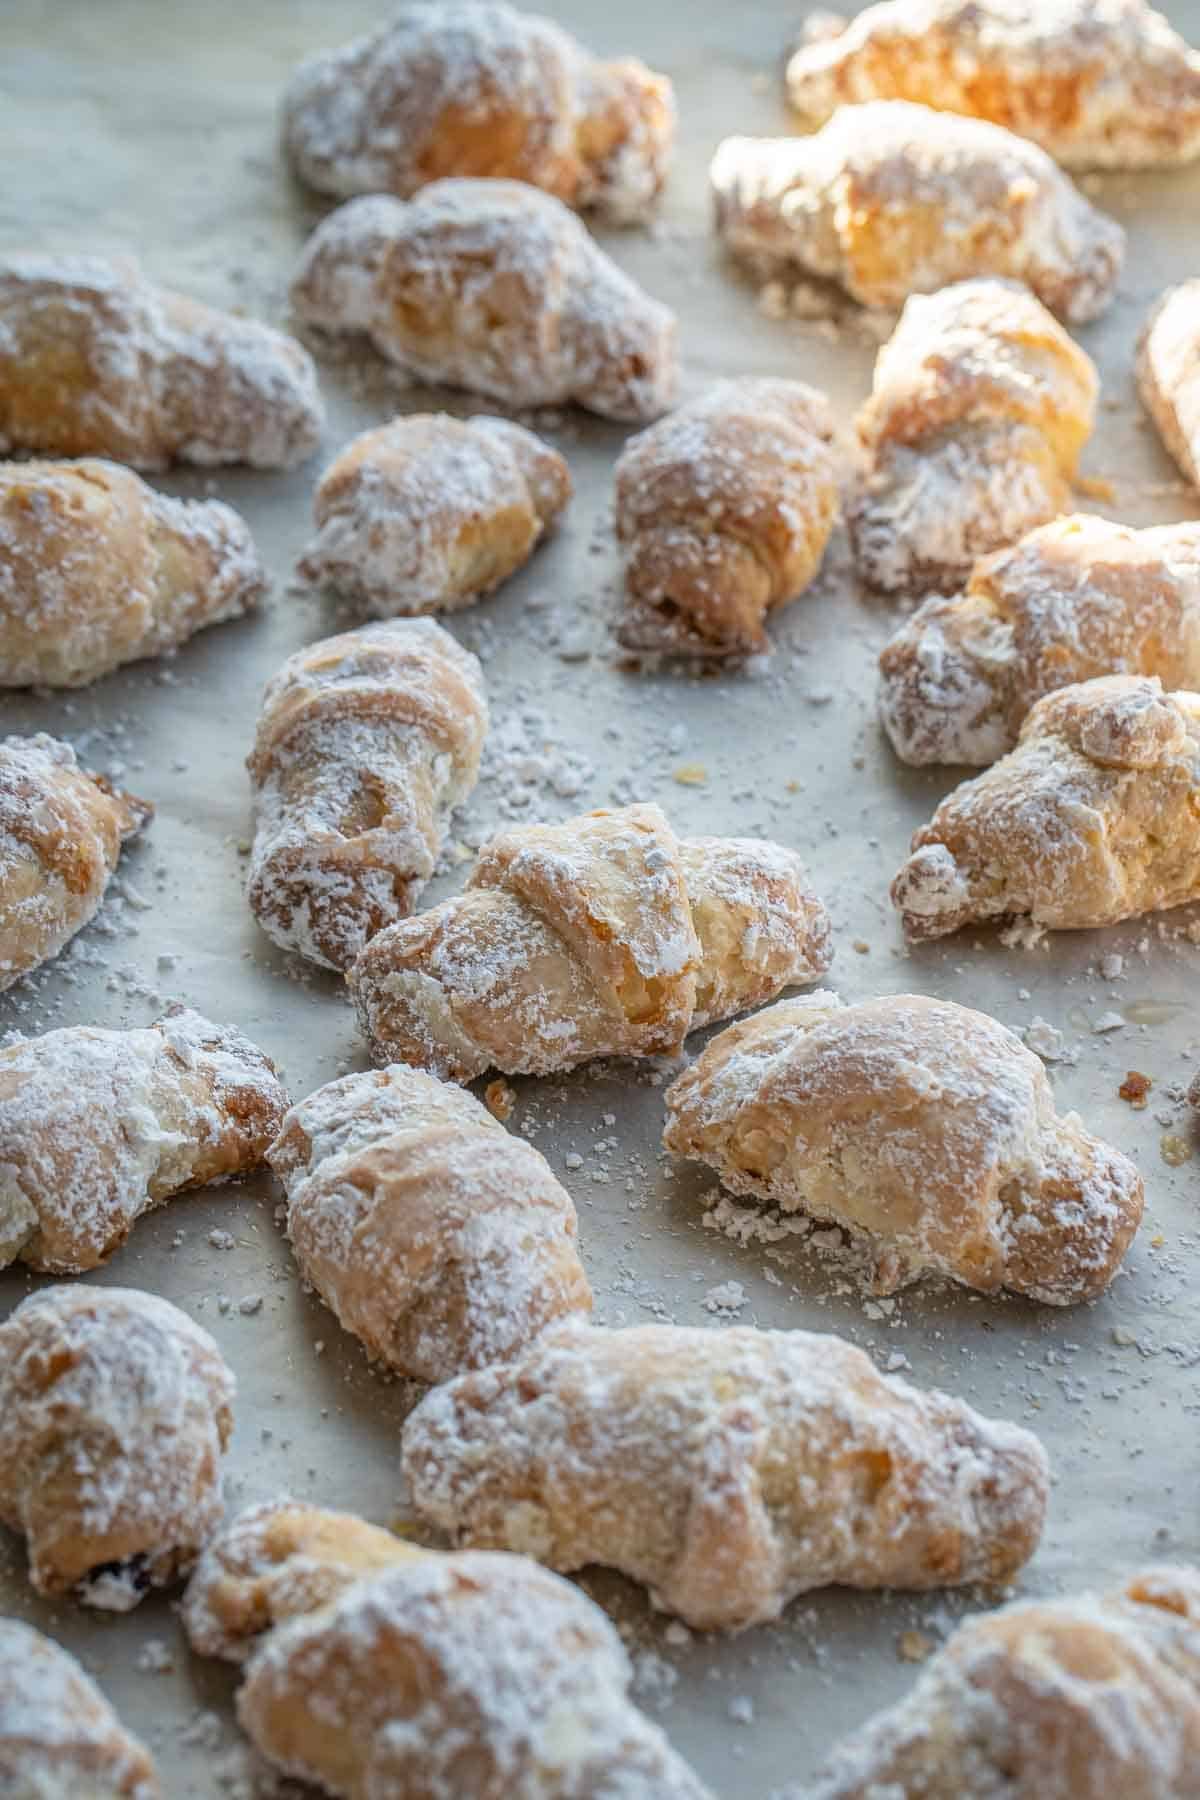
Rogaliki (rohalyky, also known as Ukrainian rugelach) are small flaky pastries with thick plum butter inside and a heavy coat of powdered sugar. I make the plum butter myself from regular prunes, so don’t worry if no one near you sells it. Here is how I make them, in both shapes.
If you like plum butter as much as I do, my Plum Butter Pirog and these Plum Crumble Bars belong on the same table.
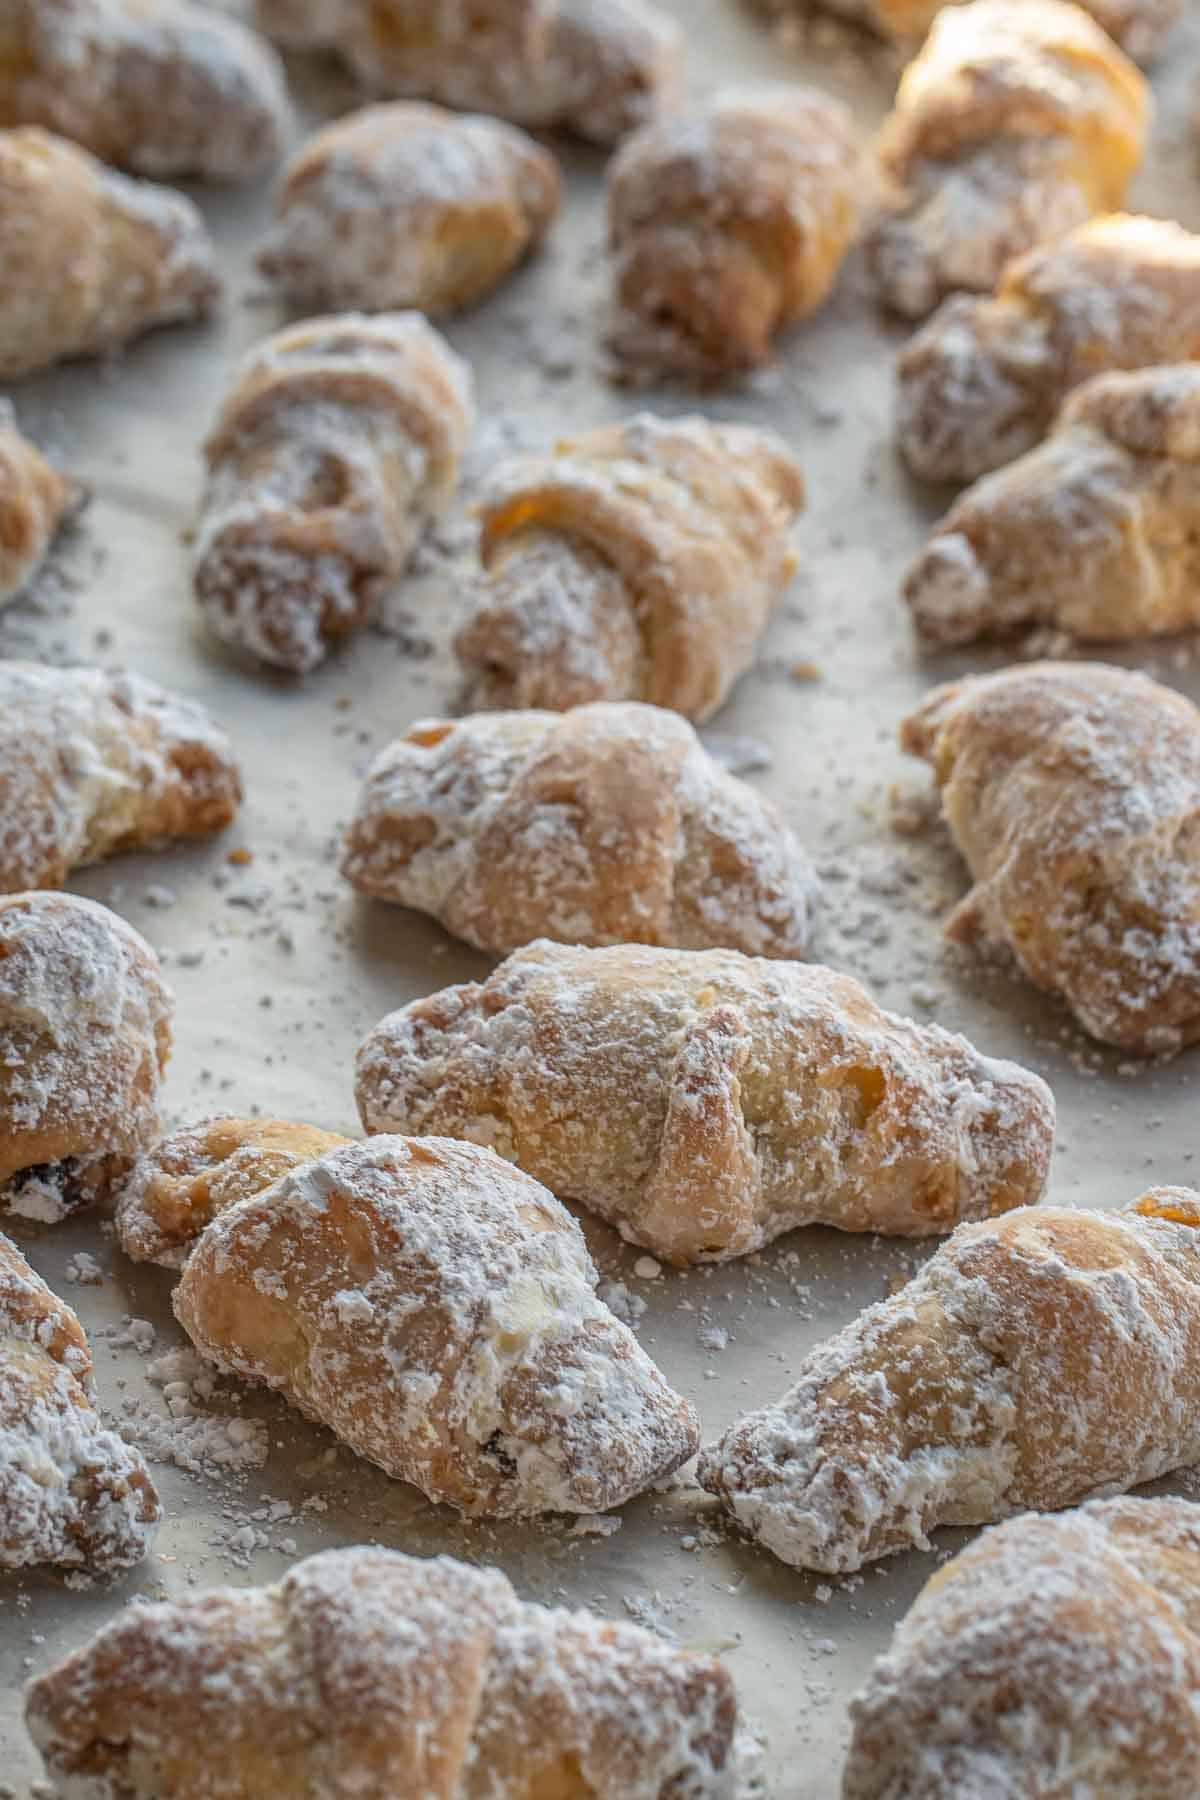
Why you’ll Love this Rogaliki Recipe
This is the cookie I bake in November and eat through New Year’s.
- Tangy and crumbly – thick, slightly sour plum butter inside a pastry that shatters, so every bite has both.
- Almost 1:1 filling – the pinched square holds nearly as much plum butter as dough. Crescents are here too, for the classic look.
- No plum butter? No problem – I make it from regular grocery store prunes. No Slavic deli, no jars of lekvar to track down.
- Four-ingredient dough – cream cheese, butter, flour, and a pinch of baking powder, cut together in 5 minutes.
- Bake as needed – I shape and freeze a big batch before the holidays, then bake a sheet straight from the freezer whenever we need one, right through New Year’s.
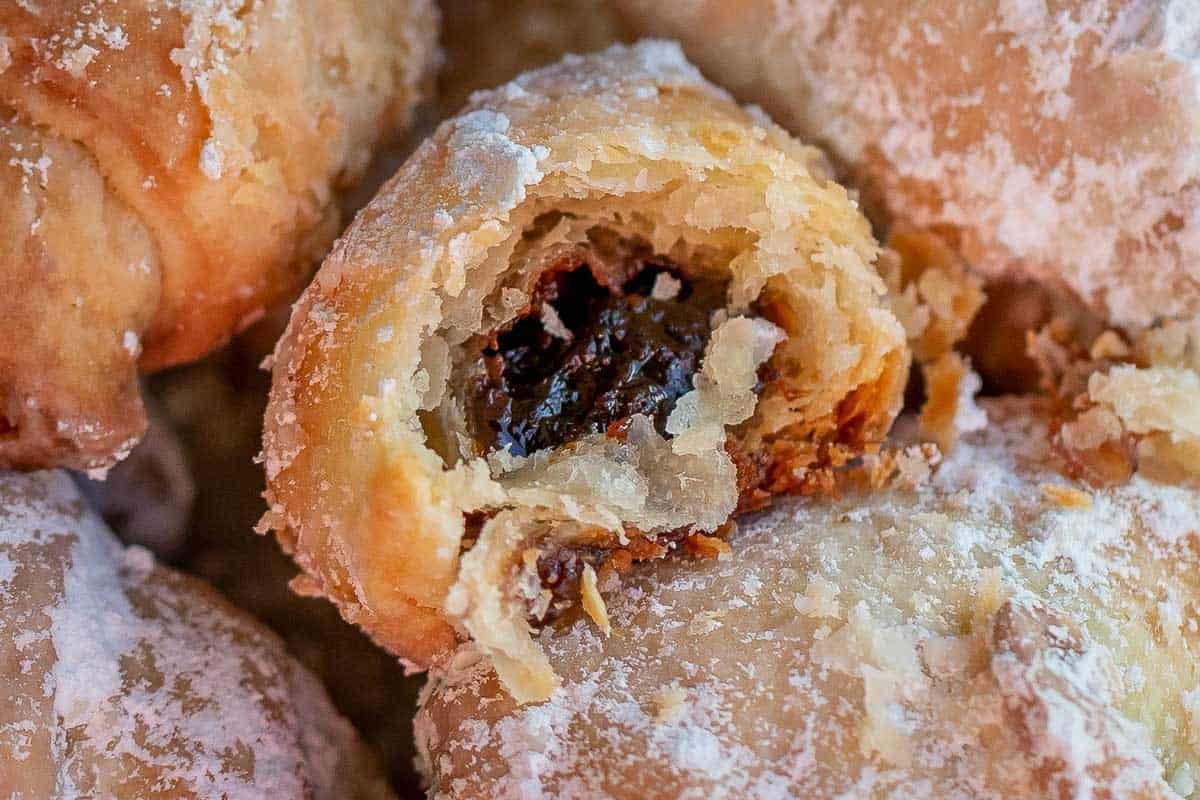
What Are Rogaliki?
Rogaliki (rohalyky) are small Ukrainian pastries: a rich, short dough wrapped around a spoon of fruit butter, usually plum, and rolled in powdered sugar. The name means “little horns,” for the crescent shape, and the same word runs across the old Austro-Hungarian map: rogale in Poland, rohlíky in Czechia, kifli in Hungary.
The crescent goes back to the Austrian kipferl, on record in Vienna since 1227. (The story that it was invented to celebrate the defeat of the Turks in 1683 is a myth.) It came east with the Habsburgs into Galicia, Bukovyna (where I’m from), and Transcarpathia, where home bakers swapped expensive butter for lard and filled it with povydlo, the thick plum butter every family with an orchard cooked down each fall. These were on every wedding and holiday table, and since a lard pastry keeps for weeks, bakers made them well ahead of the big day.
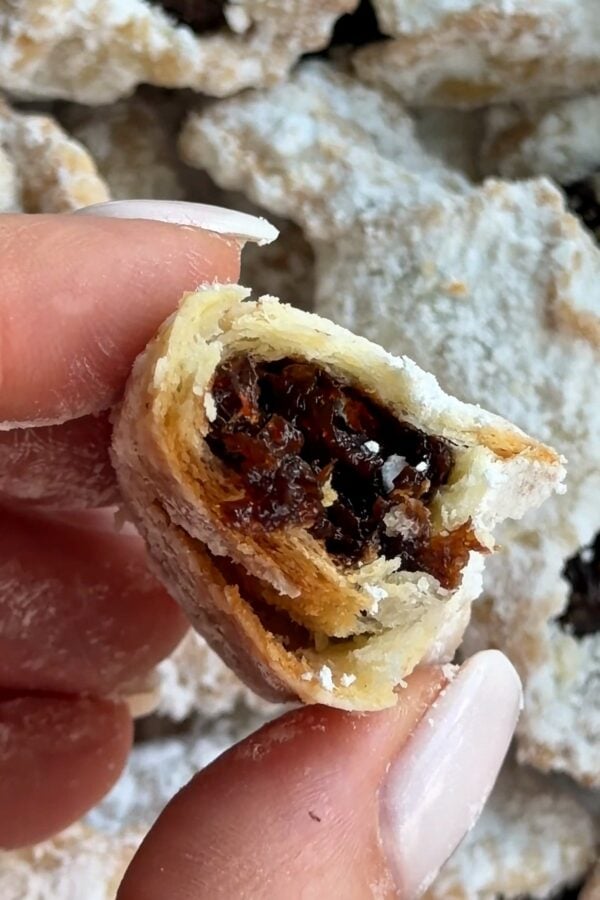
Rogaliki vs Rugelach
Close cousins. Rugelach is the Polish Jewish version, and the Yiddish name comes straight from the Polish rogaliki. Rugelach leans toward cinnamon, walnuts, and raisins. Rogaliki lean on fruit butter. Most people use American cream cheese dough for both today; it was first printed in 1950.
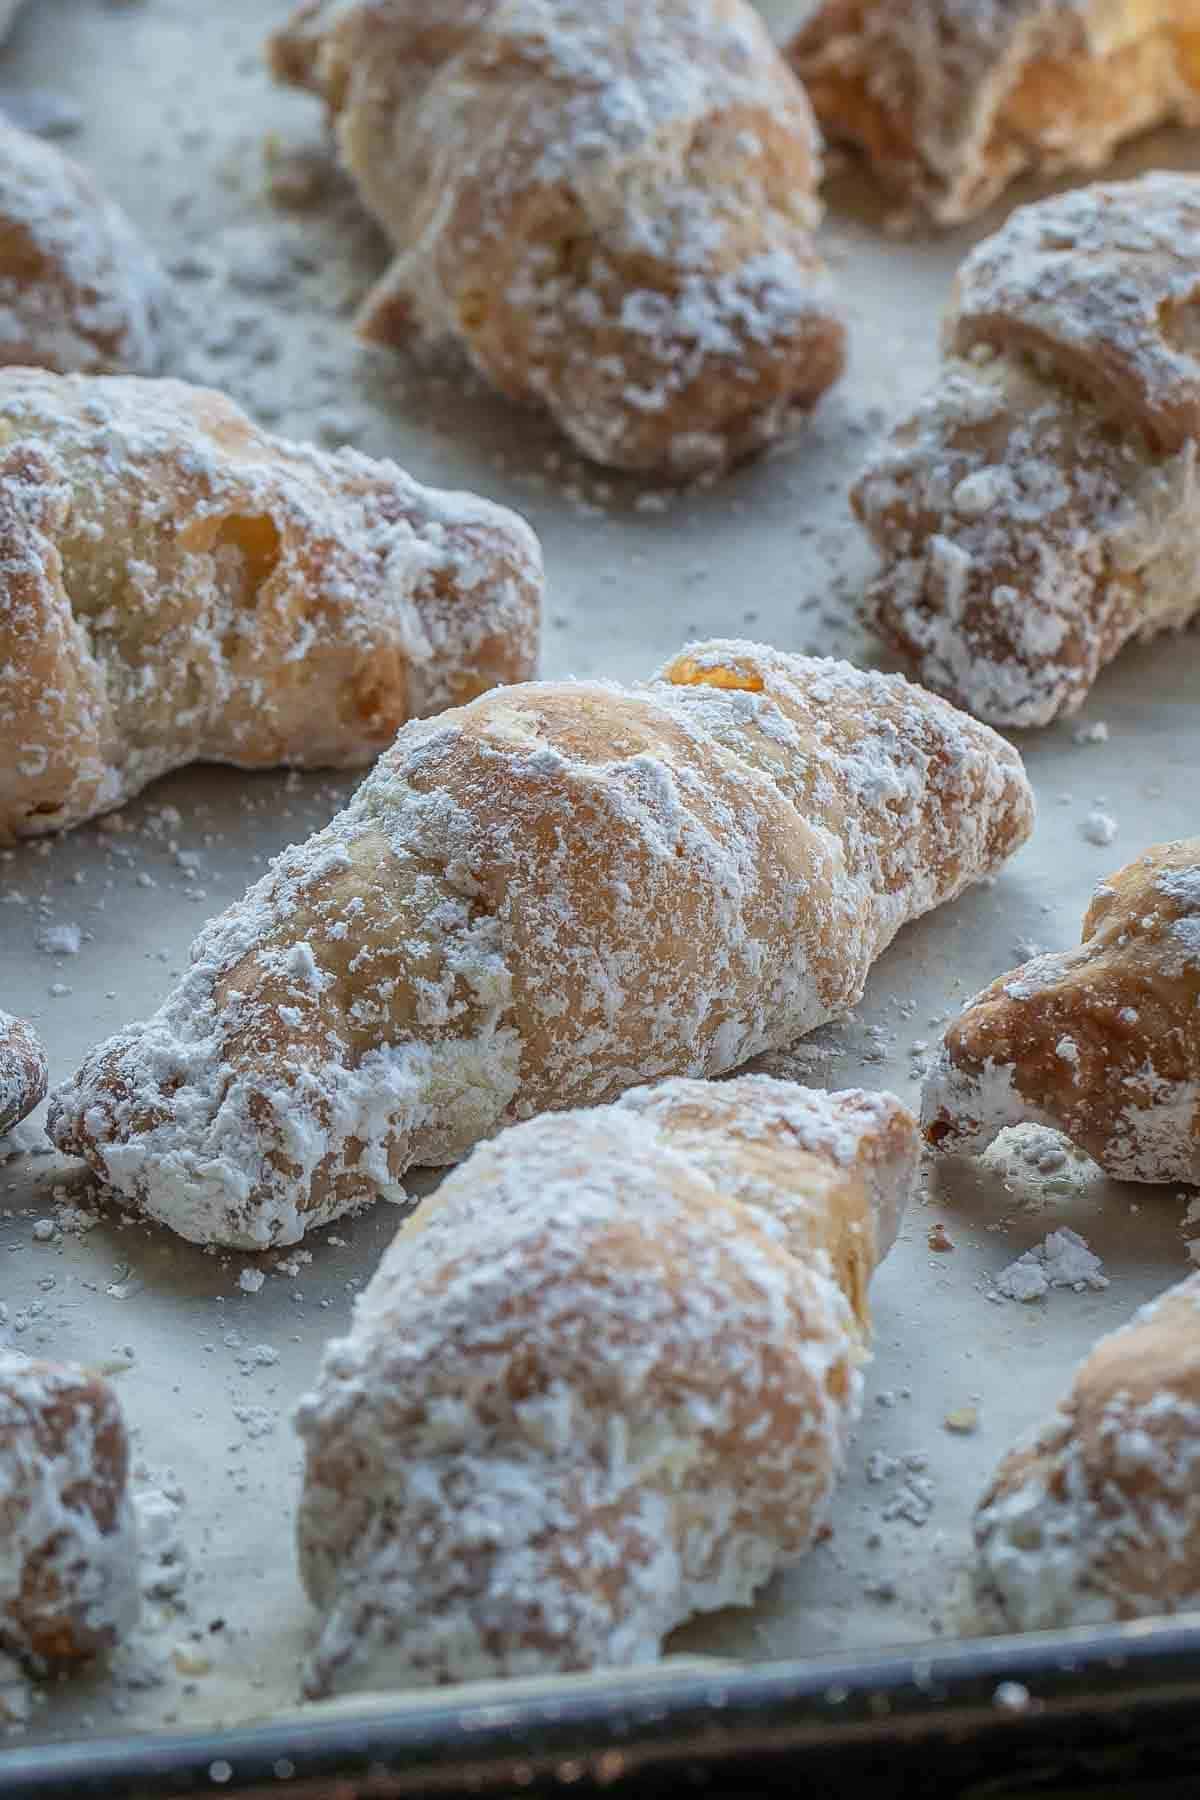
Rogaliki Squares or Crescents?
My mom did not make rogaliki, so I only ate them at weddings, and they were nothing to write home about. A smear of jam, a lot of dough. Mine are packed with filling, and the contrast of tangy plum butter and crumbly pastry keeps you reaching for another. And fresh from your own oven beats anything made to fill a bowl.
The crescent is the original shape. The square is a friend’s trick: cut small squares, pipe or spoon the filling in the center, and pinch two opposite corners together over the top. Almost as much plum butter as dough, and neater on the tray. I make the squares. The crescent is here too if you want the classic look.
Rogaliki Ingredients
Ten ingredients, nothing you have to hunt for. The dough uses only four: cream cheese, butter, flour, and a pinch of baking powder. The one thing to get right is a soft dough. Amounts are in the recipe card at the bottom.
Rogaliki Cream Cheese Dough
- Full-fat cream cheese: this is where the tender, crumbly texture and the slight tang come from. Skip the reduced-fat kind, which has more water and bakes up tough.
- Unsalted butter: this is the lard of the old recipe, swapped for something you have in the fridge, and it is almost all fat, which is why the pastry comes out flaky and rich. Small cold pieces melt in the oven and leave gaps in the dough, and those gaps are the layers.
- All-purpose flour: just enough structure to hold the filling without turning bready, and the dough should end up very soft. I measure 1 cup as 150 g: fluff the flour, scoop, and level.
- Baking powder: a small amount, not enough to make them rise, just enough to loosen the crumb. Double it and the pastry puffs up, closer to puff pastry.
Plum Butter Filling
- Pitted prunes: prunes are dried plums, so blended with a little water they turn back into plum butter with more body than the jarred kind. Regular grocery store prunes are exactly right.
- Water: just enough to let the blades catch. Extra water makes a loose filling that leaks out of the cookie and burns on the pan.
- Granulated sugar: prunes are sweet on their own, so the sugar is only there to balance the lemon. Adjust it to your taste.
- Lemon juice: the acid keeps the filling from tasting flatly sweet. It also brightens the dark plum flavor.
- Vanilla extract: it goes in the filling, not the dough, because that is where you can taste it. Rogaliki dough is plain on purpose.
To Finish Rogaliki
- Powdered sugar: it clings to the cooled pastry in a dry white coat and turns the sour filling into a sweet-sour bite. Sugar also pulls in moisture, so a thick coat keeps the pastry from drying out and keeps the rogaliki fresh longer. Be generous; these are meant to be buried, not dusted.
How to Make Rogaliki, Step by Step (With Video)
Make the plum butter first so it has time to cool, then the dough, then shape whichever way you like. The video at the bottom of the post shows every stage.
How to Make the Plum Butter Filling
Five minutes in a food processor, and the only part that needs to be done ahead.
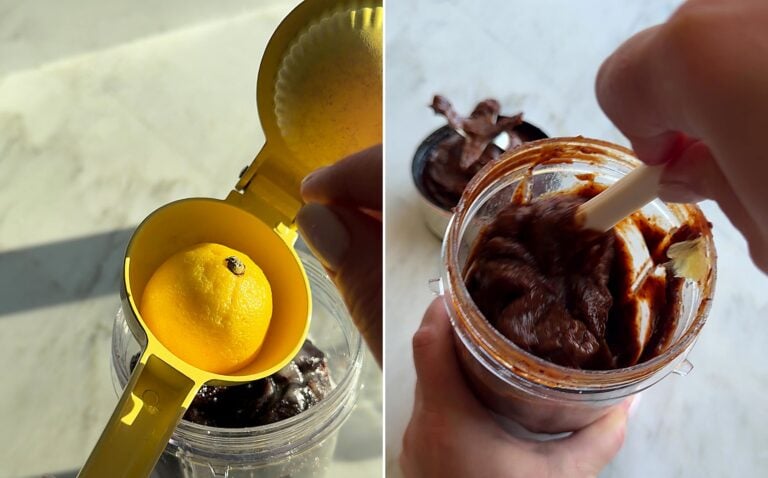
- Warm the prunes – microwave them for about 2 minutes, until hot and softened. Warm prunes blend smooth; cold ones fight the blades, and a metal blade cannot go in the microwave, so this comes first.
- Load the food processor – warm prunes, sugar, water, lemon juice and vanilla go in together. A food processor is made for thick mixtures like this one. In a pinch, a NutriBullet works too, although it strains the motor.
Can I use a regular blender?
A big countertop blender, only if it is powerful. The puree is very thick, and too much for the jar strains the motor while too little leaves the blades spinning above it. Do not double or halve the batch for the same reason; make two batches, one after the other.Why so little water?
Because a loose filling runs out of the cookie, pools on the parchment, and burns. Thick filling stays put and bakes into a dense, jammy center, so blend it thick and leave it thick. - Blend, then cool – run it until completely smooth, scrape into a bowl, and cool to room temperature.
Can I buy plum butter instead?
For crescents, yes. Slavic and Polish grocery stores sell it as povidla or lekvar, but it is looser than what you get from prunes at home, and loose filling is hard to pinch a square around. If you use jarred, pick the thickest one and reduce it on the stove if it seems runny.The motor is struggling. Is that normal?
Yes. The puree is very thick and any motor works hard on it, a NutriBullet especially. Stop and shake the cup down once or twice instead of adding water. And let it cool before you fill anything, because warm filling softens the dough while you work.
How to Make the Rogaliki Dough
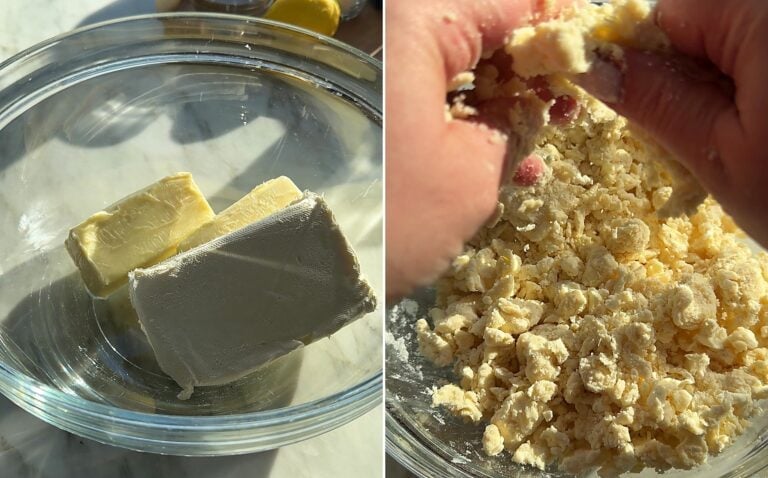
Four ingredients, and it comes together in a couple of minutes. Pastry cutter, stand mixer, or just your hands, whatever you have works.
- Cut in the fat – cut the butter and cream cheese into the flour and baking powder with a pastry cutter until it looks like coarse crumbs.
Mixer, pastry cutter, or by hand?
- In a stand mixer: beat softened cream cheese and butter until smooth, 2 to 3 minutes, then add the baking powder and flour on low just until a soft dough comes together.
- With a pastry cutter: cut the cold fat into the flour, with the baking powder added, until it looks like coarse crumbs, then press it into a ball by hand.
- By hand: rub the cold butter and cream cheese into the flour with your fingertips until crumbly, then press into a ball.
All three work. Cold fat in small pieces bakes a touch flakier than the mixer version.
Can I change the amount of cream cheese?
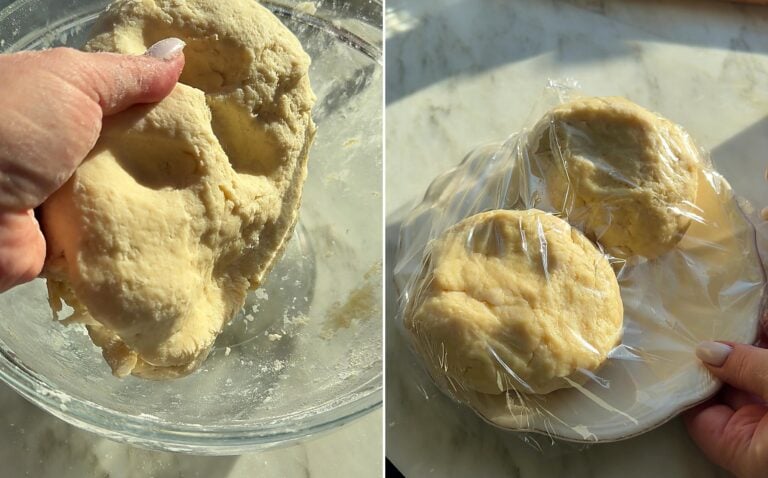
Yes, play with it to your liking. 3/4 of a pack gives you a flakier pastry. A whole pack gives you a sturdier, more pie-pastry-like cookie. - Press into a ball – gather the crumbs by hand into one soft ball. It should feel very soft, close to Play-Doh.
It feels too soft. Should I add flour?
No. This is the mistake I see most. You will flour the counter generously while rolling and the dough absorbs plenty that way. Stiffen it now and you end up with dry, tough pastry. It also firms up in the fridge as the butter cools and the flour absorbs any moisture. - Divide, wrap, refrigerate – make two balls and cover with plastic wrap, then refrigerate for 1 hour for the flour to hydrate and the butter to harden. This leads to a flakier cookie. Refrigerating is optional, but very beneficial.
How much dough do I roll at a time?
A quarter of the batch: take out one half, cut it in two, and leave the rest in the fridge. Cream cheese dough gets sticky and difficult once it warms up, and a quarter is about what you can shape before the next piece needs to come out.
How to Shape Rogaliki Squares
The shape I make, because it holds the most filling. Flour the counter generously as you go.
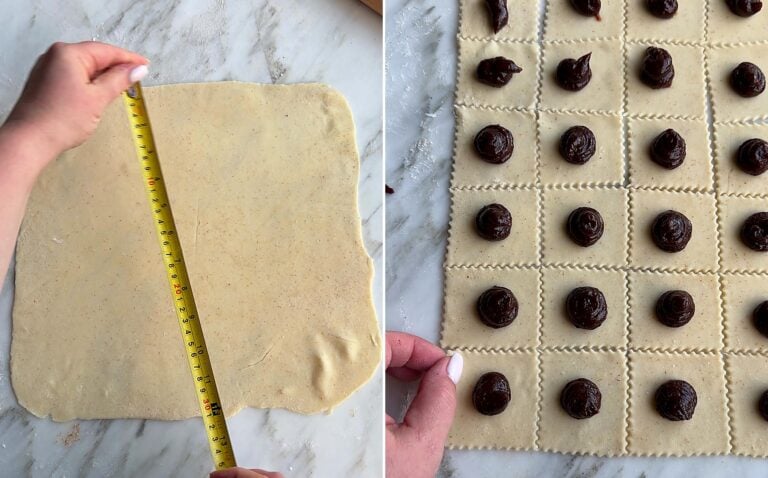
- Roll and cut squares – roll a quarter of the dough into a 12×12-inch square, about 1/8 inch thick, and cut it into 6 strips each way with a scalloped pastry wheel: 36 two-inch squares. Save the scraps.
Which cutter gives the crimped edge?
A scalloped pastry wheel. Purely cosmetic, but it gives the rogaliki a crimped edge that looks like real effort for none. A pizza cutter or a knife works the same, just without the frill. - Pipe or spoon the filling – a small mound of plum butter, about a rounded teaspoon, in the center of each square.
How much filling per rogalik?
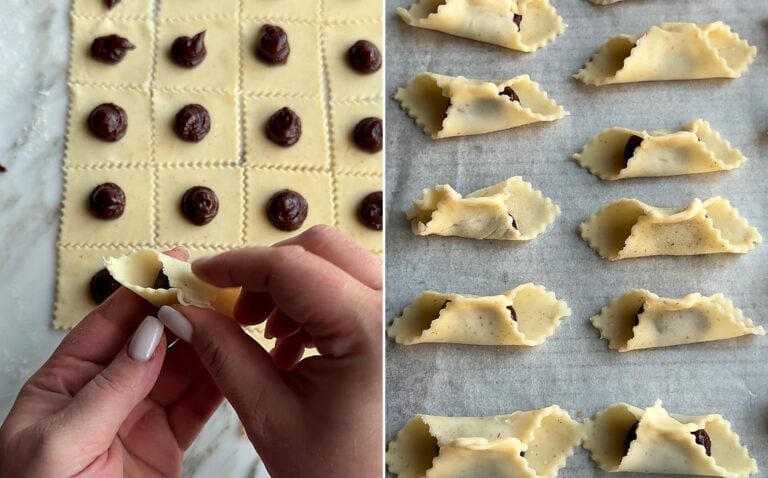
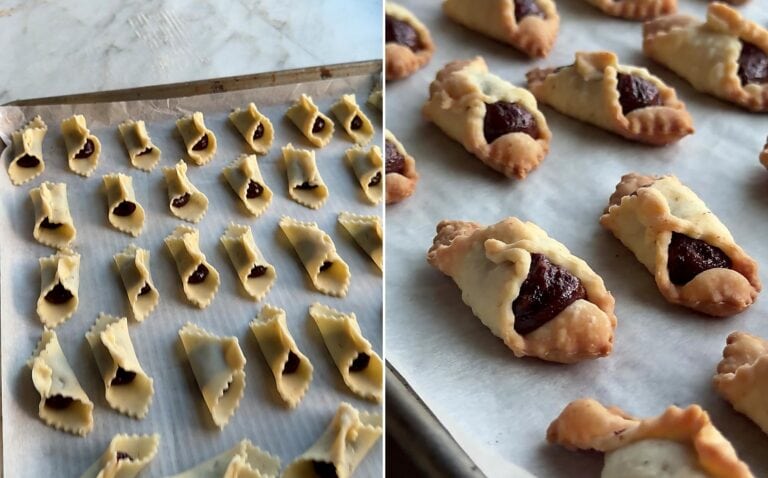
Around 7 grams, a rounded teaspoon. Weigh a few at the start: that is enough to taste, not so much that it pushes the corners open. Once you have the feel for it, stop measuring. - Pinch two corners – pinch two opposite corners together tightly over the filling and set the squares on a parchment-lined baking sheet, a finger apart.
The corners keep popping open
Pinch harder. A loose pinch opens in the oven and the filling runs. The other two corners stay open on purpose, so you see the plum butter from the ends. Gather the scraps, re-roll, and cut more.
How to Shape Rogaliki Crescents
The traditional shape, and the one everybody recognizes.
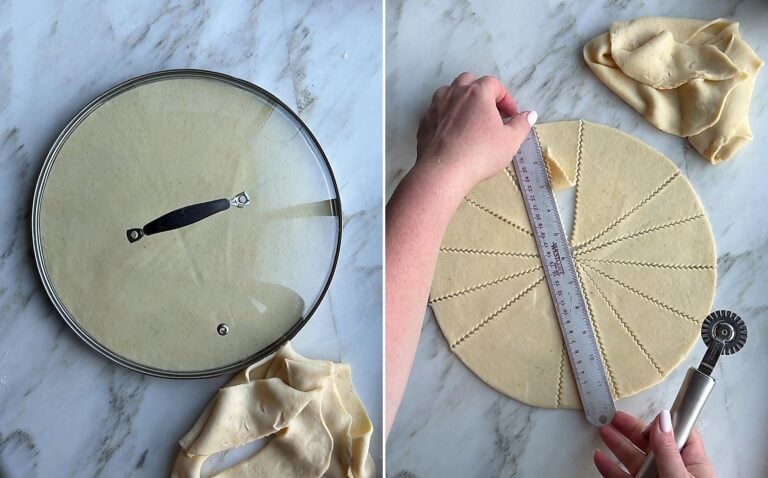
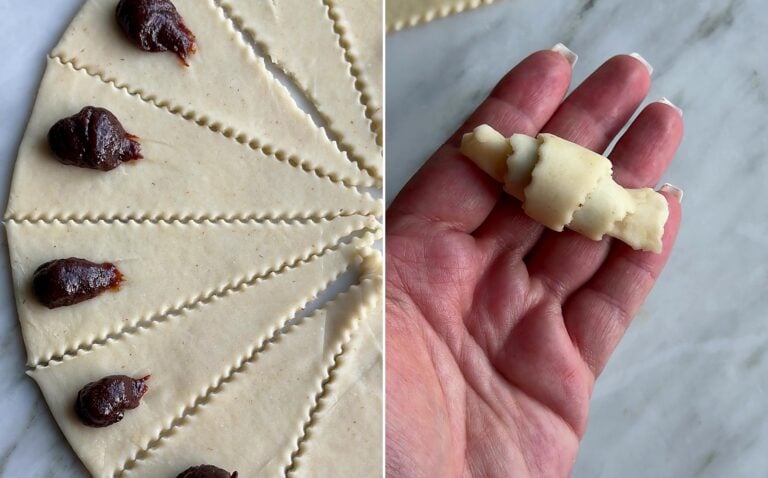
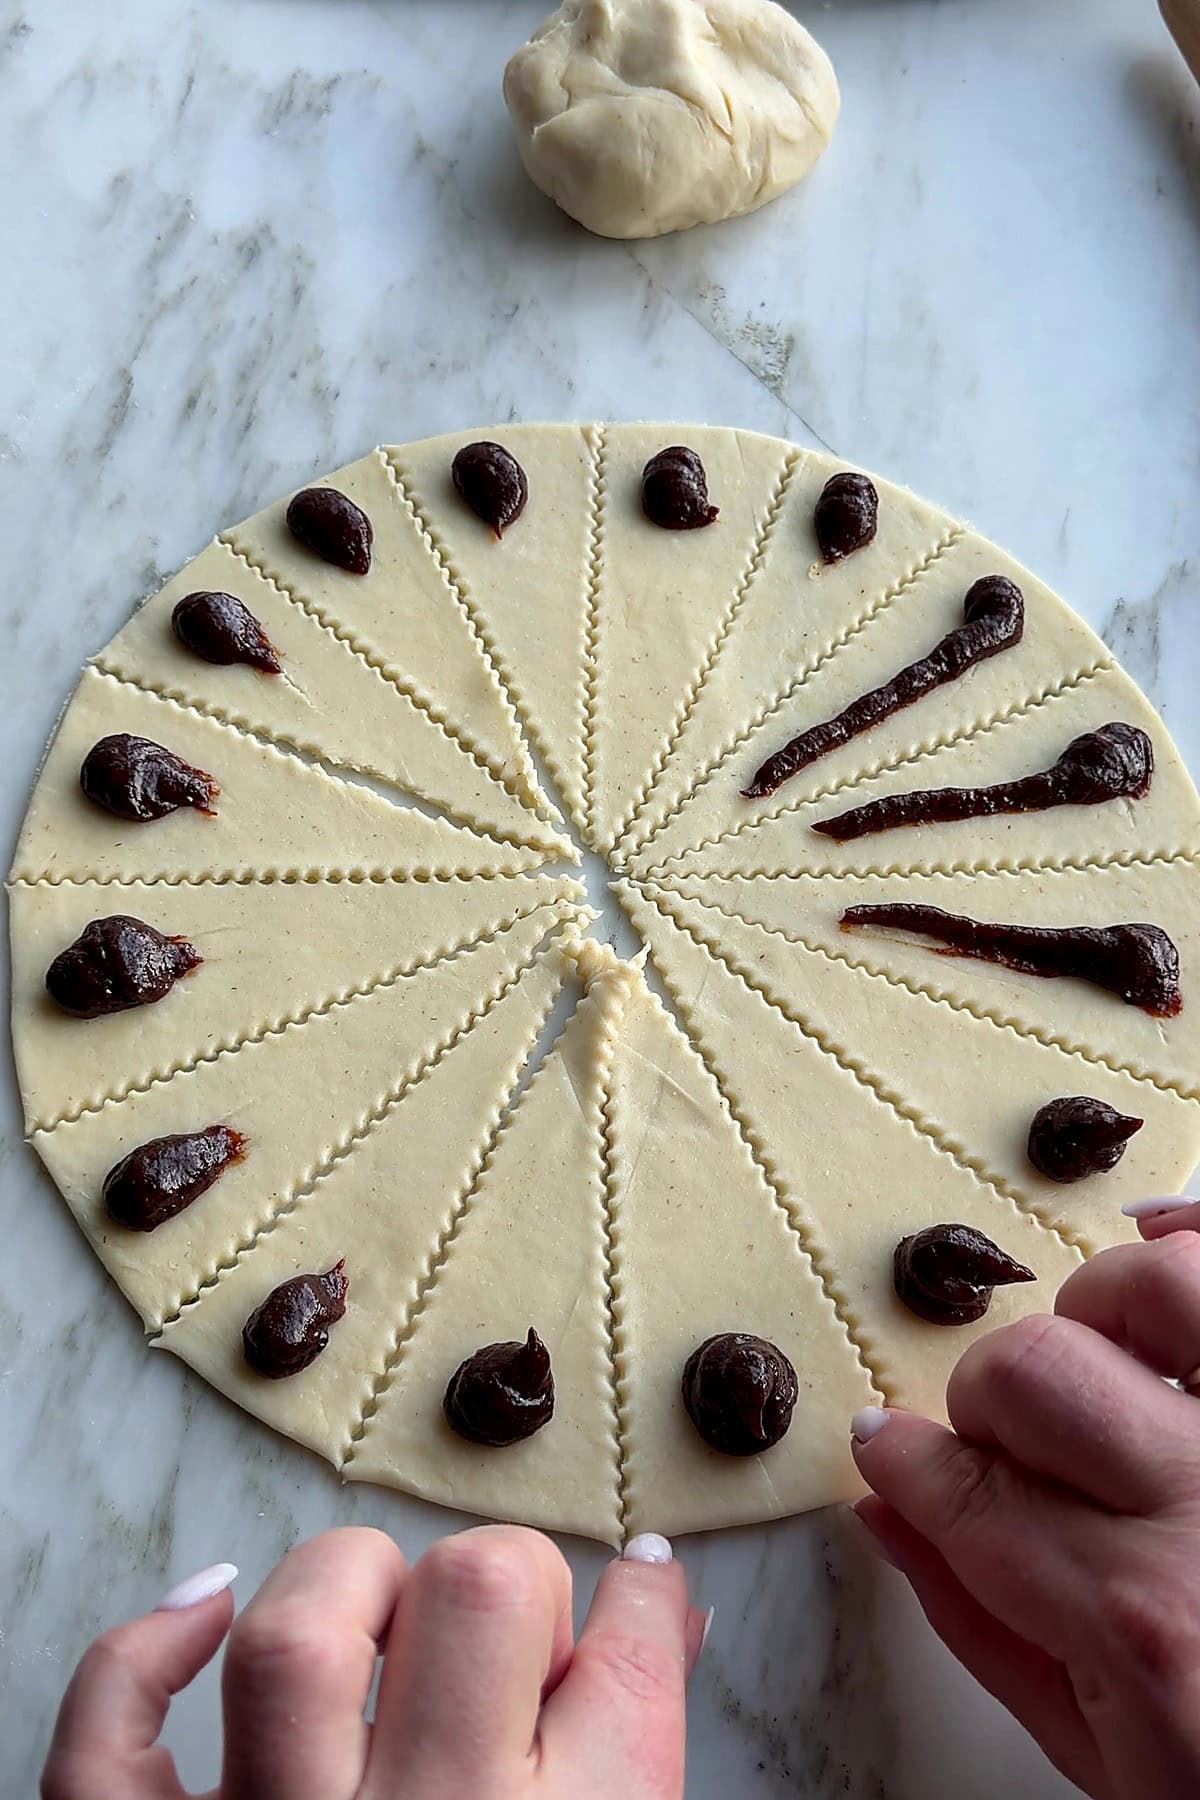
- Roll and cut wedges – roll one piece into a 12-inch round, trim it with a pot lid, and cut it into 16 wedges.
How do I get 16 even wedges?
Halve the round, halve again, and keep halving each wedge with a ruler and a pastry wheel. The pot lid gives you a clean circle to start from, which is what keeps the wedges even. Save the scraps. - Fill and roll – pipe or spoon plum butter at the wide end of every wedge and roll each one to the point. Keep the filling at the outer edge so it rolls up inside, and set the crescents point-side down on the sheet.
How to Bake Rogaliki
Both shapes bake the same way, and the color cue is not what you expect.
- Bake at 375°F (190°C) – 18 to 22 minutes, until the bottoms are light golden. The tops stay pale. Cool on the pan for 5 minutes, then on a rack.
They look pale. Are they done?
Probably. Cream cheese dough does not brown much on top, so lift one: a light golden bottom and a dry, set surface mean done. Wait for a golden top and you will overbake them and lose the tender texture.
How to Coat Rogaliki in Powdered Sugar
The powdered sugar coat turns a plain pastry into the cookie from the wedding table.
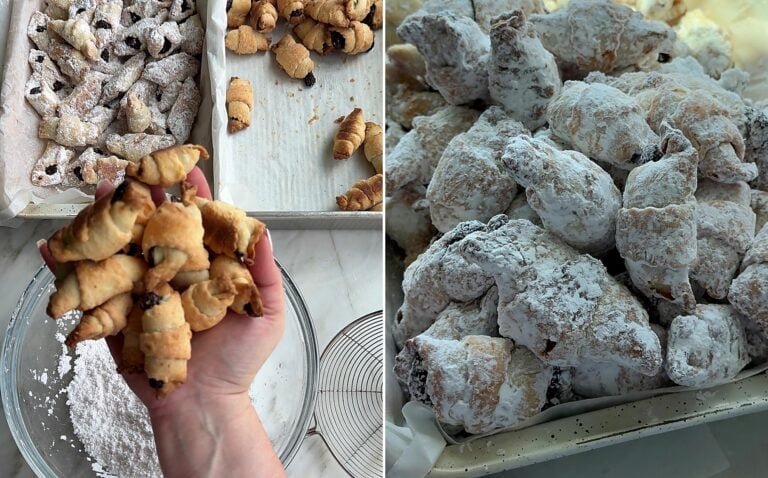
- Roll in powdered sugar – once completely cool, a handful at a time, and shake off the excess.
Why wait until they are cold?
Powdered sugar hitting a warm pastry melts into a sticky, damp film instead of a dry white coat, and you cannot fix it afterward.
Marina’s Pro Tips for theBest Rogaliki

Every one of these came from a tray that did not turn out.
- Keep the rogaliki dough soft. This is the mistake I see most. You will flour the counter generously while rolling and the dough absorbs plenty that way. If you stiffen it now, you end up with dry, tough pastry.
- Play with the cream cheese. 3/4 of a pack gives you a flakier pastry. A whole pack gives you a sturdier, more pie-pastry-like cookie.
- Chill the dough for an hour. Optional, but very beneficial. The flour hydrates and the butter hardens, and that leads to a flakier cookie that rolls out without fighting you.
- Roll a quarter at a time and keep the rest cold. Cream cheese dough gets sticky and difficult once it warms up. A quarter of the batch is about what you can shape before the next piece needs to come out.
- Make the filling in a food processor. It is made for thick mixtures like this one. A NutriBullet works in a pinch, but it strains the motor.
- Keep the plum butter thick and leave it thick. If it runs off the spoon it will run out of the cookie, pool on the parchment, and burn. Thick filling stays put and bakes into a dense, jammy center.
- Weigh a few pieces of filling at the start. Around 7 grams per cookie is the sweet spot for both shapes: enough to taste, not so much that it pushes the corners open. Once you have the feel for it, stop measuring.
- Cut the squares with a scalloped pastry wheel. Purely cosmetic, but it gives the rogaliki a crimped edge that looks like real effort for none. A pizza cutter or a knife works the same.
- Judge rogaliki by the bottoms, not the tops. Cream cheese dough does not brown much on top. Lift one: a light golden bottom and a dry, set surface mean done. Wait for a golden top and you will overbake them and lose the tender texture.
- Roll rogaliki in sugar only after they are completely cool. Powdered sugar hitting a warm pastry melts into a sticky, damp film instead of a dry white coat, and you cannot fix it afterward.
Rogaliki Variations
Both of the dough variations came out of me running out of something or misreading my own notes, and both are worth knowing about. The exact amounts are in the recipe card notes.
- Flakier rogaliki – use three quarters of the cream cheese package instead of the whole one. Less cream cheese means more butter in every bite, and the pastry moves from tender toward flaky.
- Puffier rogaliki – double the baking powder. I did this by accident once and the result was closer to puff pastry. If that sounds appealing, do it on purpose.
- Nutella rogaliki – straight from the jar, the same small mound per cookie. This is the version that disappears fastest with kids, who are generally not sold on plum butter.
- Other dried fruit fillings – dried cranberries, blueberries, or cherries blend down the same way as prunes. Walnuts or pecans are good added to any of them. Whatever you use, it has to be thick.
How to Make Rogaliki Ahead
Shape the rogaliki, freeze them raw on the tray until solid, then move them to a zip-top bag. Bake straight from frozen, adding 2 to 3 minutes, and coat in powdered sugar once they are cool. Shape a big batch in November and bake fresh sheets through December.
How to Store Rogaliki
Room temperature: In an airtight container they keep for weeks. The powdered sugar coat helps: it pulls in moisture and keeps the pastry from drying out. Best in the first several days, while the pastry is still crisp against the filling.
Freezer, baked: Up to 2 months in an airtight container. Thaw at room temperature and toss in fresh powdered sugar before serving.
The plum butter: Keeps about a week in the fridge and freezes well. The batch comes out about even with one batch of dough. Keep it at a full batch, since a smaller amount will not blend.
The questions that come up every time somebody makes rogaliki for the first time.
Rogaliki FAQ
What Is the Difference Between Rogaliki and Rugelach?
They are close cousins. Rugelach is the Ashkenazi Jewish version and rogaliki (or rohalyky) is the Slavic name, and both are small filled pastries on a rich dough. The old Eastern European version used clarified lard rather than cream cheese and leaned on fruit butter, while rugelach is more often filled with cinnamon, walnuts, and raisins. Today’s cream cheese dough shows up in both.
Why Did My Rogaliki Filling Leak Out and Burn?
The filling was too loose, or there was too much of it, or the corners were not pinched hard enough. Do not add water to the puree to make blending easier, and do not use a runny jarred jam for the square shape. If your plum butter slides off the spoon instead of sitting on it, blend it thicker or cook it down before you use it.
Can I Use Store-Bought Plum Butter for Rogaliki?
Yes. Slavic and Polish grocery stores carry it, often labeled povidla or lekvar. Jarred versions tend to be looser than what you get from blending prunes at home, which makes them harder to work with in the square shape. Look for the thickest one you can find, and reduce it on the stove if it seems runny.
Should I Make Rogaliki Squares or Crescents?
Squares if you want more filling, crescents if you want the traditional shape. A square holds close to a 1:1 ratio of plum butter to dough. A crescent wraps more dough around the same mound of filling, so it eats doughier. Both come from the same recipe, and you can make half the batch each way.
Why Is My Rogaliki Dough Hard to Roll?
Most likely it did not rest long enough. The hour in the fridge lets the flour hydrate, and rested dough rolls out much more willingly. The other possibility is too much flour went in during mixing. The dough is supposed to feel very soft at that stage, because it picks up more flour from the counter as you roll.
My Rogaliki Stayed Pale on Top. Did I Underbake Them?
Probably not. This dough does not brown much on top. Check the bottoms, which should be light golden, and look for a surface that is dry and set rather than colored. Hold out for a golden top and you will overbake them.
More Recipes You’ll Love
- Plum Butter Pirog – the same plum butter, baked into a big shortbread-crust pie.
- Linzer Cookies – jam sandwich cookies from the same holiday tray.
- Plum Crumble Bars – fresh plums under a walnut streusel.
- Cream Horns (Trubochki) – the other pastry that showed up at every wedding I went to as a kid.
Watch How to Make Rogaliki
Made these rogaliki?
Please leave a ⭐⭐⭐⭐⭐ star rating and a comment below.
It helps other readers find the recipe, and I read every single one.
Rogaliki (Ukrainian Rugelach with Plum Butter)

Ingredients
Rogaliki Cream Cheese Dough
- 6-8 oz full-fat cream cheese 3/4 to 1 package, cut into chunks (Note 1)
- 1 cup (227 g) unsalted butter 2 sticks, cut into chunks
- 2 cups (300 g) all-purpose flour 1 cup = 150 g (Note 2); a guide, not a rule, the dough should stay VERY soft (Note 3)
- 1/4 tsp baking powder
Plum Butter Filling
- 2 cups (470 g) pitted prunes packed
- 1/2 cup (120 ml) water do not add more (Note 4)
- 1/2 cup (100 g) granulated sugar
- 1 whole lemon, juiced
- 1 tsp vanilla extract
To Finish Rogaliki
- 1 cup (120 g) powdered sugar for tossing, be generous
Instructions
How to Make the Plum Butter Filling
-
Microwave the prunes 2 minutes, in a bowl, until hot and softened (Note 5). A metal blade cannot go in the microwave, so warm them first.
-
Load the food processor. Warm prunes, sugar, water, lemon juice and vanilla go in together (a NutriBullet works in a pinch). Make exactly one batch and do not add extra water (Note 4).
-
Blend until smooth. The puree is very thick and the motor works hard; that is correct. Scrape into a bowl and cool to room temperature. (See post above for the photo tutorial.)
How to Make the Rogaliki Dough
-
With a pastry cutter: cut the butter, cream cheese, flour and baking powder together in a large bowl until it looks like coarse crumbs, then press into a soft ball by hand.
In a stand mixer: beat softened cream cheese and butter until smooth, 2 to 3 minutes, then mix in the baking powder and flour on low just until a soft dough forms.
Either way it should feel very soft (Note 3). -
Divide, wrap, refrigerate. Two balls, wrapped in plastic, 1 hour in the fridge (optional, but very beneficial, Note 3). Work with a quarter of the dough at a time and keep the rest chilled.
How to Shape Rogaliki Squares
-
Roll and cut squares. A quarter of the dough into a 12x12-inch square, about 1/8 inch thick, on a well-floured counter; cut 6 strips each way with a pastry wheel for 36 two-inch squares. Save the scraps.
-
Fill and pinch. About 7 g (a rounded teaspoon) of plum butter in the center of each square, then pinch two opposite corners together tightly over the filling. The other two corners stay open. Set on a parchment-lined baking sheet.
How to Shape Rogaliki Crescents
-
Roll and cut wedges. One piece into a 12-inch round, trimmed with a pot lid or plate, then cut into 16 wedges. Save the scraps.
-
Fill and roll. About 7 g of plum butter at the wide end of each wedge, roll to the point and set point-side down on a parchment-lined baking sheet. Re-roll all scraps and cut more of either shape.
How to Bake Rogaliki
-
Bake at 375°F (190°C) for 18 to 22 minutes, until the bottoms are light golden; the tops stay pale (Note 6). Cool on the pan 5 minutes, then completely on a rack.
How to Coat Rogaliki in Powdered Sugar
-
Roll in powdered sugar, a handful at a time in a bowl, and shake off the excess. Only when completely cool (Note 7).
Recipe Notes
1. Cream cheese: 6 oz (170 g), three quarters of the package, gives a flakier pastry. The full 8 oz (227 g) gives a sturdier, more pie-pastry-like cookie. Same butter and flour either way.
2. Measuring flour: 1 cup = 150 g. Fluff the flour, scoop, and level. Weigh it if you can.
3. Dough: it should feel soft, close to Play-Doh. You flour the counter generously while rolling and it picks up plenty more that way, and it firms up in the fridge as the butter cools and the flour absorbs moisture. Stiff dough means dry, tough pastry. The hour in the fridge is optional, but very beneficial: the flour hydrates, the butter hardens, and the cookie bakes flakier.
4. Food processor: it is made for thick mixtures like this one. A NutriBullet works in a pinch but strains its motor; a big blender only if it is powerful. The puree is very thick by design, so do not double or halve the batch: too much strains the motor and too little leaves the blades spinning above it. Never thin it with extra water or the filling oozes out and burns.
5. Microwave: warm prunes blend smooth; cold ones fight the blades. If your prunes are very soft and fresh, you can skip it.
6. Color: this dough does not brown on top. Judge by the bottoms.
7. Powdered sugar: completely cool, not warm. Warm pastry melts the sugar into a sticky film. Roll them in a bowl; do not dust from above. The sugar coat also pulls in moisture and keeps the pastry from drying out.
8. Yield: about 144 squares, or 72 crescents, once the scraps are re-rolled. Mix the shapes and you land in between. The filling batch comes out about even with the dough.
9. Variation, puffier: 1/2 tsp baking powder instead of 1/4 tsp gives a noticeably puffier pastry, closer to puff pastry.
10. Other fillings: Nutella straight from the jar is the kid favorite. Dried cranberries, blueberries or cherries blend the same way as prunes; walnuts or pecans are good added in. Any filling must be THICK.
11. Storage: weeks at room temperature in an airtight container. To make ahead, freeze shaped and unbaked, then bake from frozen adding 2 to 3 minutes.

Thank you for following me on Instagram, Facebook & Pinterest!
Hashtag your photos #LetTheBakingBeginBlog so I can see your creations and for a chance to be featured!
Marina | Let the Baking Begin
















This was so delicious ❤️
Thank you, Vanessa!
Can I use pitted dates instead of prune?
You can try, but add enough lemon to give it a little bit of tartness to keep it away from being bland.