
Chicken Liver Cake Appetizer
Chicken liver cake is a savory Eastern European appetizer: thin layers of liver pâté stacked with a garlicky carrot-and-onion spread. Mine is baked in one sheet instead of fried, then cut into bite-sized stacks and served on skewers.
The classic version is called pechenochny tort (“liver cake”), and where I come from it turns up on every holiday table. If you like liver this way, try my country-style pâté, my chicken liver mousse with balsamic onions, or the simple skillet version in my fried chicken liver with onions.
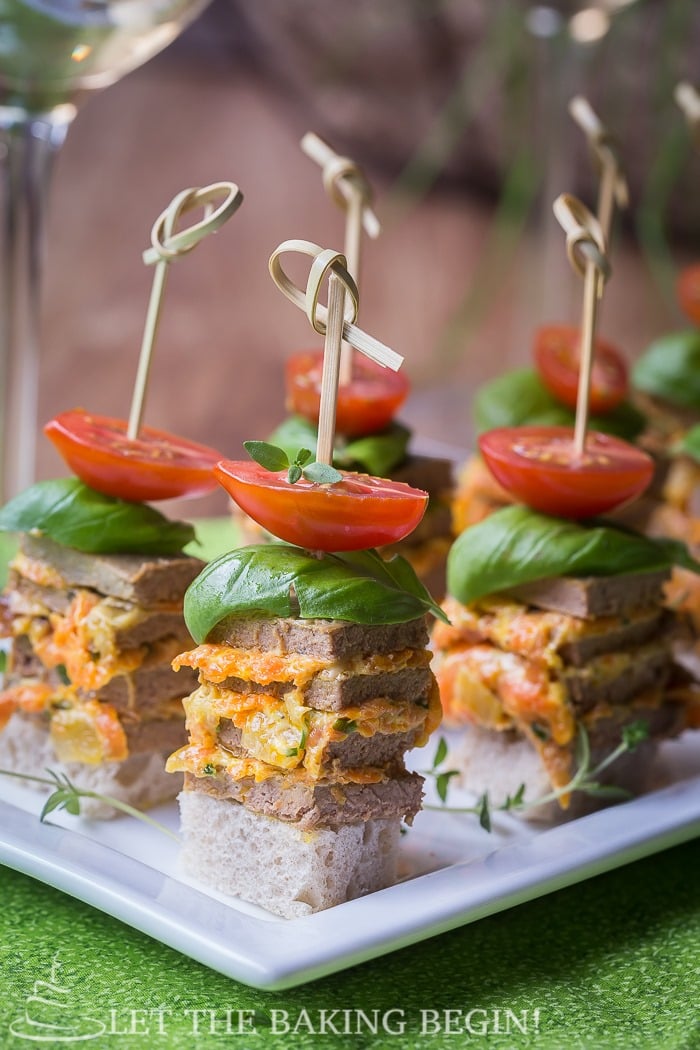
Here’s why you’ll Love this liver cake
This is the same flavor as the classic stacked liver cake, in a shape you can actually pass around at a party. Here’s why it’s worth making.
- No frying. The whole pâté layer bakes on one sheet pan. You are not standing at the stove flipping liver crepes one at a time.
- Bite-sized. Every stack is one neat square on a skewer. No slicing a cake in front of guests.
- Make ahead. The stacks want a night in the fridge anyway. That makes them better, not worse.
- Cheap. Chicken liver costs very little and feeds a crowd.
- Loaded with iron. Chicken liver is one of the richest sources of iron and vitamin B12 you can buy.
How is this liver cake different?
A traditional liver cake is made like a stack of pancakes. This one is not. Here is what changed and why.
- One sheet, one bake. The blended liver batter goes onto a lined sheet pan in a thin, even layer and bakes in about ten minutes. The classic method cooks the same batter as a dozen separate crepes in a skillet.
- No oil in the layers. Fried liver crepes soak up oil. Baked ones do not.
- Cut, not sliced. The chilled slab gets cut into small squares. Each square is a whole little cake.
- Skewers hold it together. Insert the skewer before you cut. That trick keeps the layers from sliding apart.
Ingredients for chicken liver cake bites
There are only two parts: the baked pâté layer and the carrot spread that goes between. Here is what each ingredient does.
- Chicken liver. The whole point of the recipe. Buy it fresh if you can, and look for livers that are deep reddish brown and glossy, not gray or dull. Frozen works. Thaw it in the fridge overnight and pat it dry.
- Egg. Sets the liver batter so it bakes into a sliceable sheet instead of a puddle. Do not skip it.
- Flour. Thickens the batter and gives the layer enough body to lift off the parchment. For a gluten-free version, swap in white rice flour or cornstarch by weight.
- Milk. Loosens the batter so it spreads thin. Any fat level works. Unsweetened plain non-dairy milk is fine too.
- Salt and black pepper. Liver needs more pepper than you think. Grind it fresh.
- Carrot and onion. Cooked together until soft and lightly golden. They bring the sweetness that balances the liver.
- Mayonnaise. Binds the carrot layer and keeps the stacks moist. To cut calories, swap out half of it for sour cream, blended cottage cheese, or light spreadable cheese such as Laughing Cow. Half is about the limit. Replace more than that, and the filling goes loose, and the stacks slide apart when you cut them.
- Garlic. Raw and pressed, stirred in at the end. Cooking it with the carrots kills the bite you want here.
- Fresh dill or parsley. Chopped fine. Dill is the traditional one.
- Cherry tomatoes, herb leaves and bread cubes. The garnish on the skewer. The bread cube sits at the bottom and acts as the base.
How to make chicken liver cake bites (step by step)
The pâté sheet bakes while you cook the carrots, so the active work is short. The only real waiting is the chill.
- Trim and blend the livers.
- Rinse the livers and pat them dry.
- Cut away any green or yellow spots. That is bile, and it is the single most common reason a liver dish tastes bitter. Trim the stringy connective tissue at the same time.
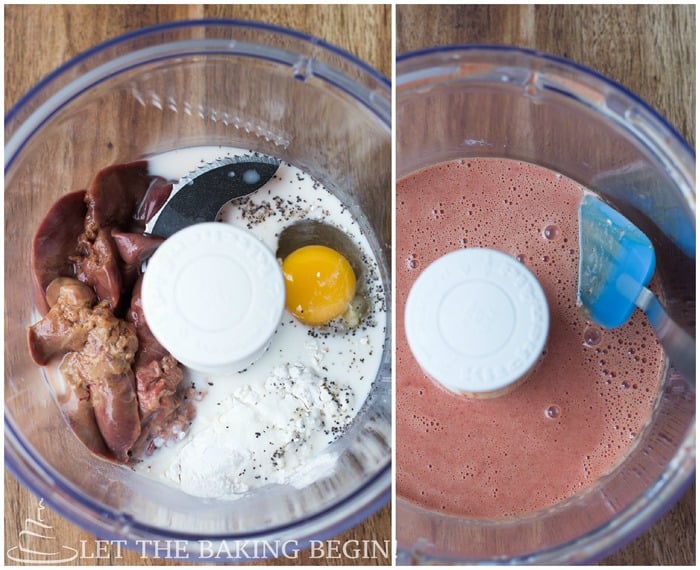
- Blend the livers with the egg, flour, milk, salt, and pepper on high until the batter is completely smooth with no flecks left.
- For the silkiest texture, push the batter through a fine mesh sieve. This catches anything the blender can’t break down.

- Bake the pâté sheet.
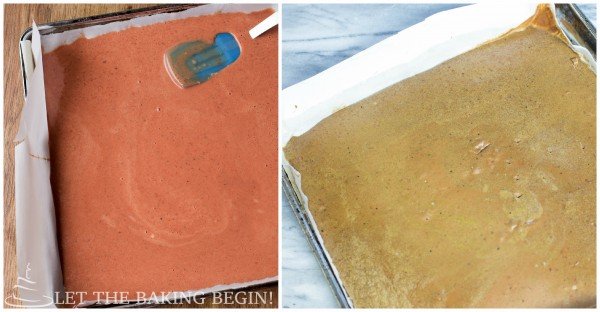
- Line a 10 by 15 inch (25 by 38 cm) jelly roll pan with parchment and pour in the batter.
- No jelly roll pan? A 9-by-13-inch (23 by 33 cm) pan works too. The layer sits a little thicker there, so add 3 to 5 minutes and go by the thermometer, not the clock.
- Tilt the pan to spread the batter into an even layer about a quarter inch thick. Even thickness matters more than anything else here, because thin spots overbake while thick spots stay raw.
- Bake at 350°F (175°C) for 10 to 14 minutes. The surface should look dry and matte, and the layer should feel set when you press it.
- Check the center with an instant-read thermometer. It needs to read 165°F (74°C). Chicken liver is not a food you cook by eye, and this is the one number in the recipe you should not guess at.

- Cool it, then cut it into four.
- Let the sheet cool completely, right in the pan and still on its parchment. Warm pâté tears.
- Cut the cooled sheet into 4 equal pieces, slicing through the parchment as well. Do not peel anything off yet.
- Each piece now has its own parchment backing, which lets you move a floppy layer without tearing it.
- Cook the carrots and onions.
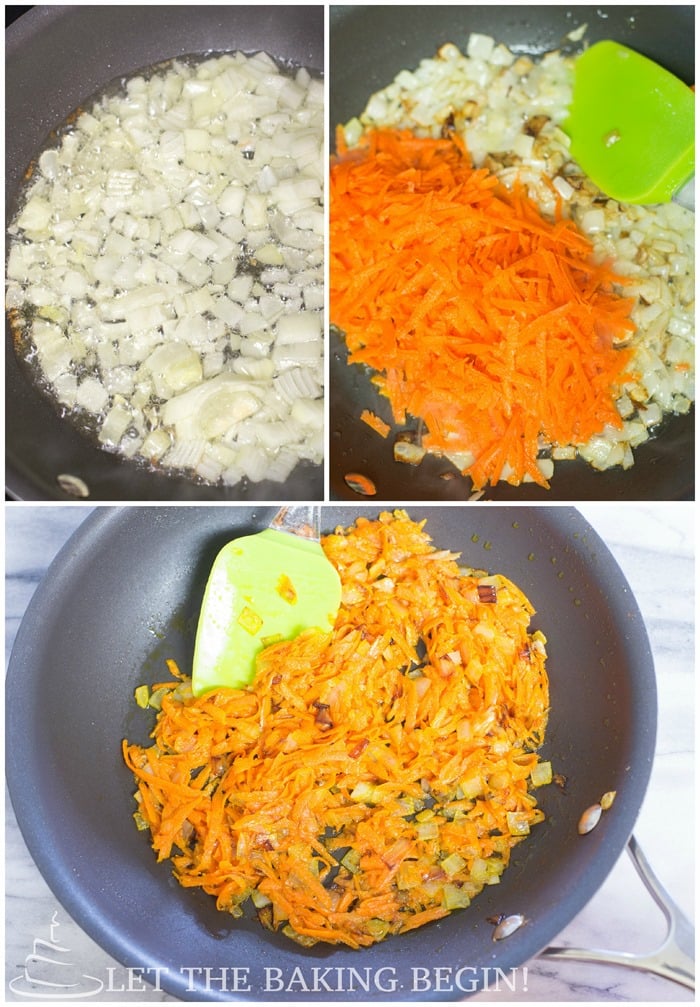
- Sauté the diced onion in oil over medium heat until golden.
- Add the grated carrot and cook until soft and just starting to color. Cover the pan if it starts to dry out.
- Cool it completely. Mayonnaise splits into an oily mess if it hits a warm pan mixture. Spread it on a plate to cool faster.

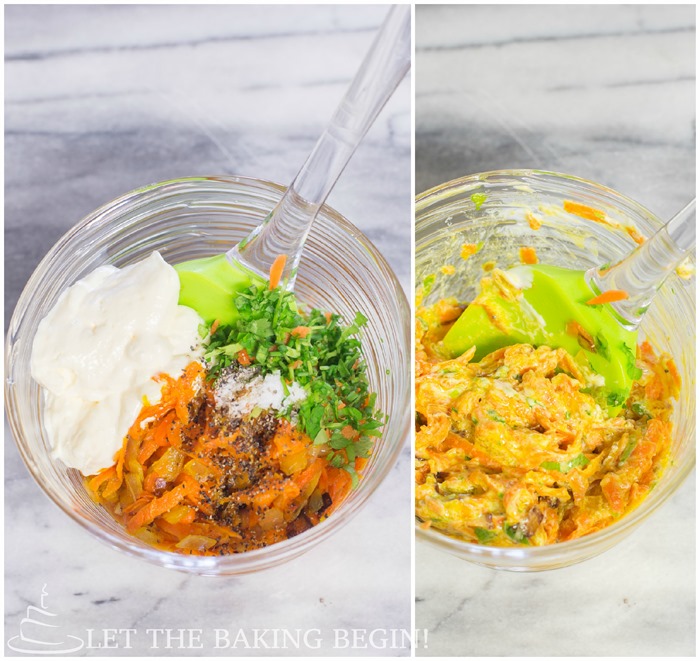
- Mix the carrot spread.
- Stir the cooled carrot and onion together with the mayonnaise.
- Add the pressed garlic, chopped herbs, salt and pepper.
- Taste it now. This layer carries most of the seasoning, so it should taste slightly too strong on its own.

- Stack and chill.
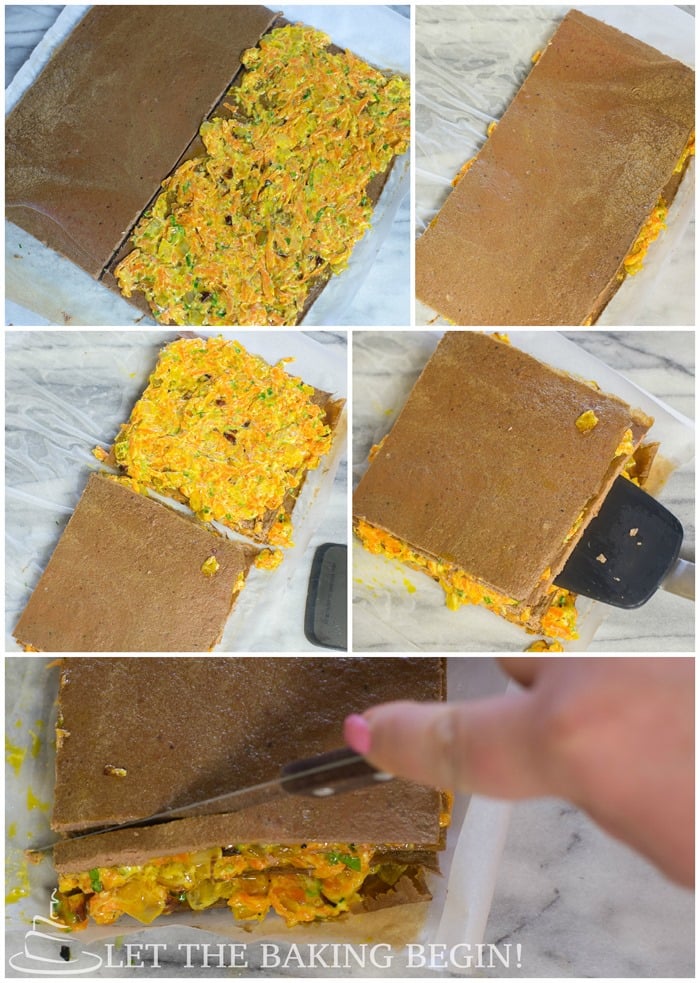
- Flip the first piece onto a plate, pâté side down. Peel off the parchment and discard it.
- Spread a third of the carrot mixture over it, right out to the edges.
- Flip the next piece on top the same way, peel its parchment, and spread again. Repeat until you have four layers, with filling between them. The top layer stays bare.
- Trim the edges square so the stacks cut cleanly.
- Refrigerate at least an hour, and overnight if you can. Cold firms the layers so they cut without smearing, and the garlic mellows throughout.

I shot these photos with a 12 x 12-inch pan, so my sheet came out square. A 10 by 15 jelly roll pan gives you a longer rectangle, so your layers will look narrower than mine. The stacking works exactly the same either way.
- Skewer, then cut.
- Push skewers down through the chilled slab in a grid, spaced about an inch apart, as if it were already cut. The skewers pin the layers together.
- Cut between the skewers into one-inch squares. Press gently on the skewer tops as you cut so nothing shifts.
- An electric carving knife makes this easy. The moving blades cut straight down through the soft layers instead of dragging them sideways. The edges come out clean and nothing slides. A long thin knife works too, but saw gently and wipe the blade between cuts.
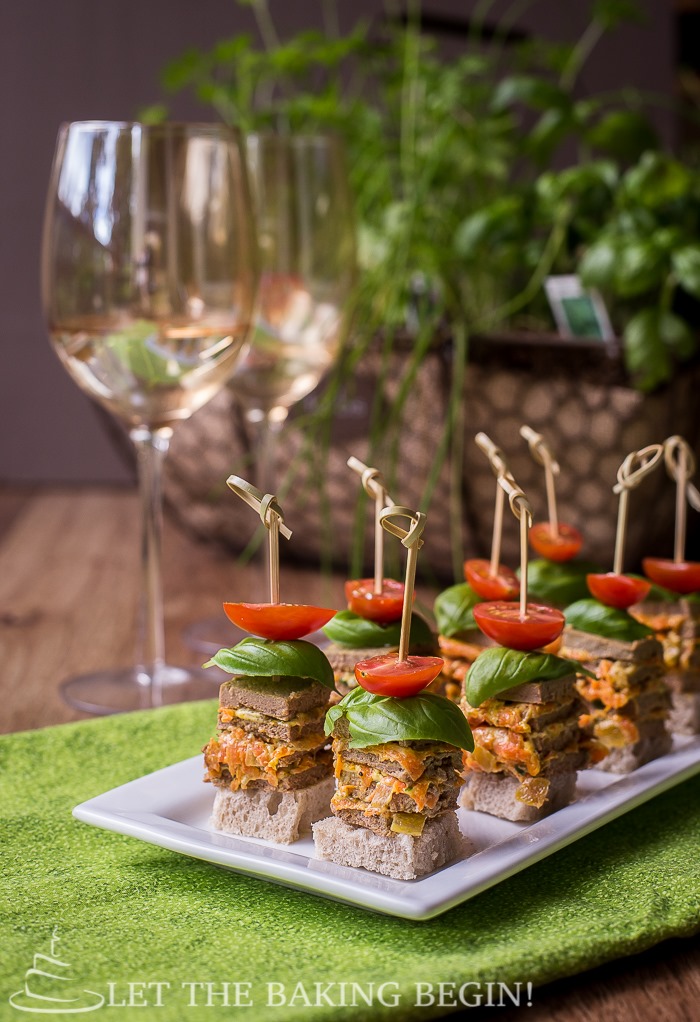
- Pull one skewer out at a time. Thread on half a cherry tomato cut side up, then a small herb leaf, then push it back down into its stack.
- Add a bread cube at the bottom of each skewer and stand them on a platter about an inch apart.
Marina’s Pro Tips for theBest Liver Cake

- Trim the green spots. Bile is bitter and one missed spot flavors the whole batch. Look the livers over before they go in the blender.
- Blend longer than feels necessary. Any fleck of liver left whole shows up as a grainy bit in the finished layer.
- Strain the batter. A fine mesh sieve catches the connective tissue a blender cannot handle. This step separates a smooth pâté from a rough one.
- Spread it even. An uneven layer bakes unevenly, and you can’t fix it once it is in the oven.
- Use a thermometer. Chicken liver needs to reach 165°F (74°C) all the way through. Color and time are not reliable here. An instant-read thermometer is the one tool this recipe really needs.
- Cool the carrots all the way. Warm vegetables break mayonnaise. The filling turns greasy and slides out of the stacks.
- Chill overnight. One hour makes the stacks cuttable. A night makes them taste better.
- Skewer before you cut. Cutting first and skewering after means chasing four loose layers around a cutting board.
- Cut with an electric carving knife. It saws through the soft layers without pushing them sideways. Clean edges, no smearing, no shifting.
Ways to serve chicken liver cake
These stacks are made for a platter. A few ideas that work.
- On a mixed appetizer board next to cucumber tuna bites and spicy roasted pepper and feta canapés.
- With something acidic nearby. Pickles, pickled onions or a sharp mustard cut through the richness.
- On toasted bread instead of skewers. Skip the skewer, set a square on a cracker or a round of toast, and you have a canapé. My pepper and goat cheese crostini uses the same idea.
- As part of a holiday spread with the rest of the cold appetizers, plated last so they stay chilled.
Make it ahead
This is one of the few appetizers that is better the next day. Bake the pâté sheet, make the carrot spread, stack the slab and refrigerate it whole overnight. The next day it cuts into clean squares in a few minutes.
Leave the last step for the last moment. Add the tomatoes, herbs and bread cubes just before serving. Tomatoes weep, and bread cubes go soft if they sit on the platter for hours.
How to store chicken liver cake
- Fridge: store the uncut slab or the finished stacks in an airtight container for up to 3 days. Cut squares dry out faster than a whole slab, so keep it whole if you can.
- Room temperature: the filling is mayonnaise-based, so bring the platter out for no more than 2 hours. On a hot day, make it 1 hour.
- Freezer: freeze the plain baked pâté sheet, wrapped tight, for up to 2 months. Do not freeze the assembled stacks. Mayonnaise separates when it thaws, and the carrot layer turns watery.
- Thawing: thaw the pâté sheet overnight in the fridge, then fill and stack fresh.
Chicken liver cake FAQ
My liver cake tastes bitter. What went wrong?
Almost always bile. Chicken livers sometimes carry green or yellow stains where the gallbladder sat against them, and that spot is intensely bitter. Cut it away before blending. A missed spot flavors the entire sheet, because everything gets blended together.
Why is my liver cake dry or grainy?
Two causes. Overbaking is the usual one. The layer is thin, so a few extra minutes turns it chalky. Pull it as soon as the center hits temperature. The other cause is underblending, which leaves tiny bits of whole liver in the batter. Blend until perfectly smooth and strain the batter if you want it silky.
Do I have to soak the livers in milk first?
No. Soaking is a real technique, and it does mellow strong liver, but it gets far more credit than it deserves. In my experience, the bitterness people blame on the liver itself is nearly always untrimmed bile. Trim well, and you can skip the soak.
How do I know the chicken liver is cooked through?
165°F (74°C) in the center, measured with a thermometer. This matters more with liver than with most meats. Campylobacter can live inside chicken liver tissue, not just on the surface, so the pink-center rule people use for steak doesn’t apply. The USDA safe temperature chart lists giblets, where chicken liver falls, at 165°F, right alongside whole birds and breasts. Baked in a thin layer, it usually reaches that temperature in 10 to 14 minutes.
Can you freeze chicken liver pâté?
The plain baked pâté sheet freezes well for up to 2 months, wrapped tightly. The assembled stacks do not. The carrot filling is bound with mayonnaise, and mayonnaise separates on thawing. Freeze the sheet, then assemble fresh after it thaws overnight in the fridge.
How long does chicken liver pâté last in the fridge?
Up to 3 days in an airtight container. Keep the slab whole and cut it as you need it, because cut edges dry out. Once it has been on a party platter, the 2-hour room temperature limit applies, and anything left over after that goes in the trash, not back in the fridge.
Can I eat chicken liver pâté when pregnant?
No, and this one is worth taking seriously. Liver is extremely high in vitamin A, and too much vitamin A in pregnancy can harm the baby. The NHS lists liver and all foods containing liver among the foods to avoid in pregnancy. That includes this recipe. Serve your pregnant guests something else from the platter and tell them why.
Is chicken liver pâté healthy? Does it have iron?
Chicken liver is one of the most iron-rich foods you can buy, and it is loaded with vitamin B12, folate, and vitamin A. These bites run about 48 calories each, so a few are a light appetizer. To cut calories further, swap half the mayonnaise in the carrot layer for sour cream, blended cottage cheese, or a light spreadable cheese. Keep at least half the mayonnaise or the filling gets too loose to hold the stacks together. Watch the vitamin A. It builds up in the body, so eat liver sometimes rather than every week.
Can I make this gluten-free?
Yes. The only gluten in the recipe is the flour in the pâté batter. Swap it for white rice flour or cornstarch, measured by weight rather than by cup. The layer bakes and cuts the same way. Serve the stacks with gluten-free crackers instead of bread cubes.
How is this different from a traditional liver cake?
The flavor is the same. The method is not. A traditional pechenochny tort cooks the liver batter as a stack of thin fried crepes, layered with a mayonnaise-carrot filling, and served as a whole round cake. Mine bakes the same batter as one thin sheet, then cuts it into small squares. No frying, no flipping, and it is served as a bite instead of a slice.
More appetizers and liver recipes to try
If this one worked for you, make these next.
- Country Style Pâté – the baked terrine version, wrapped in bacon and sliced cold. The make-ahead one for a crowd.
- Chicken Liver Mousse with Balsamic Onions – smooth and spreadable, the dressed-up one.
- Fried Chicken Liver with Onions – the plain weeknight skillet version.
- Nalisniki with Meat Filling – crepes stuffed with a liver and meat filling.
- Cucumber Tuna Bites – another cold, make-ahead party bite.
- Spicy Roasted Pepper and Feta Canapés – good next to the liver stacks on the same board.
- Browse the full recipe index for more appetizers.
Made this recipe?
Please leave a ⭐⭐⭐⭐⭐ star rating and a comment below.
It helps other readers find it, and I love reading every single one.
Skewered Chicken Pate Stacks

Layered of a creamy chicken liver mixture and a vegetable layer. Made for a perfect appetizer.
Ingredients
Carrot Mixture
- 1 medium carrot peeled, finely grated
- 1 medium onion peeled, diced
- 3 Tbsp mayonnaise
- 1-2 cloves garlic pressed/minced
- 3 Tbsp chopped parsley or/and dill
- 1/3 tsp salt
- 1/2 tsp pepper
- Oil for frying
Also:
- Bread cut into 1 inch cubes or squares
- Cherry Tomatoes cut in half
- Basil/Parsley leaves washed & patted dry
- Skewers
Instructions
-
Whirl together on high speed chicken liver, egg, flour, milk, salt & pepper until smooth mixture with no chunks forms.
-
Bake it in a parchment paper lined 12x12 inch baking sheet for 10 minutes at 350F, or until the mixture is no longer runny. Let cool.
-
While the pate is baking, saute onions in couple tablespoons of oil until golden in color, then add carrots and saute a little longer, until the carrots are slightly golden & soft. Cover with lid if needed. Let mixture cool.
-
Combine the carrot mixture with mayonnaise, salt, ground pepper, chopped greens, pressed or minced garlic and mix together.
-
Cut the baked pate in 2 halves. Spread 2/3 of the carrot mixture on one half. Cover with the other half. ((You could sandwich it with all of the carrot mixture and just stop at this point. It would yield smaller stack but a true 1 small bite appetizer, instead of 1.5 bites 🙂 ) Cut this in 2 again. Spread the remaining carrot mixture on one half & cover with the other half. Trim the ends to make a neat square. Refrigerate for about an hour before attempting to cut into squares.
To Assemble the Skewers:
-
Remove the stacked pate from the fridge. Take the skewers and stick them into the pate, as though the pate is already cut into 1 inch squares. This will prevent the squares from sliding as you cut it. Now cut it into 1 inch squares, placing gentle pressure on the top of the skewers as you cut. Electronic carving knife works wonderful.
-
Now remove the skewers out of the pate one by one and thread 1 half of the tomato, cut side up onto the skewer. Then thread a small basil leaf or parsley leaf. Now put it back into the pate. Take 1 bread cube and add it to the bottom of the skewer.
-
Serve on a plate, placing each skewer at least 1 inch apart.

Thank you for following me on Instagram, Facebook & Pinterest!
Hashtag your photos #LetTheBakingBeginBlog so I can see your creations and for a chance to be featured!
I first published this recipe in 2014, and it has been on my holiday table every year since. I updated it in 2026 with a real doneness temperature for the liver, trimming and straining tips for a smoother pâté, full storage and freezing notes, and a new FAQ covering freezing, pregnancy and gluten free swaps.
Marina | Let the Baking Begin













Wow, very creative! I will definitely have to try this recipe!
Thanks Julia! Let me know how it all goes when you do!